Sharing a Filter with Other Users
Give specific people access to a filter you've saved, with the permissions and duration you choose
Contents
- 1. Introduction & Context
- 2. Key Features & Functions
- 3. Requirements
- 4. Step-by-Step Guide
- 5. Common Issues & Troubleshooting
- 6. Related Articles
1. Introduction & Context
Once you've saved a filter, you can share it with specific people instead of making it available to everyone, so you control exactly who gets it, whether they can edit it, and for how long.
Who is it for? Any user who has saved a filter and wants specific colleagues to be able to use or edit it, without ticking Share with all users.
What does it impact? Sharing a filter only changes who can see and use that filter. It does not change which registers, projects, or records the people you share it with can already access, that remains controlled by their Security Groups.
2. Key Features & Functions
- Targeted sharing: choose exactly which users can access a filter, rather than sharing it with everyone.
- Read permission: lets a user apply the filter to a widget.
- Update permission: also lets a user edit the filter's conditions.
- Notify users: sends the people you shared with a notification that the filter is available to them.
- Expires date: automatically ends a user's access to the filter on a date you choose, or leave it as Never for ongoing access.
Example scenario: You've built a filter called "Status in Draft" for your own use. A contractor on your team needs to check the same view for the next three months, so you share it with them directly, with Read permission and an Expires date three months out, rather than making it available to the whole organisation.
3. Requirements
- You need a filter already saved in My Filters. See How to Apply My Own Filters in a Widget if you haven't created one yet.
- No administrator access is needed to share a filter you've created.
- Sharing a filter does not grant access to any data. The people you share it with still need their own Security Group access to see the records the filter narrows down.
4. Step-by-Step Guide
- Go to My Filters and find the filter you want to share.
- Click the Share Permissions icon in the Actions column for that filter.
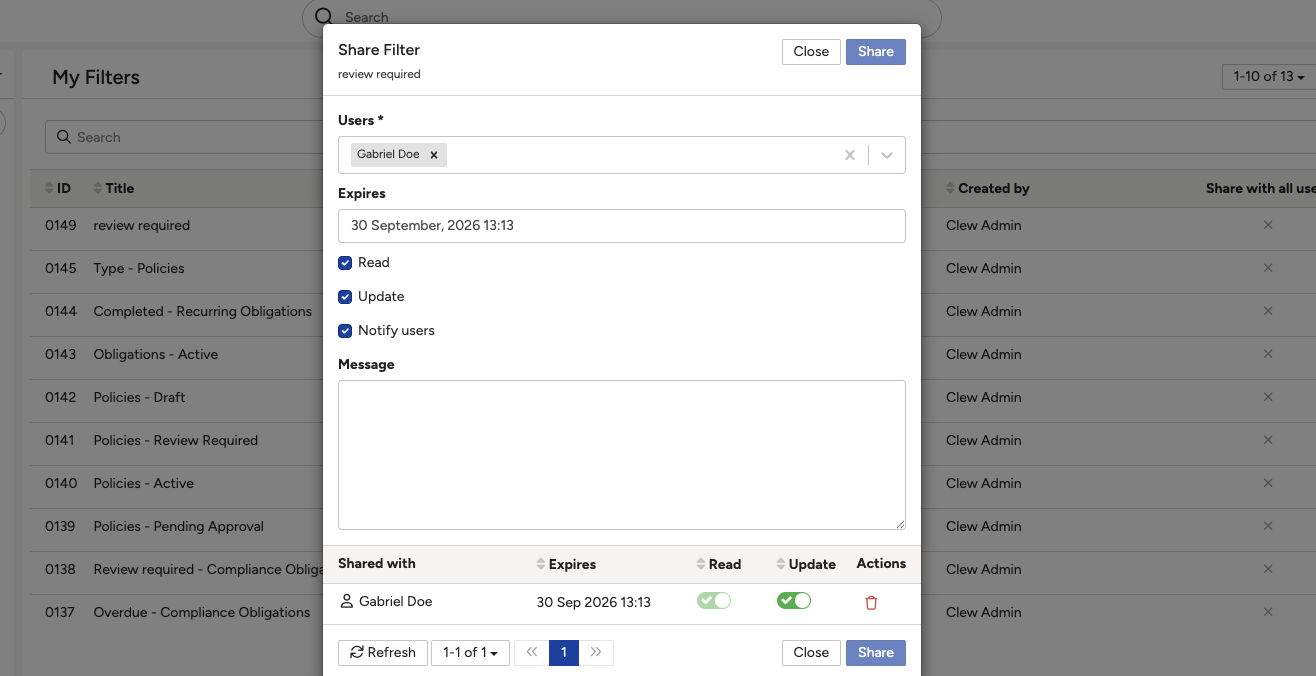
- In the Share Filter dialog, select the Users you want to share it with.
- Optionally set an Expires date if their access should end automatically. Leave it as Never for ongoing access.
- Choose the permissions to grant: tick Read so they can use the filter, Update so they can also edit it, and Notify users to send them a notification about the share.
- Click Share.

5. Common Issues & Troubleshooting
| Issue | Likely Cause | Solution |
| A filter I shared doesn't appear for another user | They were not given Read permission, or the share has expired | Reopen Share Permissions on the filter and confirm Read is ticked and the Expires date has not passed |
| A user I shared a filter with can see it but cannot edit it | Only Read permission was granted, not Update | Reopen Share Permissions on the filter and tick Update as well |
| A user I shared a filter with still can't see the records it points to | Sharing a filter does not grant access to data; their Security Groups control that separately | Check their Security Group access to the relevant register or module |
Best practices:
- Use targeted sharing rather than Share with all users when a filter is only relevant to a specific team or project.
- Set an Expires date when sharing a filter with a contractor or temporary user.
- Only grant Update permission to users you trust to change the filter's conditions for everyone it's shared with.
- Tick Notify users so people know a filter has been shared with them, rather than expecting them to notice it in My Filters.
Click a title to preview it here. Use the Open full article button to read the full version in a new tab.
▾How to Apply My Own Filters in a Widget Open full article »
Related article
How to check for, build, and save your own filter on a widget before sharing it.
▾Setting a Default Filter on a Widget Open full article »
Related article
How to attach a saved filter permanently to a widget's own configuration, so everyone who sees it gets the same pre-filtered view.
Was this article helpful?
That’s Great!
Thank you for your feedback
Sorry! We couldn't be helpful
Thank you for your feedback
Feedback sent
We appreciate your effort and will try to fix the article