Lost Time Injury Frequency Rate (LTIFR)
How to configure LTIFR, record hours worked, and report frequency rates on dashboards
Contents
- 1. Introduction & Context
- 2. Key Features & Functions
- 3. Requirements
- 4. Step-by-Step Guide
- 5. Common Issues & Troubleshooting
- 6. Related Articles
1. Introduction & Context
The Lost Time Injury Frequency Rate (LTIFR) measures the number of lost-time injuries per million hours worked, giving you an accurate, comparable picture of workplace safety. This article explains how to configure LTIFR in Clew, record hours worked, and display frequency rates on dashboards and reports.
A lost-time injury is one that resulted in time lost from work of one day or shift or more, including injuries resulting in fatality or permanent disability. Hours worked are stored in the LTIFR module and are used to calculate frequency rates based on the count of specific incidents or impacts, which are then displayed on Clew dashboards and reports.
Who is it for? System administrators who configure safety reporting, and the authorised users who record hours worked for each period.
What does it impact? LTIFR configuration determines how hours and injuries are recorded, classified, and calculated. Because frequency rates depend on accurate hours and correctly mapped incident data, the configuration directly affects the safety metrics shown to your organisation and clients.
2. Key Features & Functions
- Track safety metrics: LTIFR gives an accurate picture of workplace safety by tracking lost-time injuries against hours worked.
- Client reporting: produce detailed reporting for clients who require safety frequency metrics segmented by classification, such as staff versus contractors.
- Custom scoping: configure different injury types and project-based settings for precise safety analytics.
- Rolling frequency rates: calculate rates over a rolling window, such as 3 or 12 months, using the dedicated LTIFR dashboard widget.
3. Requirements
- System Administrator access is required to configure LTIFR settings through the admin panel.
- Accurate work hour entries and appropriate mapping of incident data. LTIFR relies on both.
- Consistent data input over a rolling period, such as 3 or 12 months, for the most reliable frequency rates.
4. Step-by-Step Guide
Setting Up the LTIFR Configuration
Step 1: Create an LTI Frequency Rate configuration. Go to Admin, then LTI Frequency Rates. Here you define the allowed projects and authorise the users who can input hours worked. Complete the fields below, then click Save.
| Field | Description |
| Title | Give your configuration a clear name, for example "Monthly". |
| Period | Define the time interval, for example Monthly. |
| Authorised Users | Assign the users permitted to log hours. |
| Registers (sometimes referred to as Projects, the default term in the platform) | Select the registers the hours are logged against. In most cases these are your organisational units. |
| Enabled | Select Yes or No depending on whether you want the field to be enabled. |
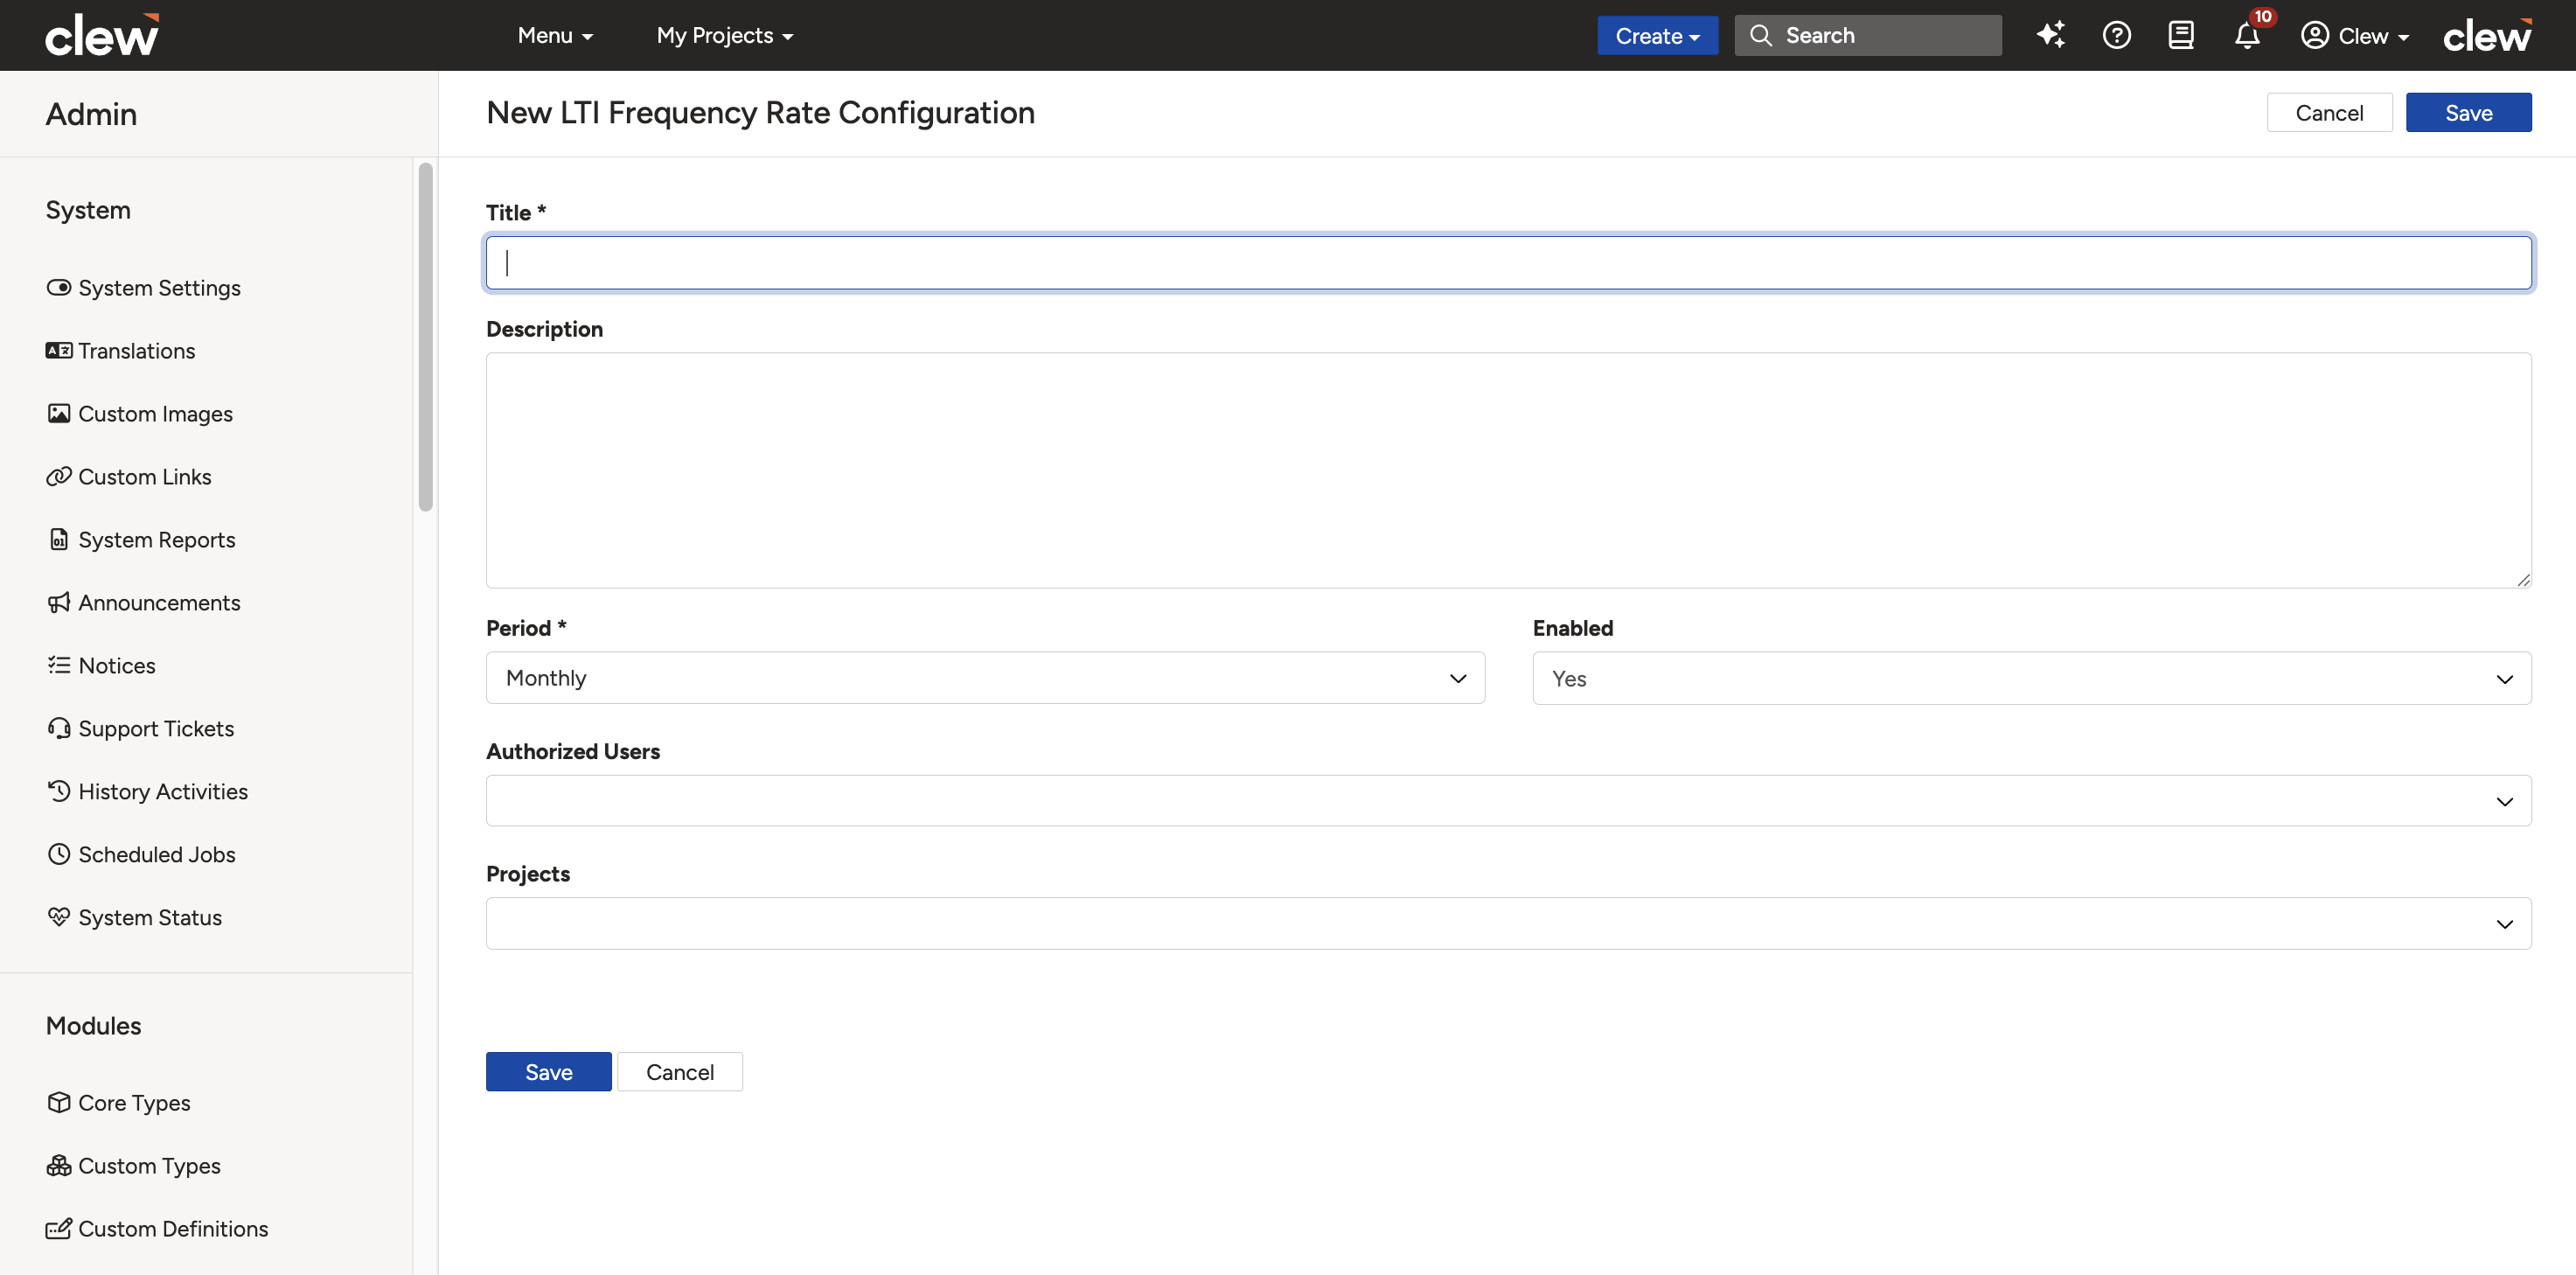
Creating an LTI Frequency Rate configuration.
Step 2: Add LTI Frequency Rate columns. Go to Admin, then LTI Frequency Rates Columns. Here you define how data is displayed in each LTI Frequency Rate row. Complete the fields below, then click Save to add the column to your configuration.
| Field | Description |
| Title | Enter a name for the column, for example Injuries YTD or Contractor Hours. |
| Filter (optional) | Select a filter if you want to limit the data shown in this column, for example by project, user role, or incident type. Click Manage filters if you need to create or edit filters. |
| Position | Specify the column's display order. Columns with lower numbers appear first. |
| Enabled | Choose Yes to activate the column, or No to keep it inactive. |
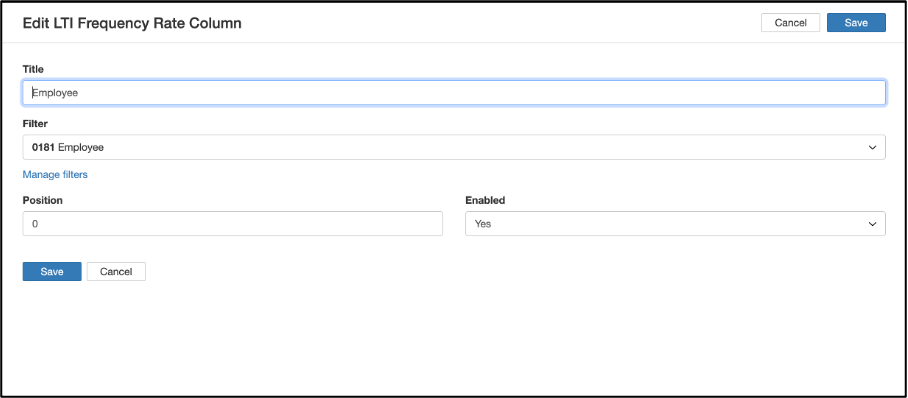
Adding an LTI Frequency Rate column.
Recording Hours Worked
- Click your name in the top menu, then select LTI Frequency Rates.
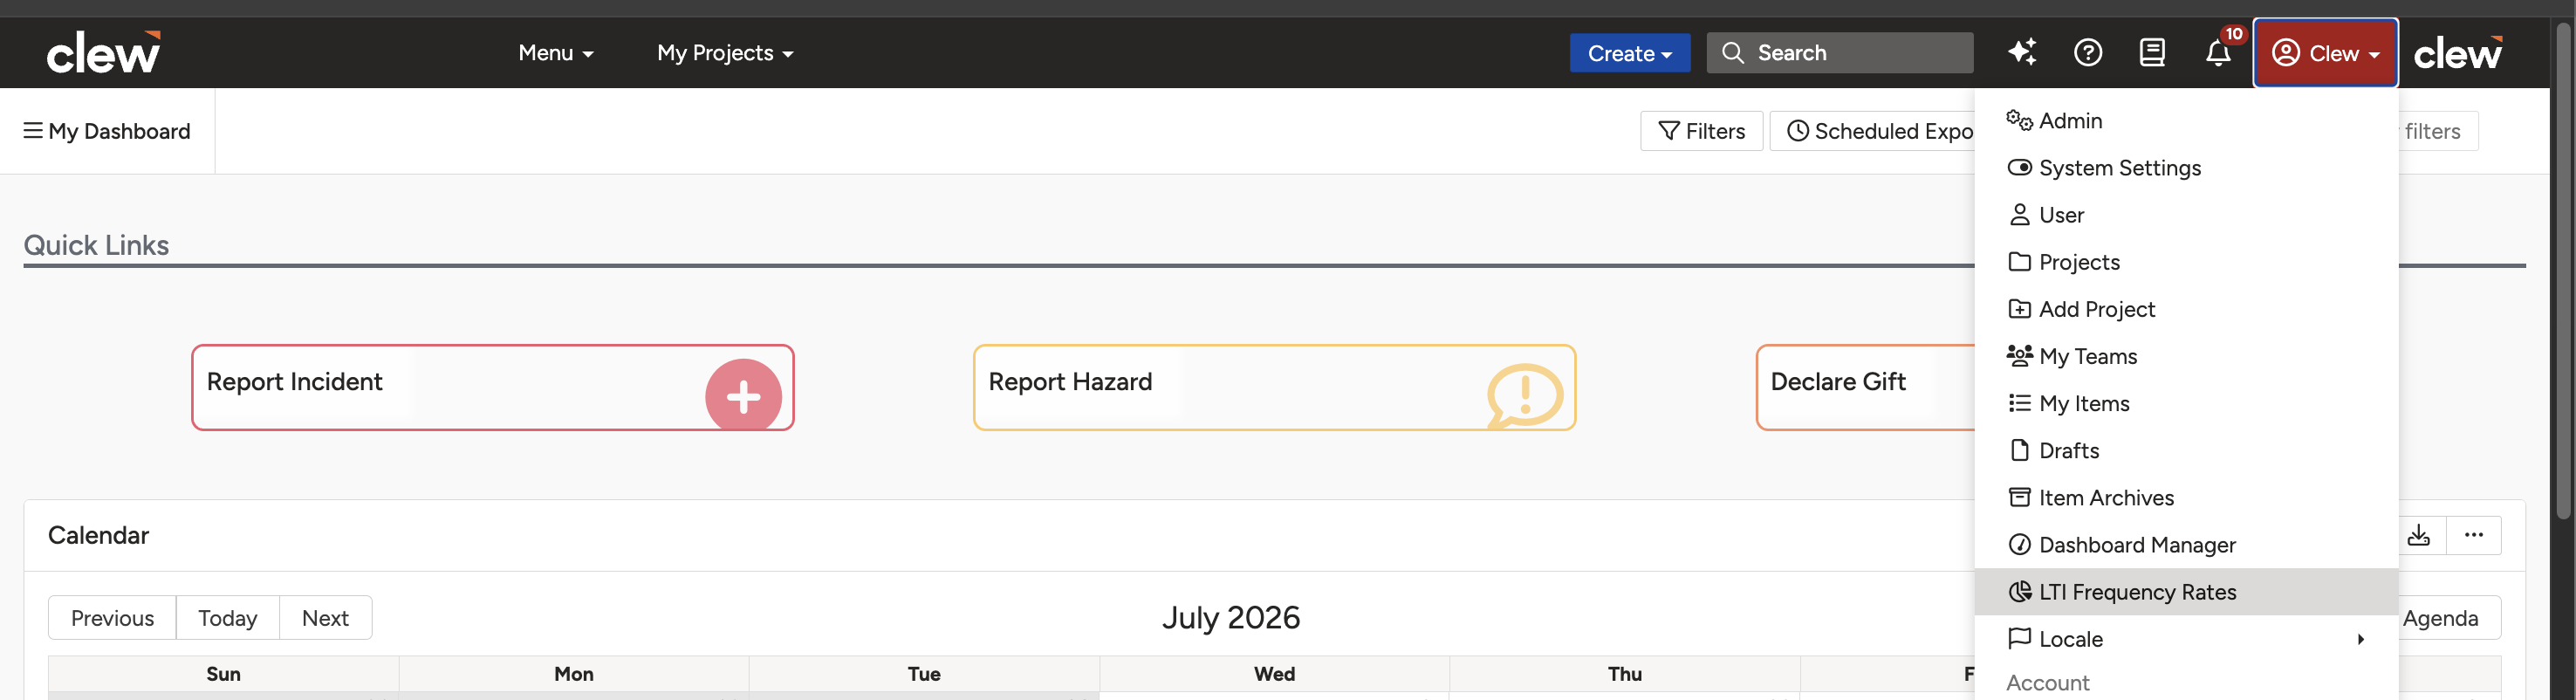
Opening LTI Frequency Rates from the user menu.
- Click the relevant LTI Frequency Rate configuration.
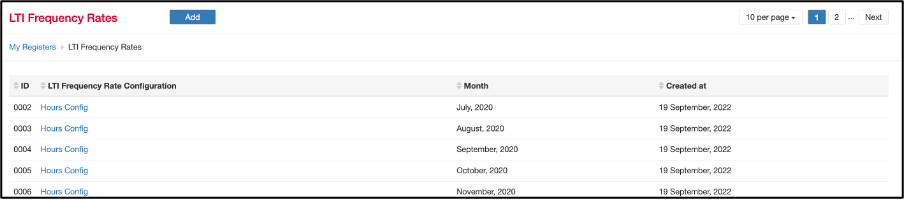
Selecting an LTI Frequency Rate configuration.
To create a new record, click the +Add button at the top, next to LTI Frequency Rates. Create an LTIFR record for the relevant period, for example June 2025, then click Save. This record acts as the container for storing hours and incident counts for that period.
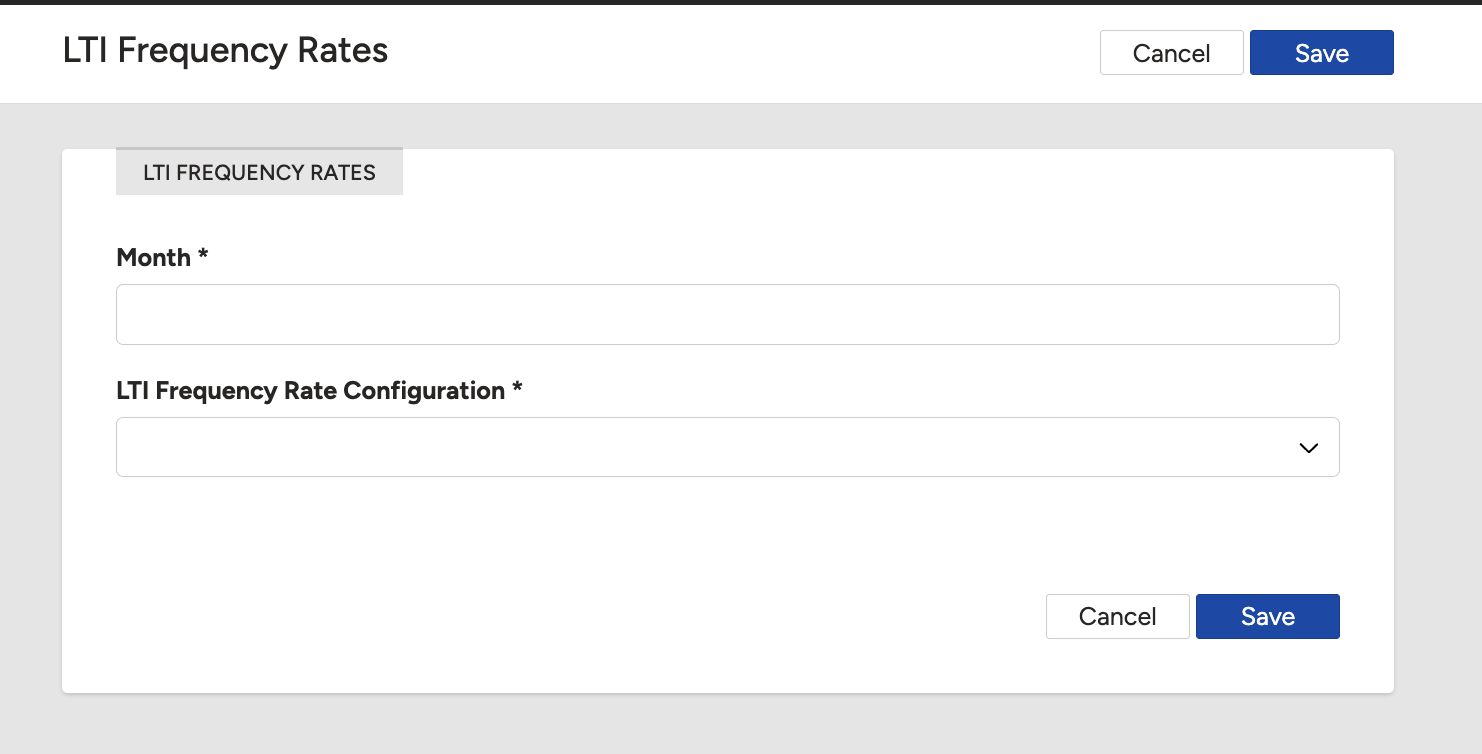
Creating an LTIFR record for a period.
- Log the hours worked for each project and classification column, for example 2000 hours under Staff and 500 under Contractors, then click Save.
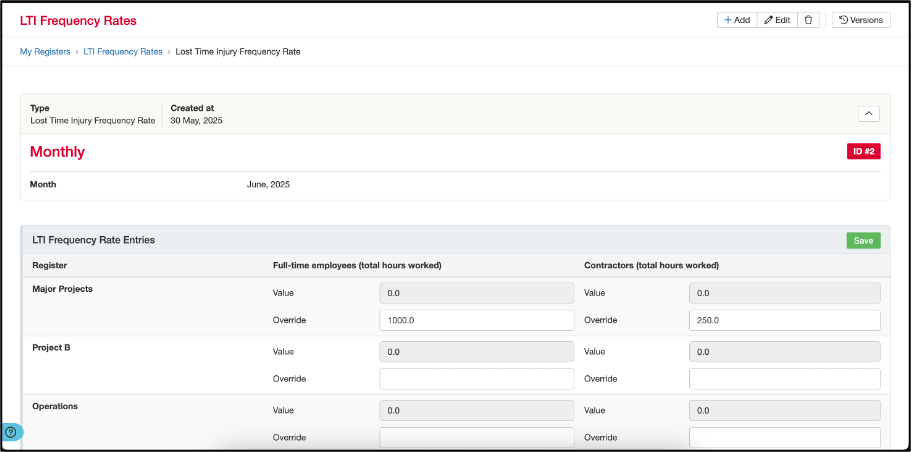
Logging hours worked against each project and column.
Creating Filters for Reporting (Optional)
Create a filter by injured person type. This is for clients who want to separate frequency rates by the type of injured person, for example internal staff versus external contractor. Go to Admin, then Filters, create a filter condition based on the injured person classification, then click Save. This filter can then be applied to the LTI Frequency Rate columns.
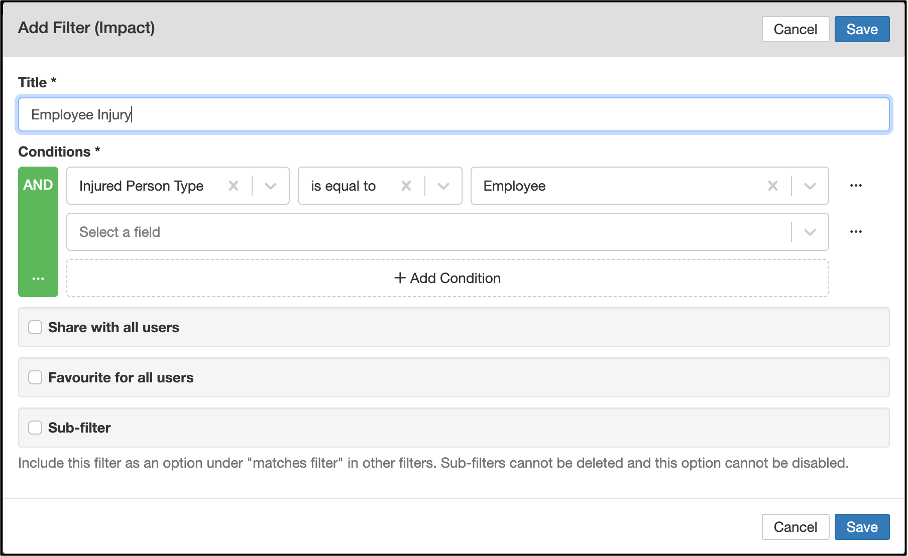
Creating a filter by injured person type.
Create filters for injury classification. There are many injury frequency rate metrics, which vary mainly by the classification of the injury. The main one is Lost Time Injury (LTI), but depending on the client there can be many more. To distinguish between different frequency rate types, for example LTIs versus Medical Treatments, create filters in Admin, then Filters, to define what qualifies as each injury type.
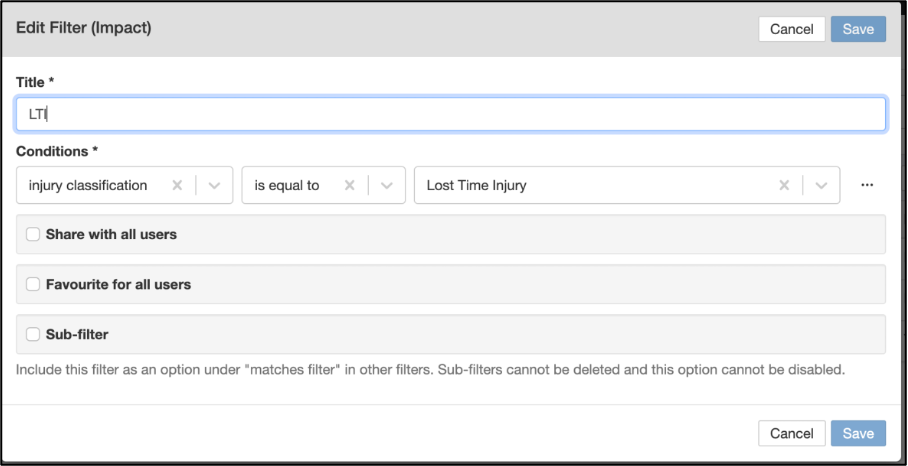
Creating filters for injury classification.
Creating Injury Types
- Go to Admin, then Injury Types, to create each injury category and assign it the appropriate filter created in the previous step. Once done, click Save.
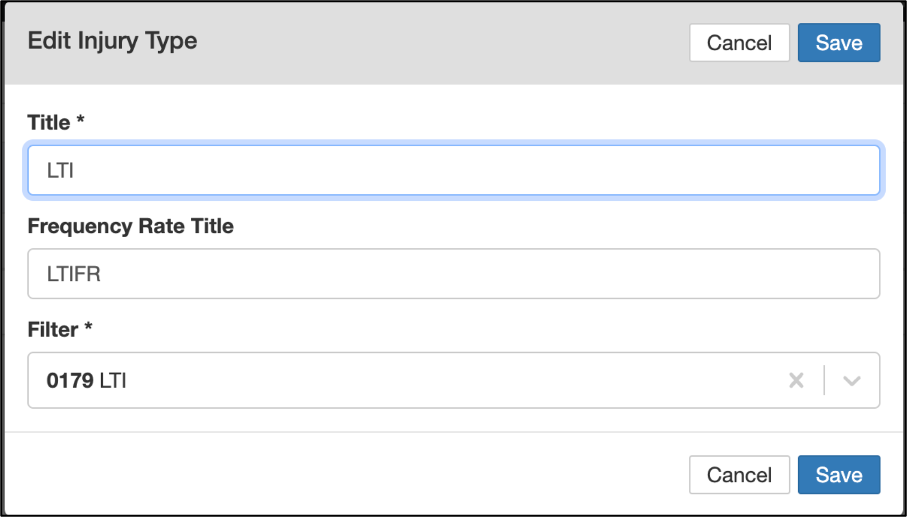
Creating an injury type and assigning its filter.
Creating the LTIFR Dashboard Widget
Use the LTIFR widget type, which handles all the logic for calculating counts and frequency rates and visualising them on dashboards. Configure the following options.
- Rolling Month Lag: choose a rolling window, for example 3 or 12 months, for the frequency rate calculations. For example, the LTIFR value for December 2024 includes the LTIFR hours and incidents or impacts from January 2024 to December 2024.
- Columns: choose injury classifications to display separate frequency rate series. For example, selecting the injured person classification adds an extra frequency rate series for each type.
- Injury Types: select which injury types should be counted and plotted. Note that the count series are not rolling; they show the counts of matching incidents or impacts for the relevant month only.
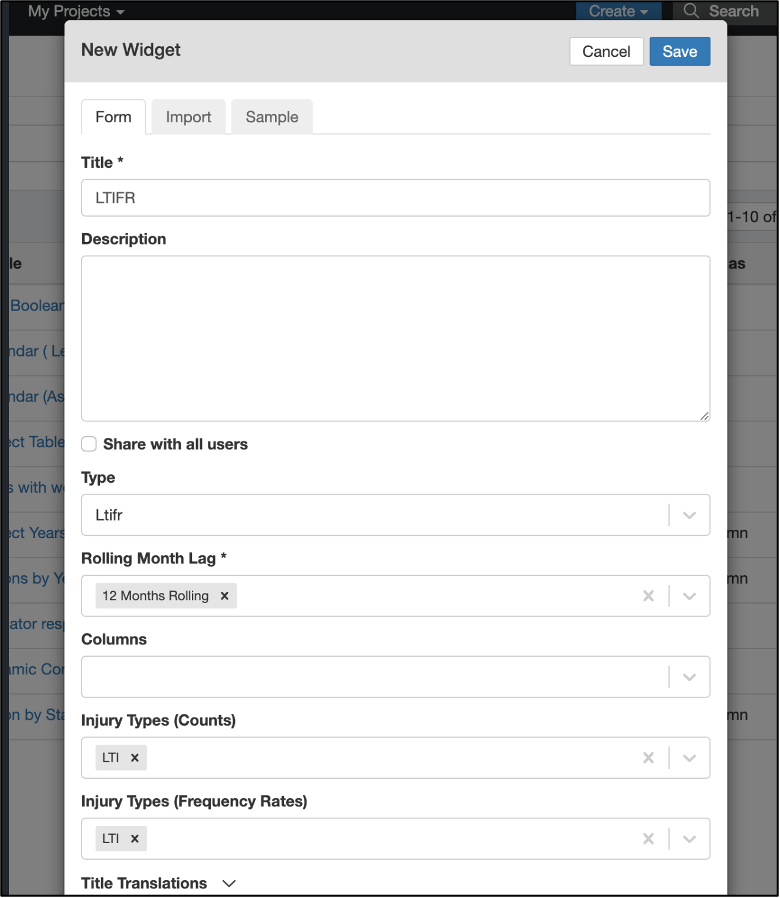
Configuring the LTIFR dashboard widget.
Understanding Widget Behaviour
- The widget allows date range selections, which are cached across the dashboard. You can hide series by clicking the legend, and the widget is included in PDF exports.
- Click navigation is available for counts but not for frequency rates.
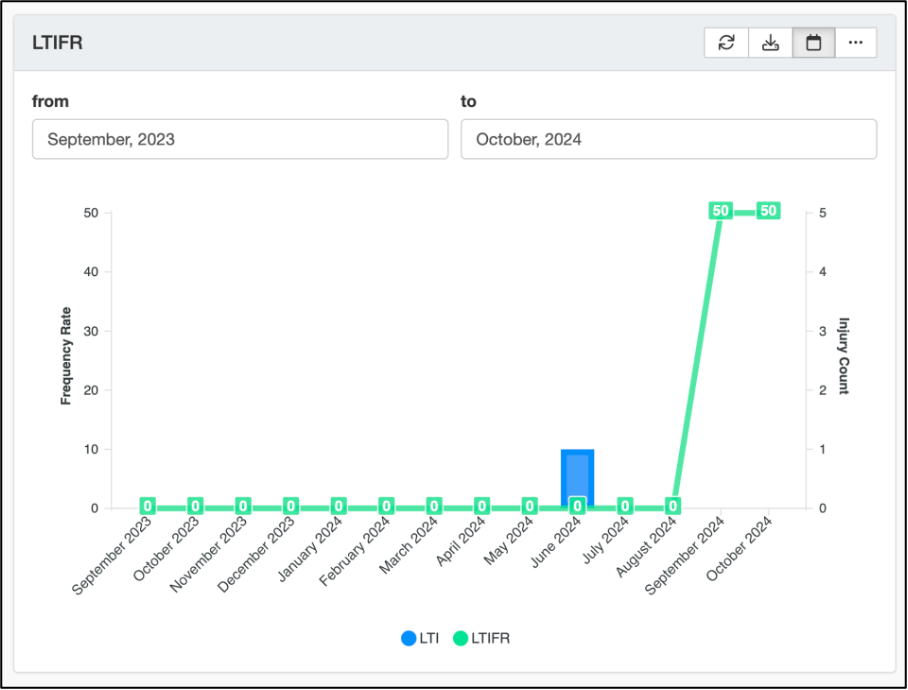
The LTIFR widget displayed on a dashboard.
Project Scoping
LTIFR records (hours worked) and widgets are scoped by project. Because hours worked are project-scoped, a global filter on projects will filter out both the hours worked and the incidents. To scope a widget by default:
- Create filters on both Incidents and LTIFR Entries.
- Apply these filters to the widget under its configuration.
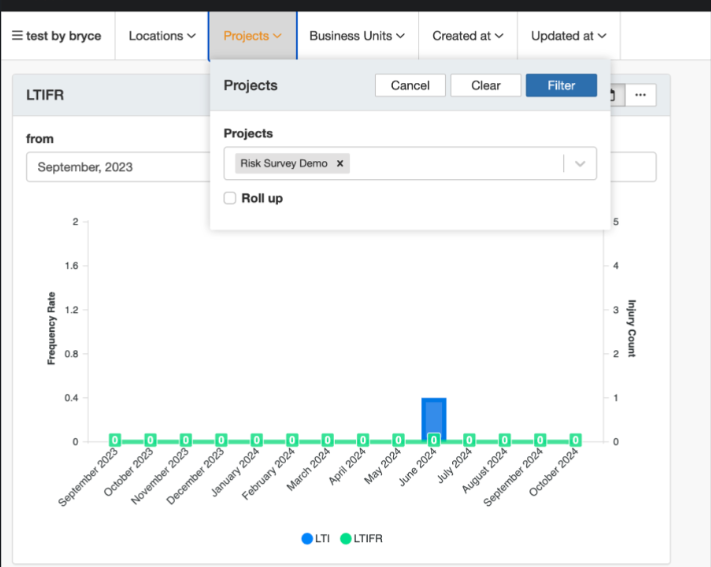
Applying project-scoped filters to the LTIFR widget.
5. Common Issues & Troubleshooting
| Issue | Likely Cause | Solution |
| A user cannot enter hours worked | The user is not listed under Authorised Users on the configuration. | Add the user to Authorised Users in the LTI Frequency Rate configuration. |
| Frequency rates look wrong or incomplete | Hours are missing for one or more periods, or incident data is not mapped correctly. | Confirm hours are logged for every period in the rolling window, and check that injury type filters match the correct incidents. |
| A column shows no data | The column is disabled, or its filter excludes all records. | Set the column's Enabled field to Yes and review the assigned filter. |
| The widget shows no hours or incidents | A global project filter is scoping out the data, since hours worked are project-scoped. | Review the dashboard's global filters, and apply matching filters on both Incidents and LTIFR Entries in the widget configuration. |
Best practices:
- Log hours consistently for every period so rolling frequency rates remain accurate.
- Use the CSV importer to load backdated hours when first setting up LTIFR.
- Keep injury type filters aligned with how your incidents are classified, so the right incidents feed each frequency rate.
- Match your register structure to your organisational units so hours and incidents map correctly.
Click a title to preview it here. Use the Open full article button to read the full version in a new tab.
▾Creating Custom Filters As A System Administrator Open full article »
Related article
How to build custom filters, used here to segment LTIFR columns and scope the widget by injury type or injured person.
▾Building Dashboards Open full article »
Related article
How to build dashboards and add widgets, the surface on which the LTIFR widget is displayed.
▾Advanced Dashboard Templates Open full article »
Related article
How to use advanced dashboard templates, useful for presenting LTIFR alongside other safety metrics.
▾CSV Imports Open full article »
Related article
How to import data via CSV, used here to upload backdated hours worked when first setting up LTIFR.
Was this article helpful?
That’s Great!
Thank you for your feedback
Sorry! We couldn't be helpful
Thank you for your feedback
Feedback sent
We appreciate your effort and will try to fix the article