Teams
What a team is, what it controls, and how to create one
Contents
- 1. Introduction & Context
- 2. Key Features & Functions
- 3. Requirements
- 4. Step-by-Step Guide
- 5. Common Issues & Troubleshooting
- 6. Related Articles
1. Introduction & Context
A team is a named group of users in Clew. Grouping people into a team lets you point permissions, workflow buttons and notifications at the group rather than at each person, so you configure once instead of repeating yourself every time somebody joins or leaves.
Teams also support a hierarchy, so certain members can be given administrative abilities over the team while the rest are ordinary members.
A worked example. Only the incident review group should be able to press the Approve button on the incident workflow. Rather than naming five people on that transition, you create a team called Incident Review, add the five, and add the team to Team restrictions on the transition. When a sixth person joins, you add them to the team and they get the button automatically.
Who is it for? System administrators. Creating and editing teams happens in the Admin area, which only administrators can reach.
What does it impact? Teams affect who can use particular workflow transitions, who receives certain notifications, and which security groups members inherit. A team does not itself grant access to records. It is a way of applying access and behaviour to several people at once.
2. Key Features & Functions
- Workflow restrictions: add a team to Team restrictions on a workflow transition, and only members of that team see and use the button.
- Notifications: a team can be selected as the recipient of a notification, so the whole group is told at once.
- Security groups: a team can carry a set of available groups, which its members inherit through membership.
- Automatic membership: a team can be set to pick up every new user added to the system, which is useful for an all-staff team.
- Clone templates: a team can be made available for cloning and for scoping a clone template.
- Quick Create: a team can be given the Quick Create button at the top of the screen.
3. Requirements
- System administrator permissions. Teams sit in the Admin area and are not visible to other users.
- The users already in Clew. You can only add people who have an account, so create or import users first.
- Any security groups you want the team to carry should exist before you create it, though they can be added later.
4. Step-by-Step Guide
Opening the Teams list
- Go to the Admin area.
- Click Teams in the left-hand bar. This opens the list of teams that already exist.
Creating a team
- From the Teams list, click Add.
- Complete the form, using the table below for what each field does.
- Click Save.
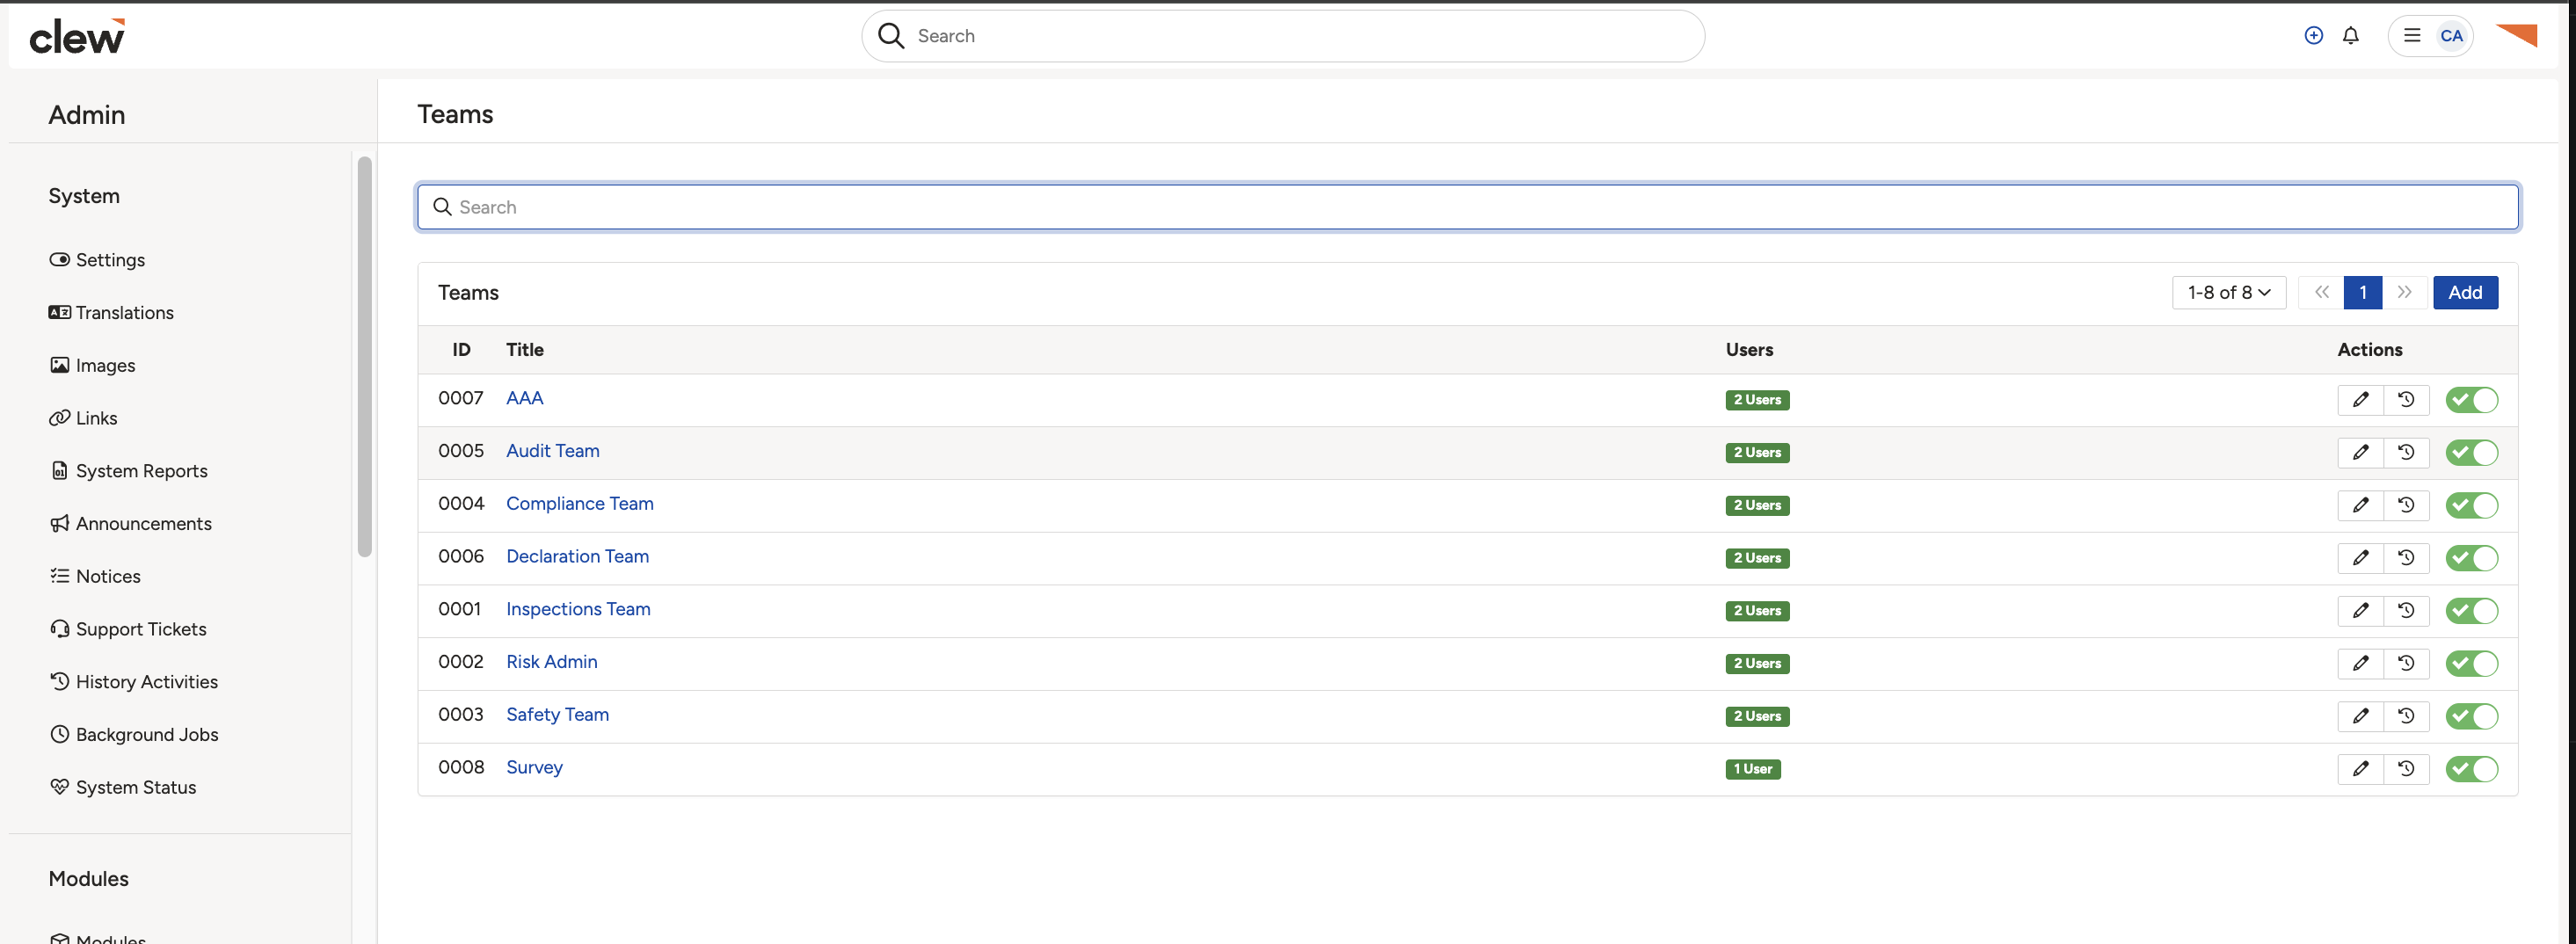
The Teams list in the Admin area, with the Add button.
What each setting does
| Field | What it does |
| Title | The team name. Required. This is what appears wherever a team can be selected, so make it recognisable. |
| Description | Optional. Worth completing, as it tells the next administrator what the team is for. |
| Members | Optional. The users in the team. Can be left empty and filled in later. |
| Available Groups | Optional. Click inside the field and select the security groups this team gives access to. |
| Enabled | Leave as Yes to make the team active. Setting it to No switches the team off without deleting it. |
| Add new users to this team | Set to Yes if every new user should join this team automatically. Defaults to No. |
| Create button active | Set to Yes to give members the Quick Create button at the top of the screen. |
| Cloning | Leave as Yes to make the team available for cloning. |
| Custom Fields | Leave as Yes to make the team available for scoping a clone template. |
| Notifications | Leave as Yes to allow the team to be picked as a notification recipient. |
| Security | Leave as Yes to allow the team to provide security groups to its members. |
| Workflow | Leave as Yes to allow the team to be used in workflow transition restrictions. |
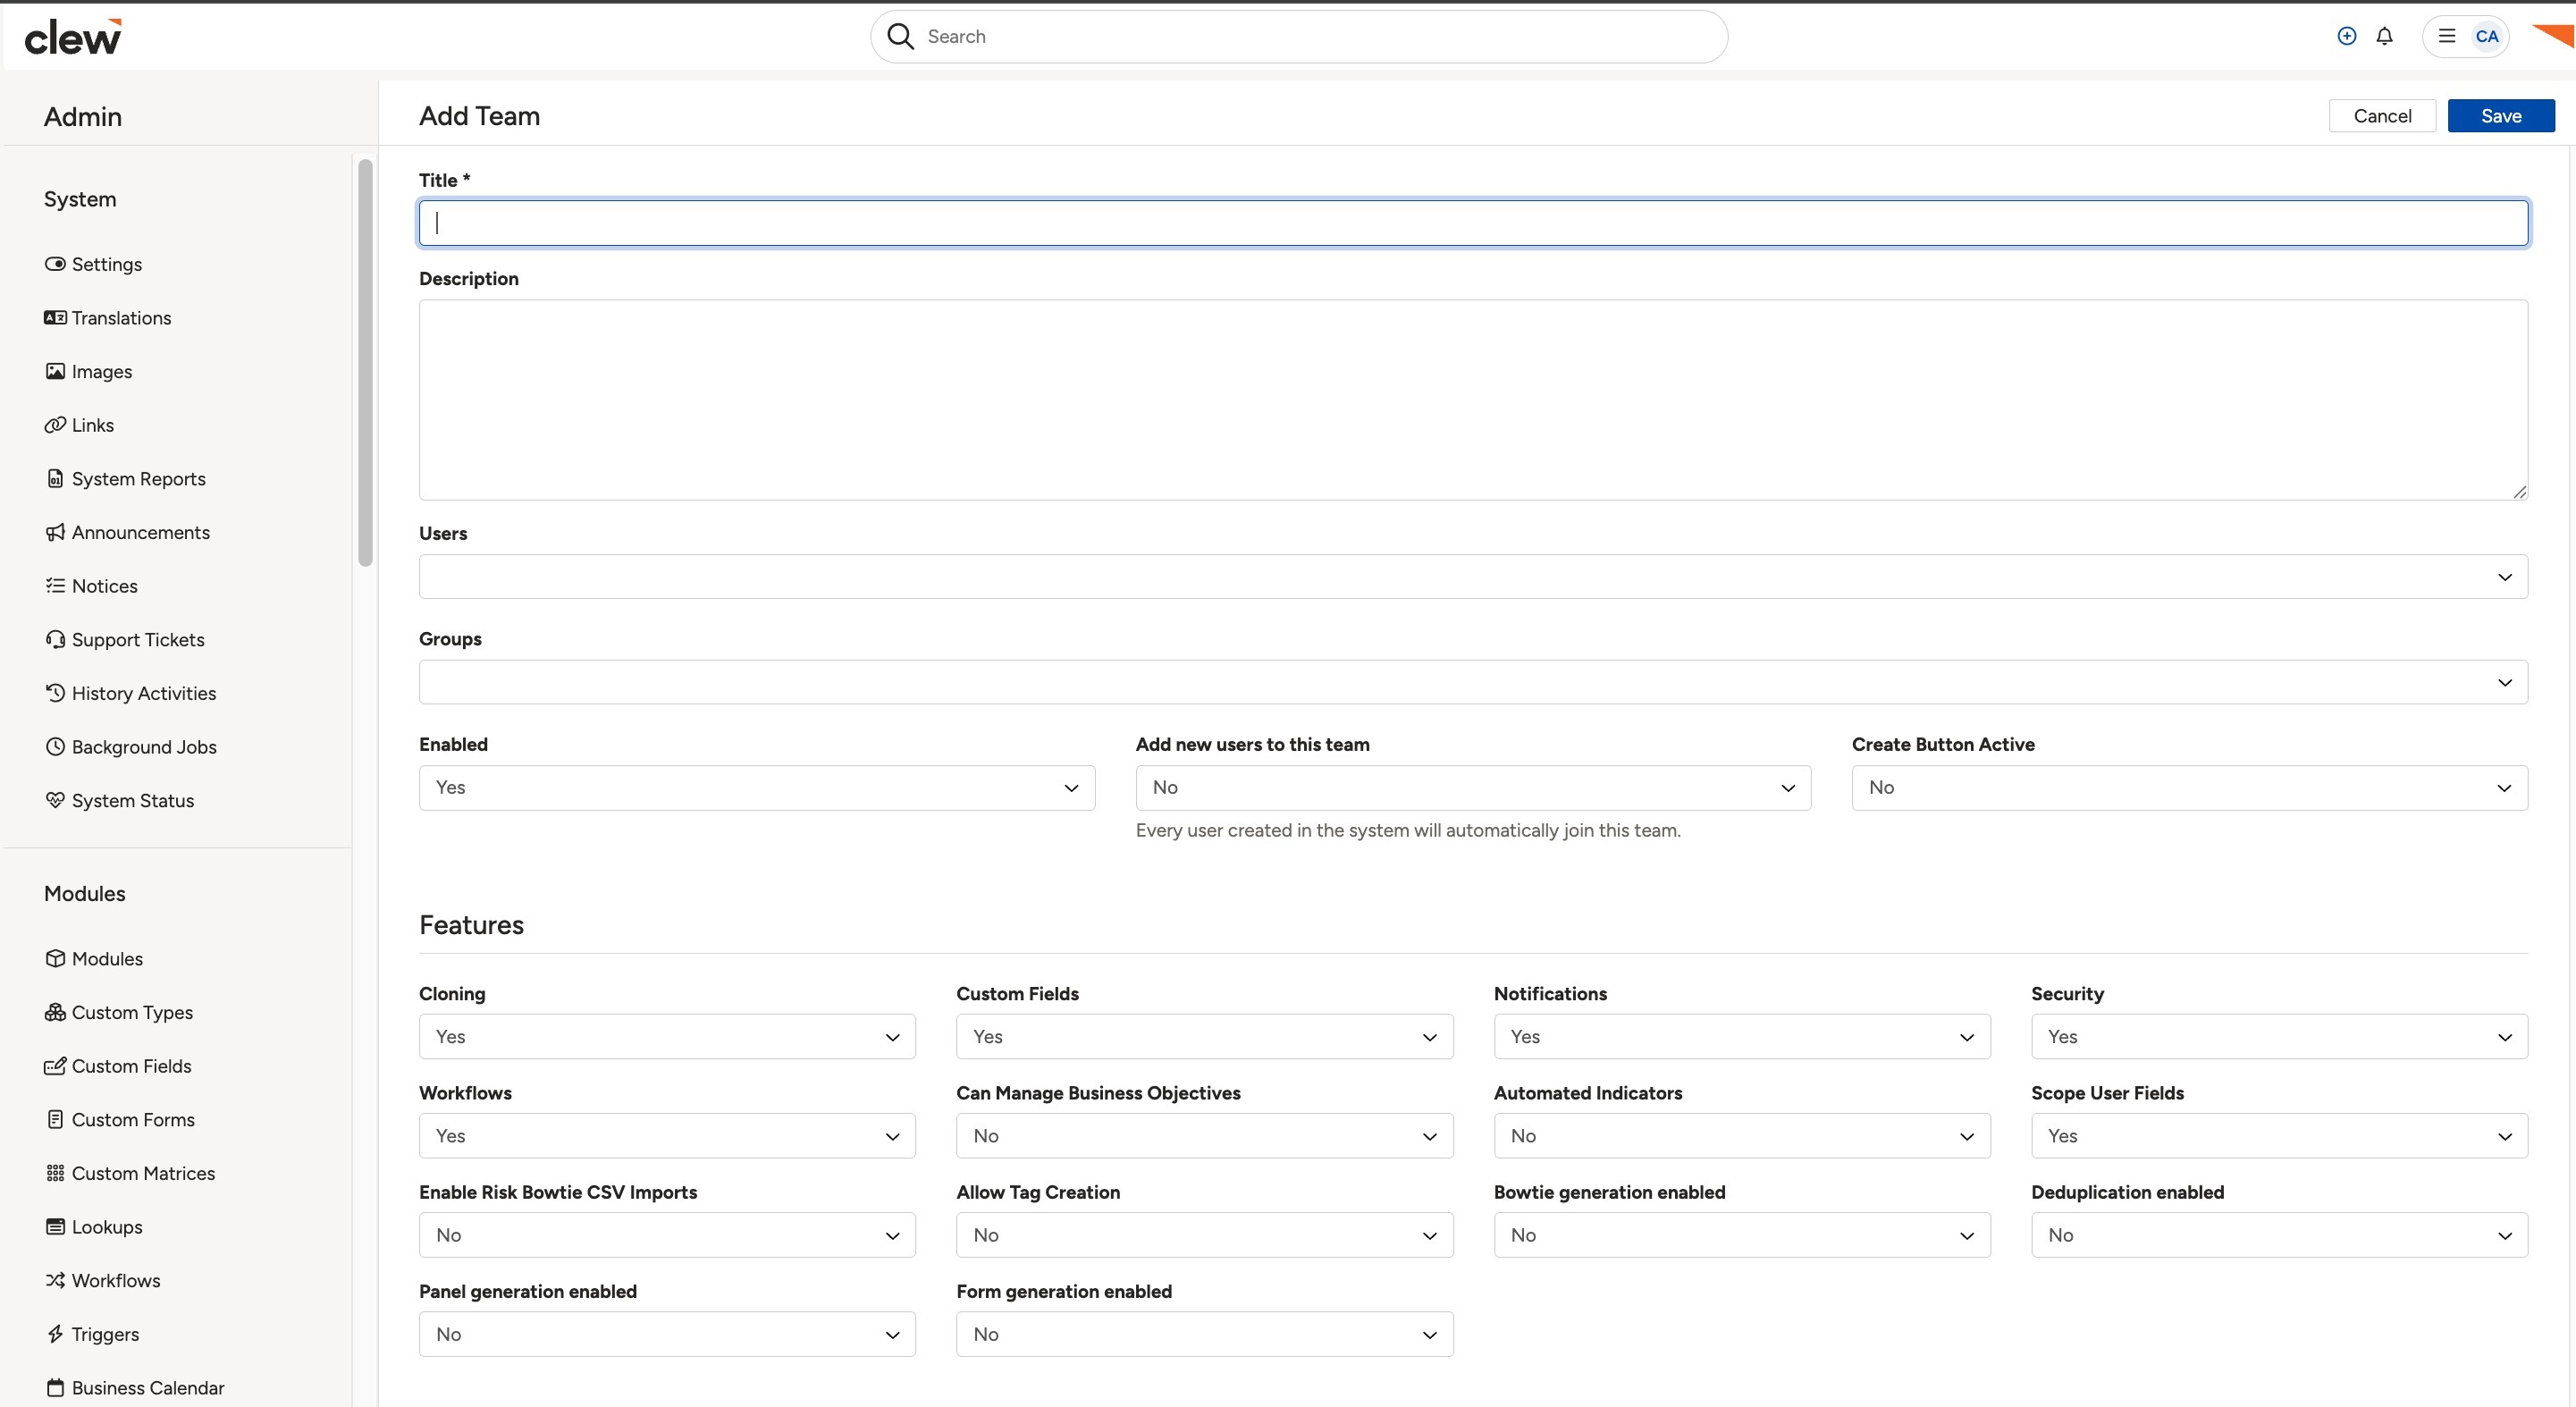
The team form, with the title, members, available groups and the yes or no settings.
5. Common Issues & Troubleshooting
| Issue | Likely Cause | Solution |
| There is no Teams option in the Admin left bar | Your account does not hold system administrator permissions | Ask a system administrator in your organisation to create or amend the team for you. |
| The team cannot be selected in Team restrictions on a workflow transition | The team's Workflow setting is No, or the team is not enabled | Open the team, set Workflow and Enabled to Yes, and save. |
| The team does not appear when choosing notification recipients | The team's Notifications setting is No | Open the team, set Notifications to Yes, and save. |
| New users are not joining the team automatically | Add new users to this team defaults to No | Set it to Yes. Note it applies to users added afterwards, so add existing users to the team manually. |
| Members cannot see records you expected the team to open up | No security groups are listed under Available Groups, or Security is set to No | Add the groups to the team, set Security to Yes, and ask a member to sign out and back in. |
Best practices:
- Name teams after what they do rather than who is in them, so the name still makes sense after people move on.
- Complete the description. It is the only place recording why the team exists.
- Disable rather than delete a team you no longer need, so anything still pointing at it does not break.
- Keep the number of teams small. Several overlapping teams make it hard to work out why somebody can or cannot do something.
- Use Add new users to this team for an all-staff team only. On a restricted team it quietly widens access every time someone is onboarded.
▾Team Management Open full article »
Related article
How to maintain a team once it exists, including adding and removing members and managing team administrators.
▾Security Groups Open full article »
Related article
What security groups control, and how the groups listed on a team reach its members.
Was this article helpful?
That’s Great!
Thank you for your feedback
Sorry! We couldn't be helpful
Thank you for your feedback
Feedback sent
We appreciate your effort and will try to fix the article