Automatic User Provisioning with SCIM2 (Microsoft Entra ID)
How to configure automatic user and role provisioning between Microsoft Entra ID and Clew using SCIM2
Contents
- 1. Introduction & Context
- 2. Key Features & Functions
- 3. Requirements
- 4. Step-by-Step Guide
- 5. Common Issues & Troubleshooting
- 6. Related Articles
1. Introduction & Context
Automatic user provisioning lets Clew create, update, and manage user accounts directly from your identity provider, so your team no longer has to add or maintain users in Clew by hand. This article explains how to set up provisioning between Microsoft Entra ID (formerly Azure AD) and Clew using SCIM2 (System for Cross-domain Identity Management), including how to map attributes, scope which users sync, assign roles automatically, and read the logs when something goes wrong.
Who is it for? Administrators who manage user access in Clew and have administrator access to Microsoft Entra ID. This is a technical setup task and assumes familiarity with your organisation's identity provider.
What does it impact? Provisioning affects user accounts across your Clew instance. Depending on your configuration it can create new users, update existing ones, and automatically assign or move users between roles. Because it can create and change accounts, it is important to scope the users that sync and to review the settings described below before you start provisioning.
2. Key Features & Functions
- Automatic user provisioning: create and update Clew users automatically whenever their details change in Entra ID, removing the need for manual account management.
- Flexible sync strategy: choose whether provisioning can create new users, only update existing ones, or is turned off entirely.
- User scoping: control exactly which users and groups sync to Clew by assigning them to the enterprise application in Entra ID.
- Attribute mapping: map the user attributes held in Entra ID to the corresponding fields in Clew so the right information lands on each account.
- Role mapping via position ID: assign users to roles automatically based on their position identifier, and move them to a new role when their position changes.
- Failure notifications: optionally send a CSV of any failed users to a list of contacts so issues can be actioned quickly.
- Logs on both sides: review provisioning activity and errors in both Entra ID and Clew to help diagnose any problems.
3. Requirements
Before you begin the SCIM2 configuration, make sure the following are in place.
- A SCIM authentication token and endpoint URL from Clew. Contact Clew Support at support@clew.io to generate a SCIM authentication token, receive your organisation's SCIM endpoint URL, and discuss your user identifier strategy.
- A chosen user identifier. The identifier you use for user accounts is critical for a seamless link between auto-provisioning and Single Sign-On (SSO). Agree this with Clew Support before you start.
- Administrator access to your identity provider. You need administrator access to Microsoft Entra ID to create the enterprise application and configure provisioning.
- Administrator access to Clew. You need access to the /admin/provisioners page in Clew to create or edit a provisioner configuration.
4. Step-by-Step Guide
Setting Up the Enterprise Application in Entra ID
- From the Microsoft Entra ID home page, click Add, then Enterprise Application, then Create your own application.
- Enter a name for the application, for example Clew Platform, then click Create.
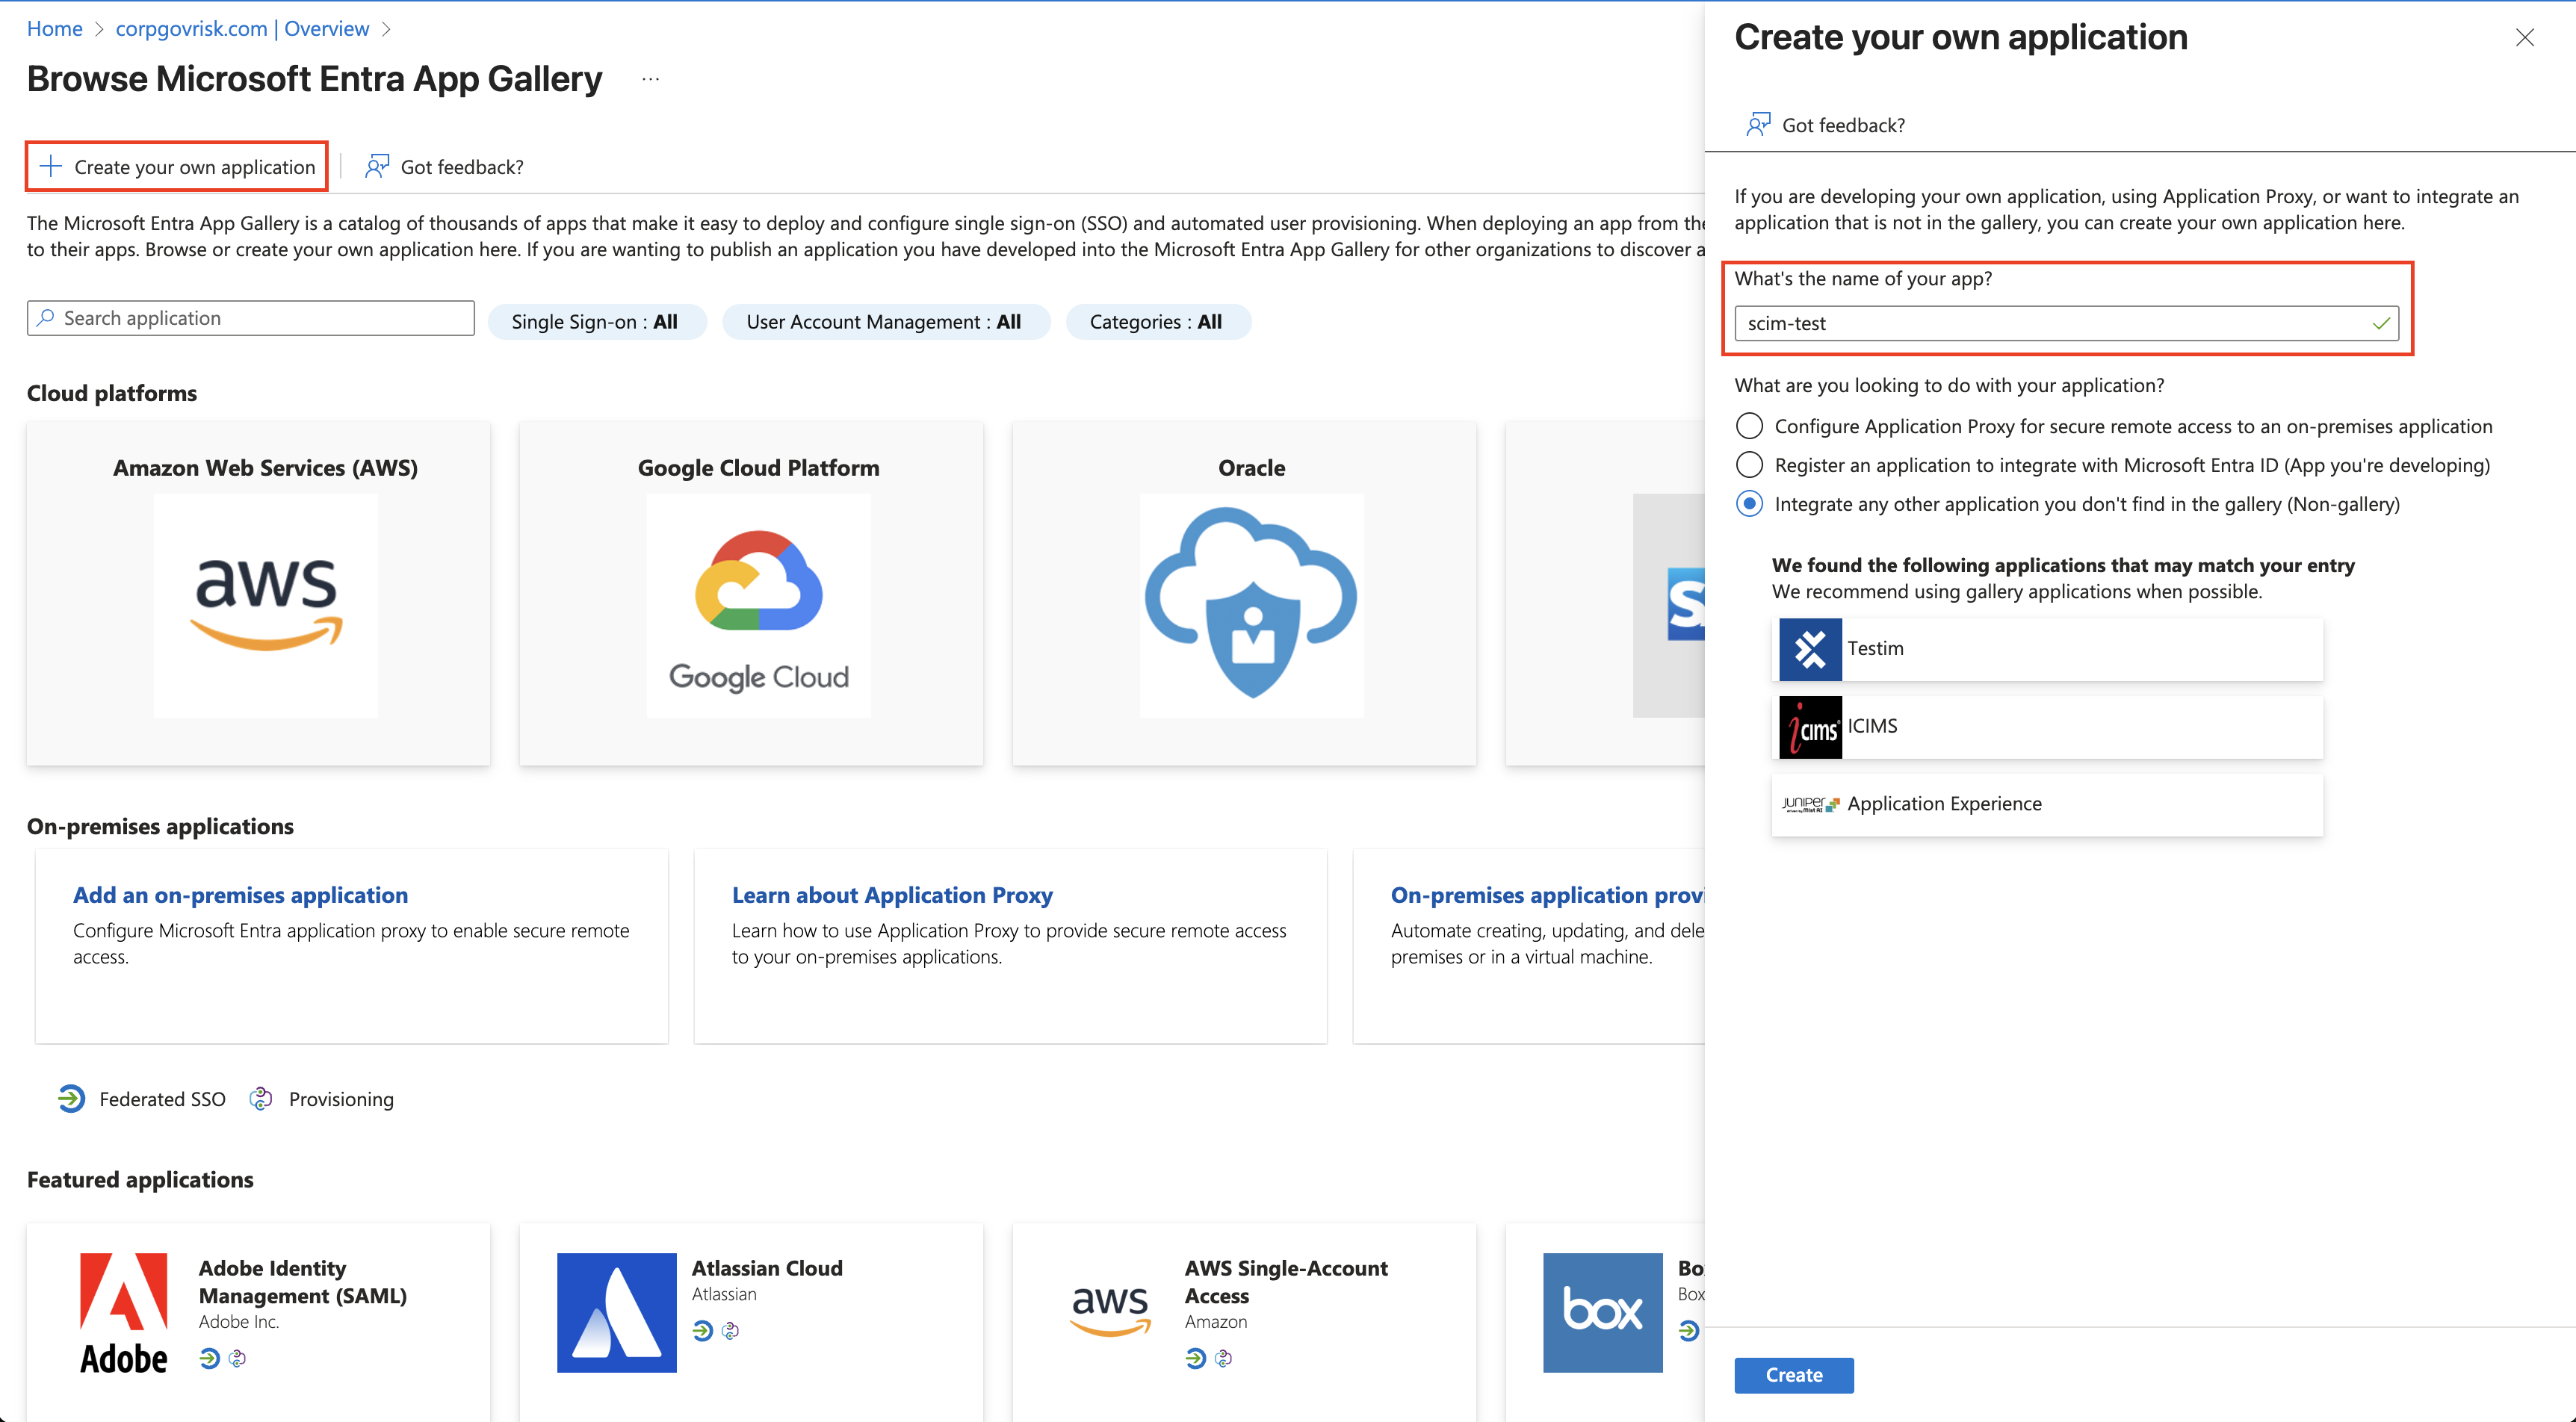
Creating a new enterprise application in Microsoft Entra ID.
- Open the new application and go to Provisioning, then click Connect your Application.
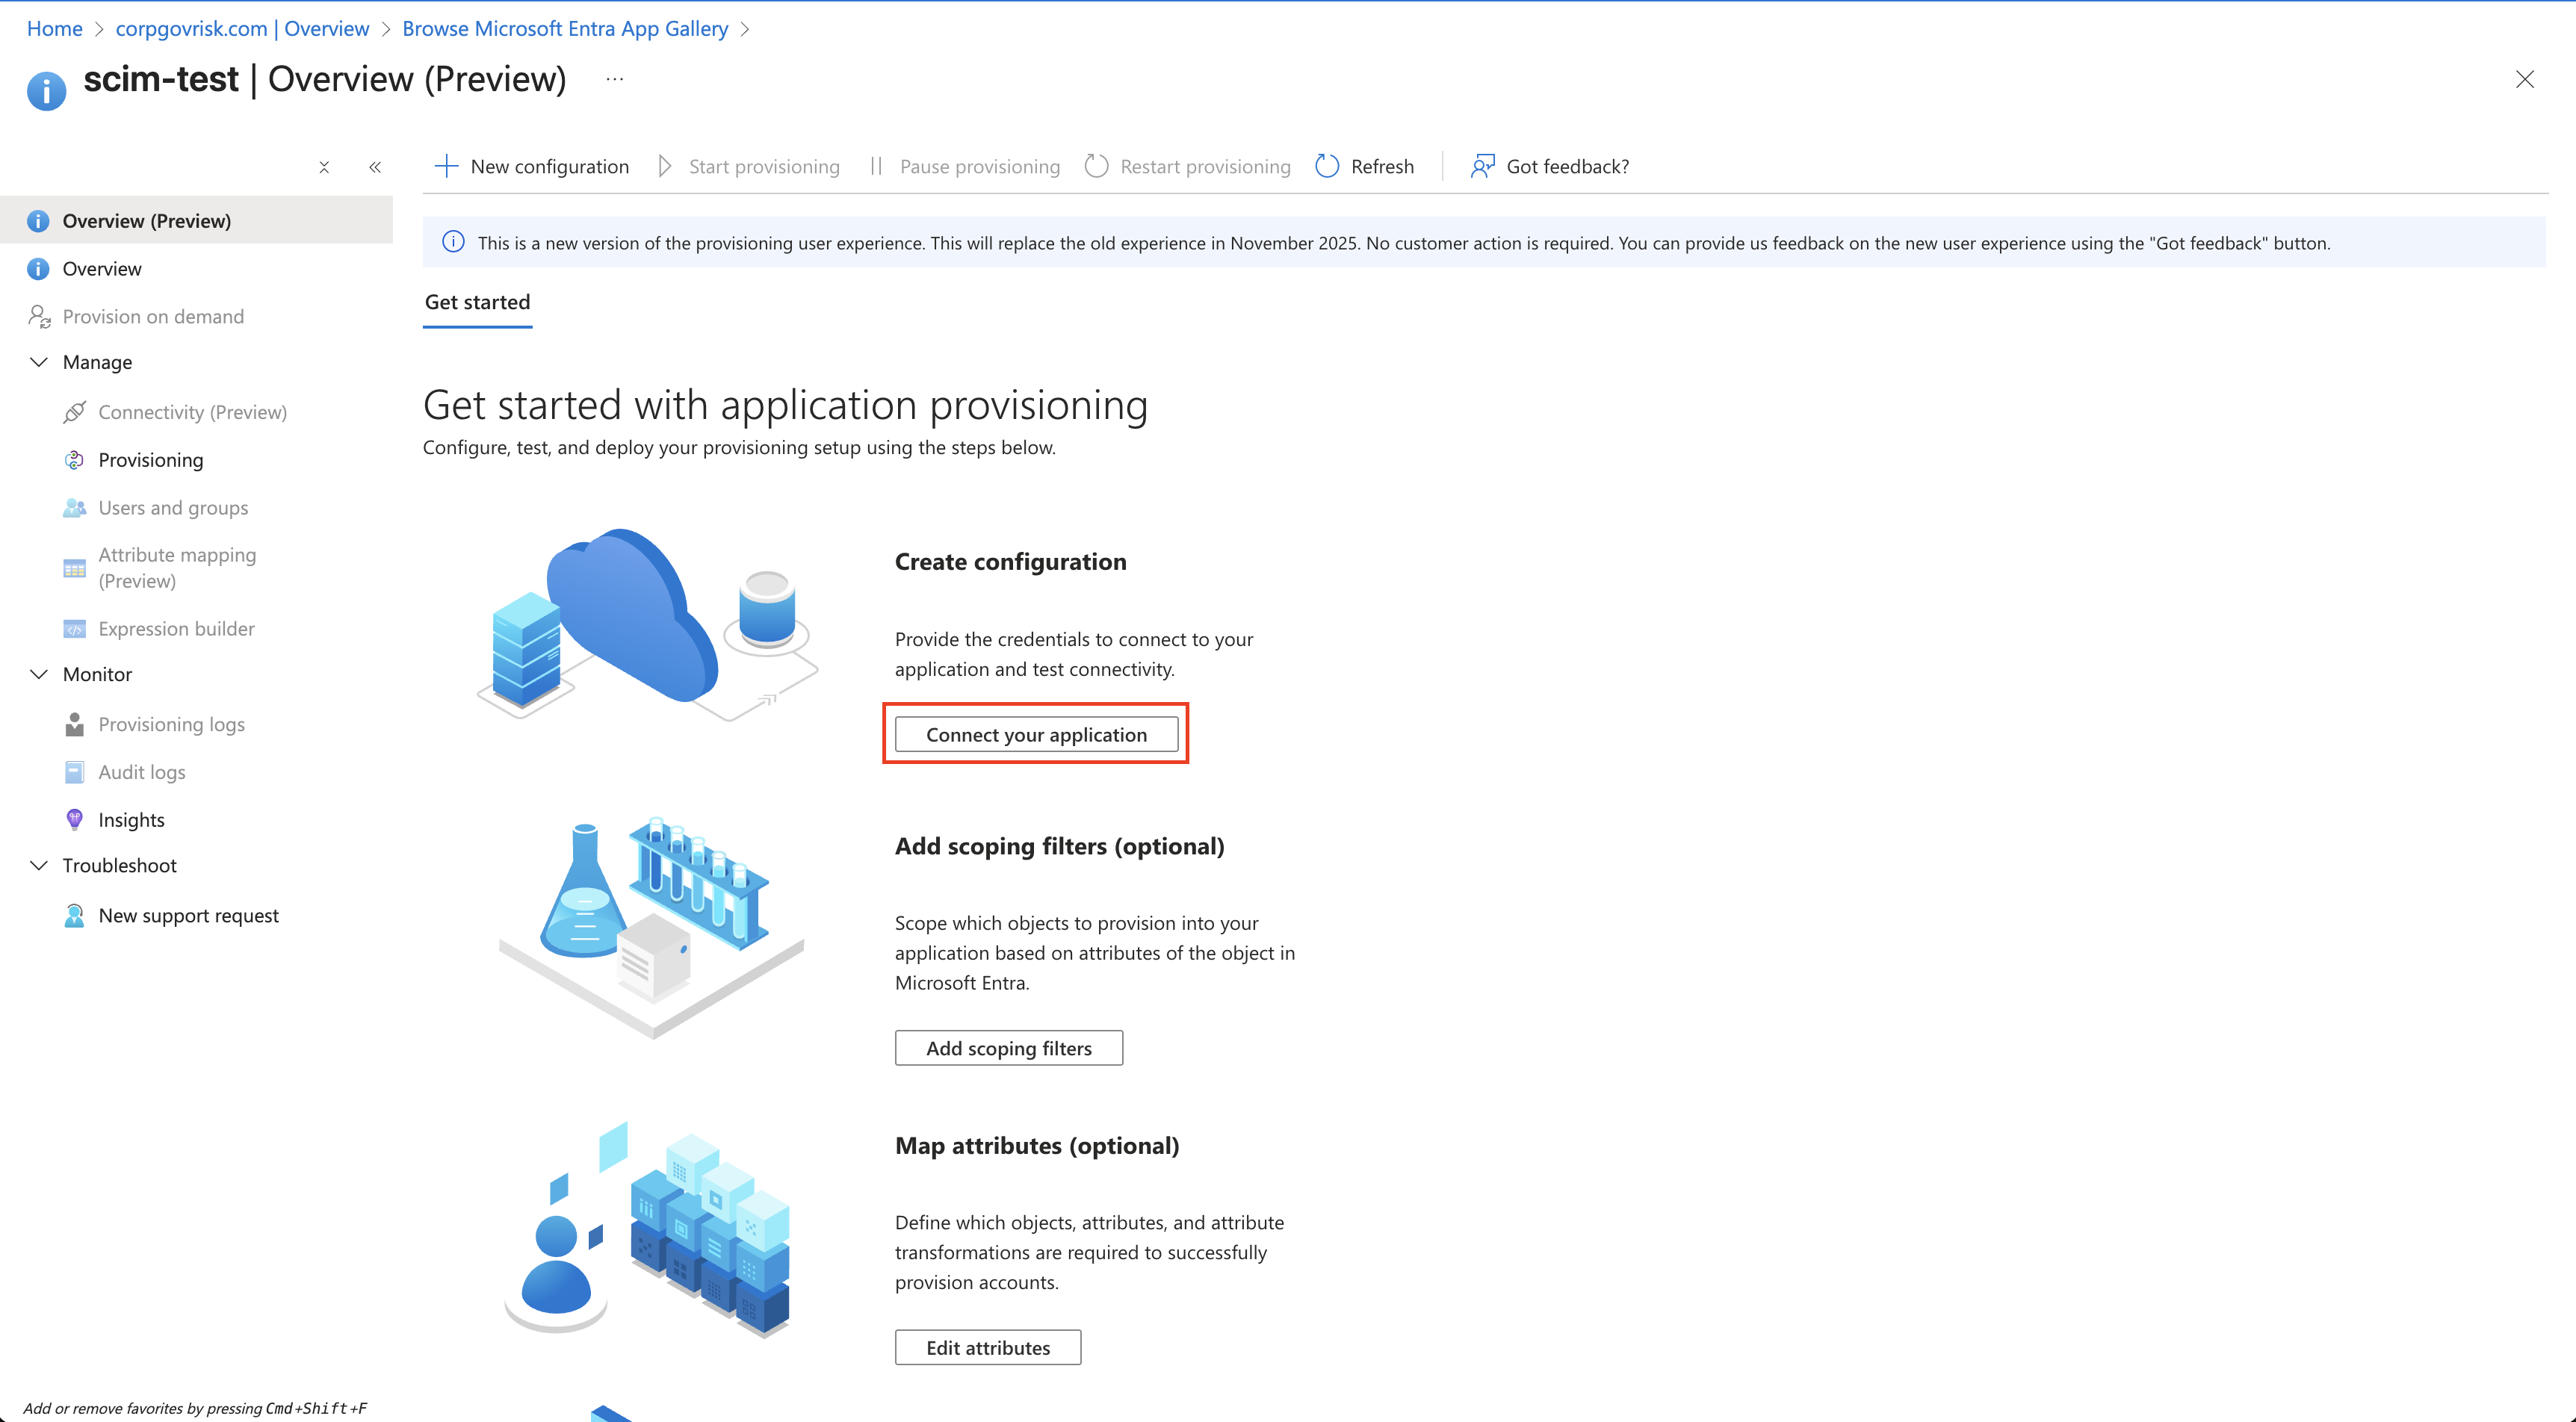
Opening the Provisioning section to connect the application.
- Enter the Tenant URL and Secret Token provided by Clew Support during setup.
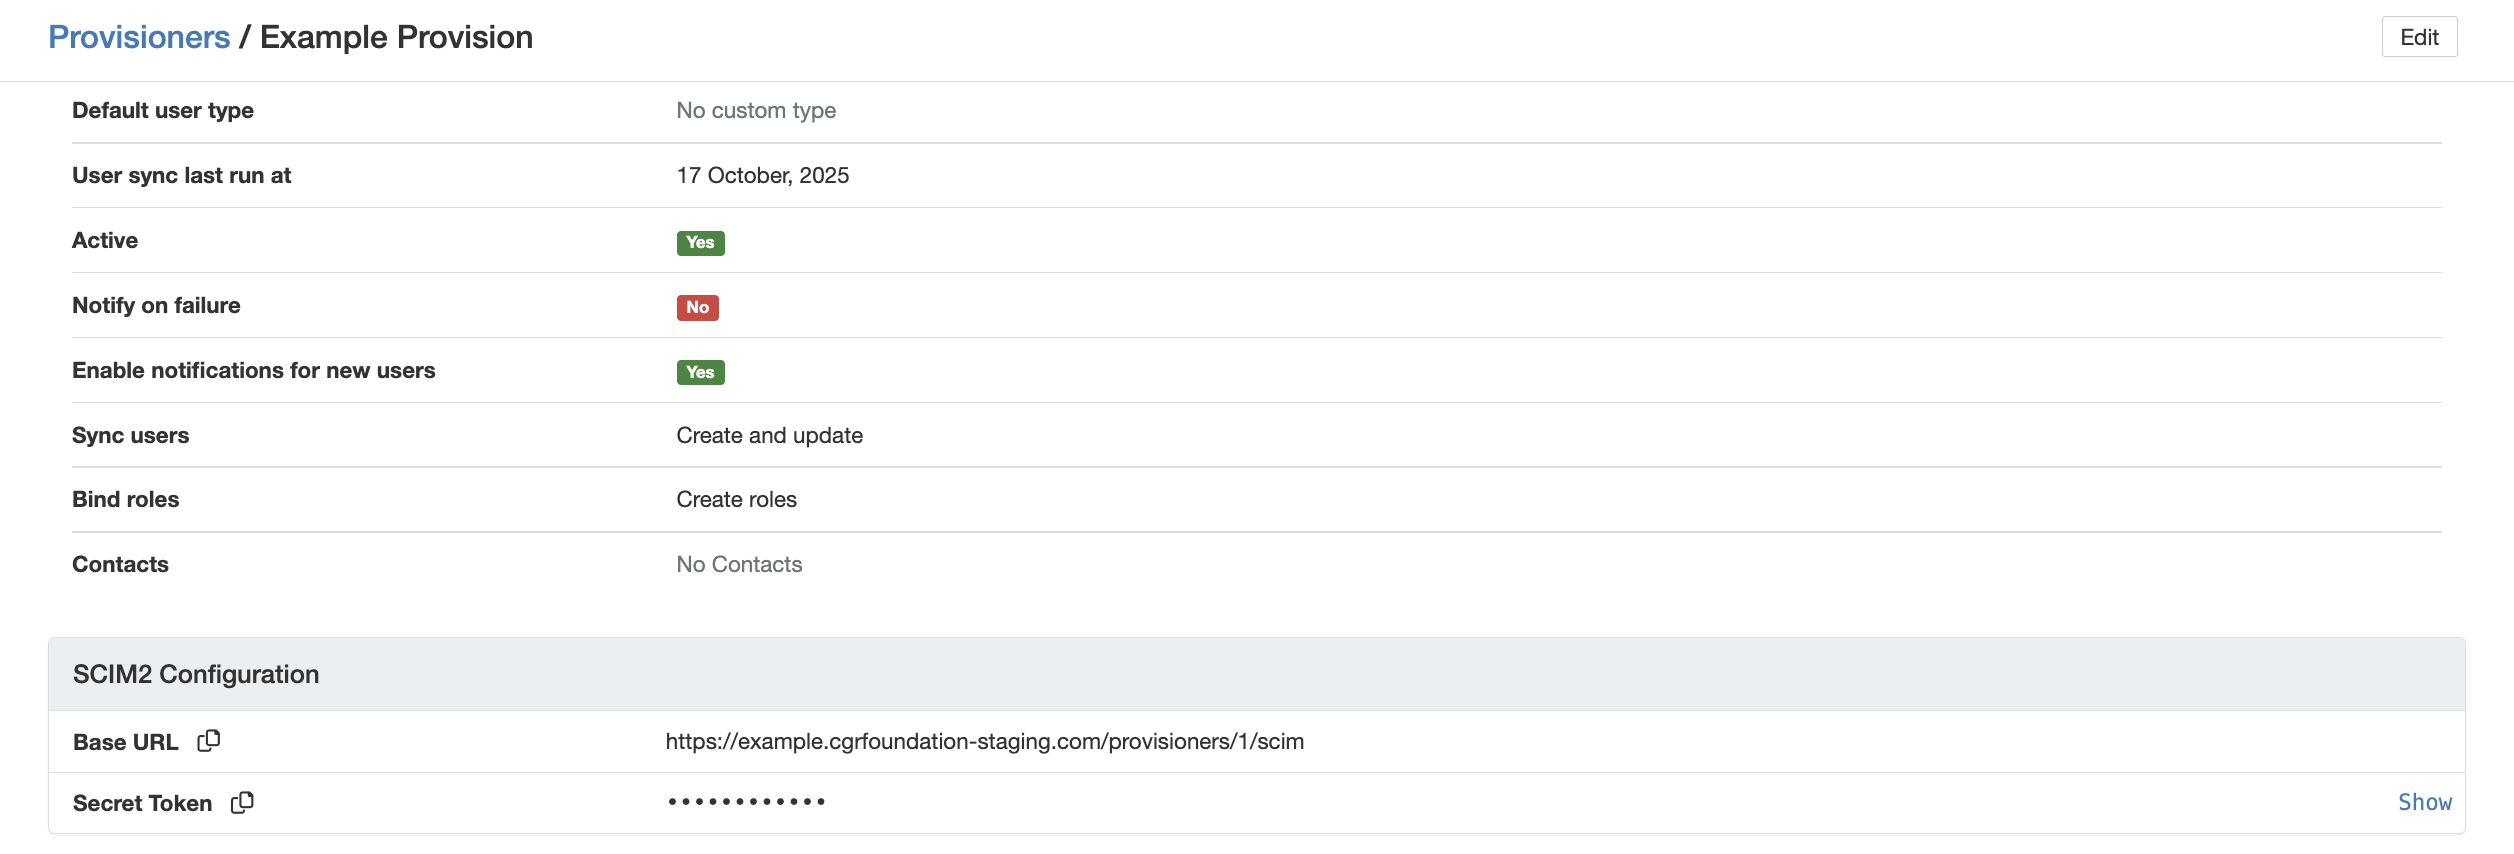
Entering the Tenant URL and Secret Token supplied by Clew.
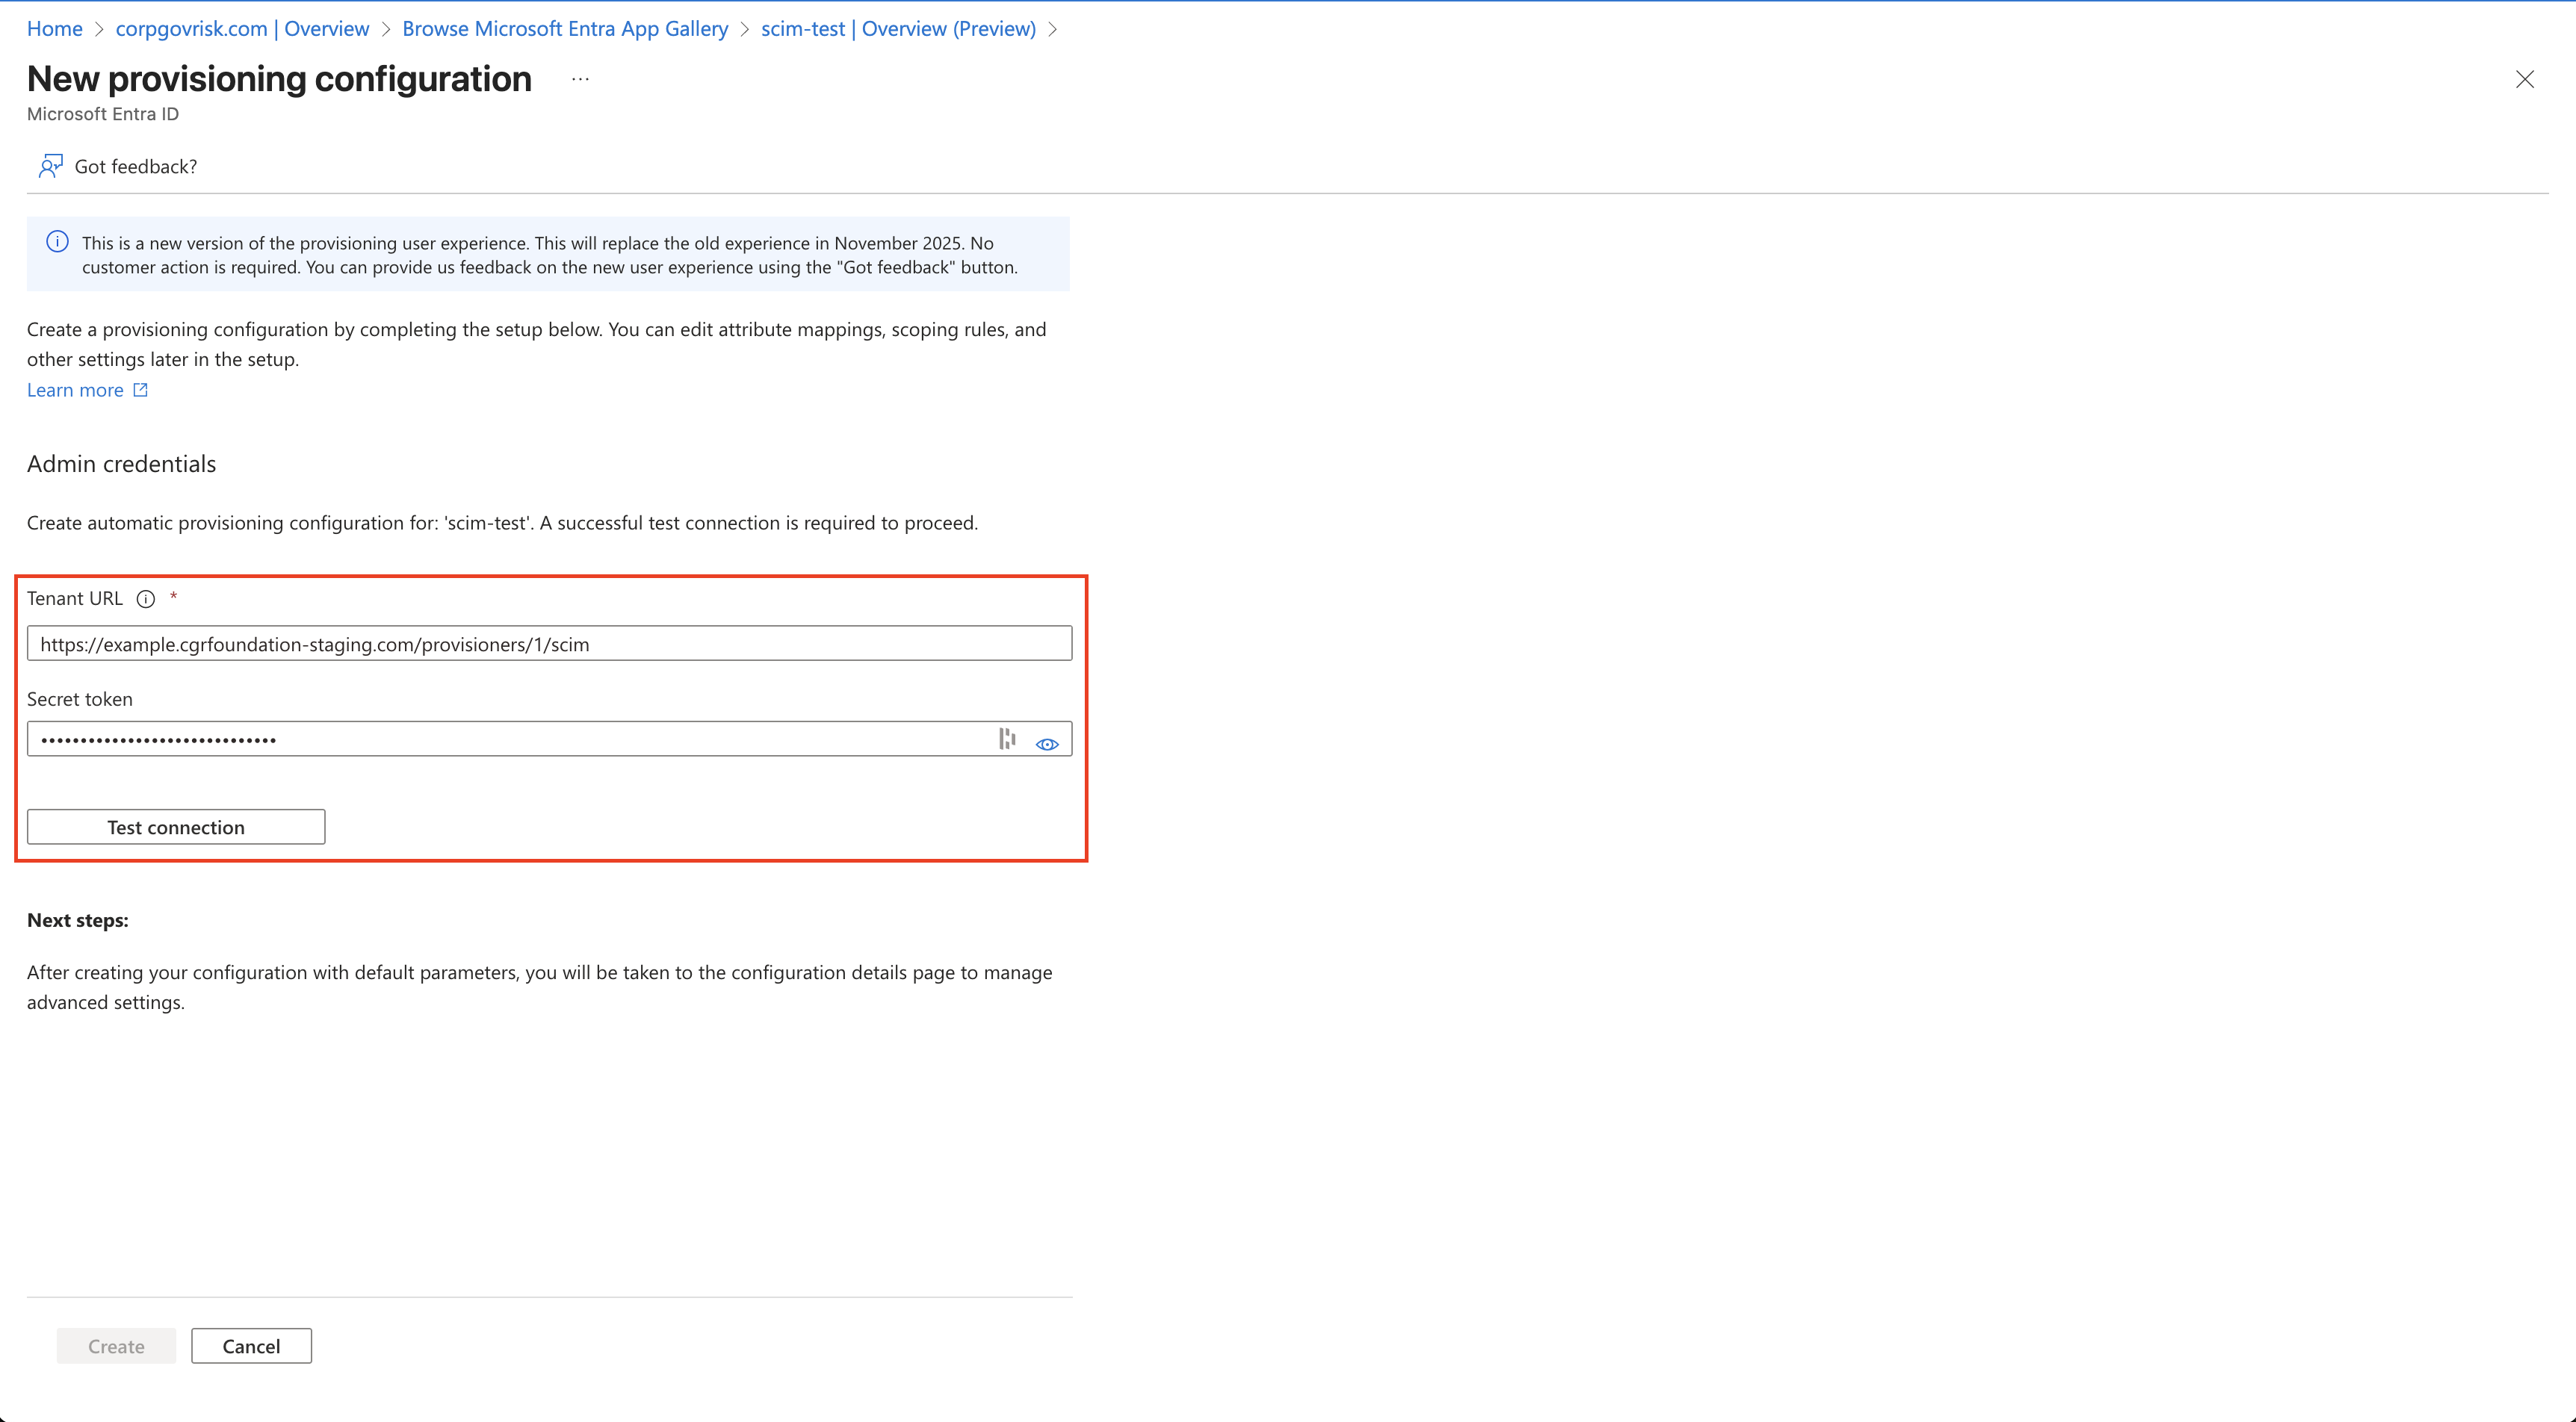
Admin credentials populated and ready to test.
- Click Test Connection to confirm the credentials work, then save.
Configuring the Provisioner in Clew
- In Clew, go to the /admin/provisioners page.
- Edit an existing configuration or create a new one.
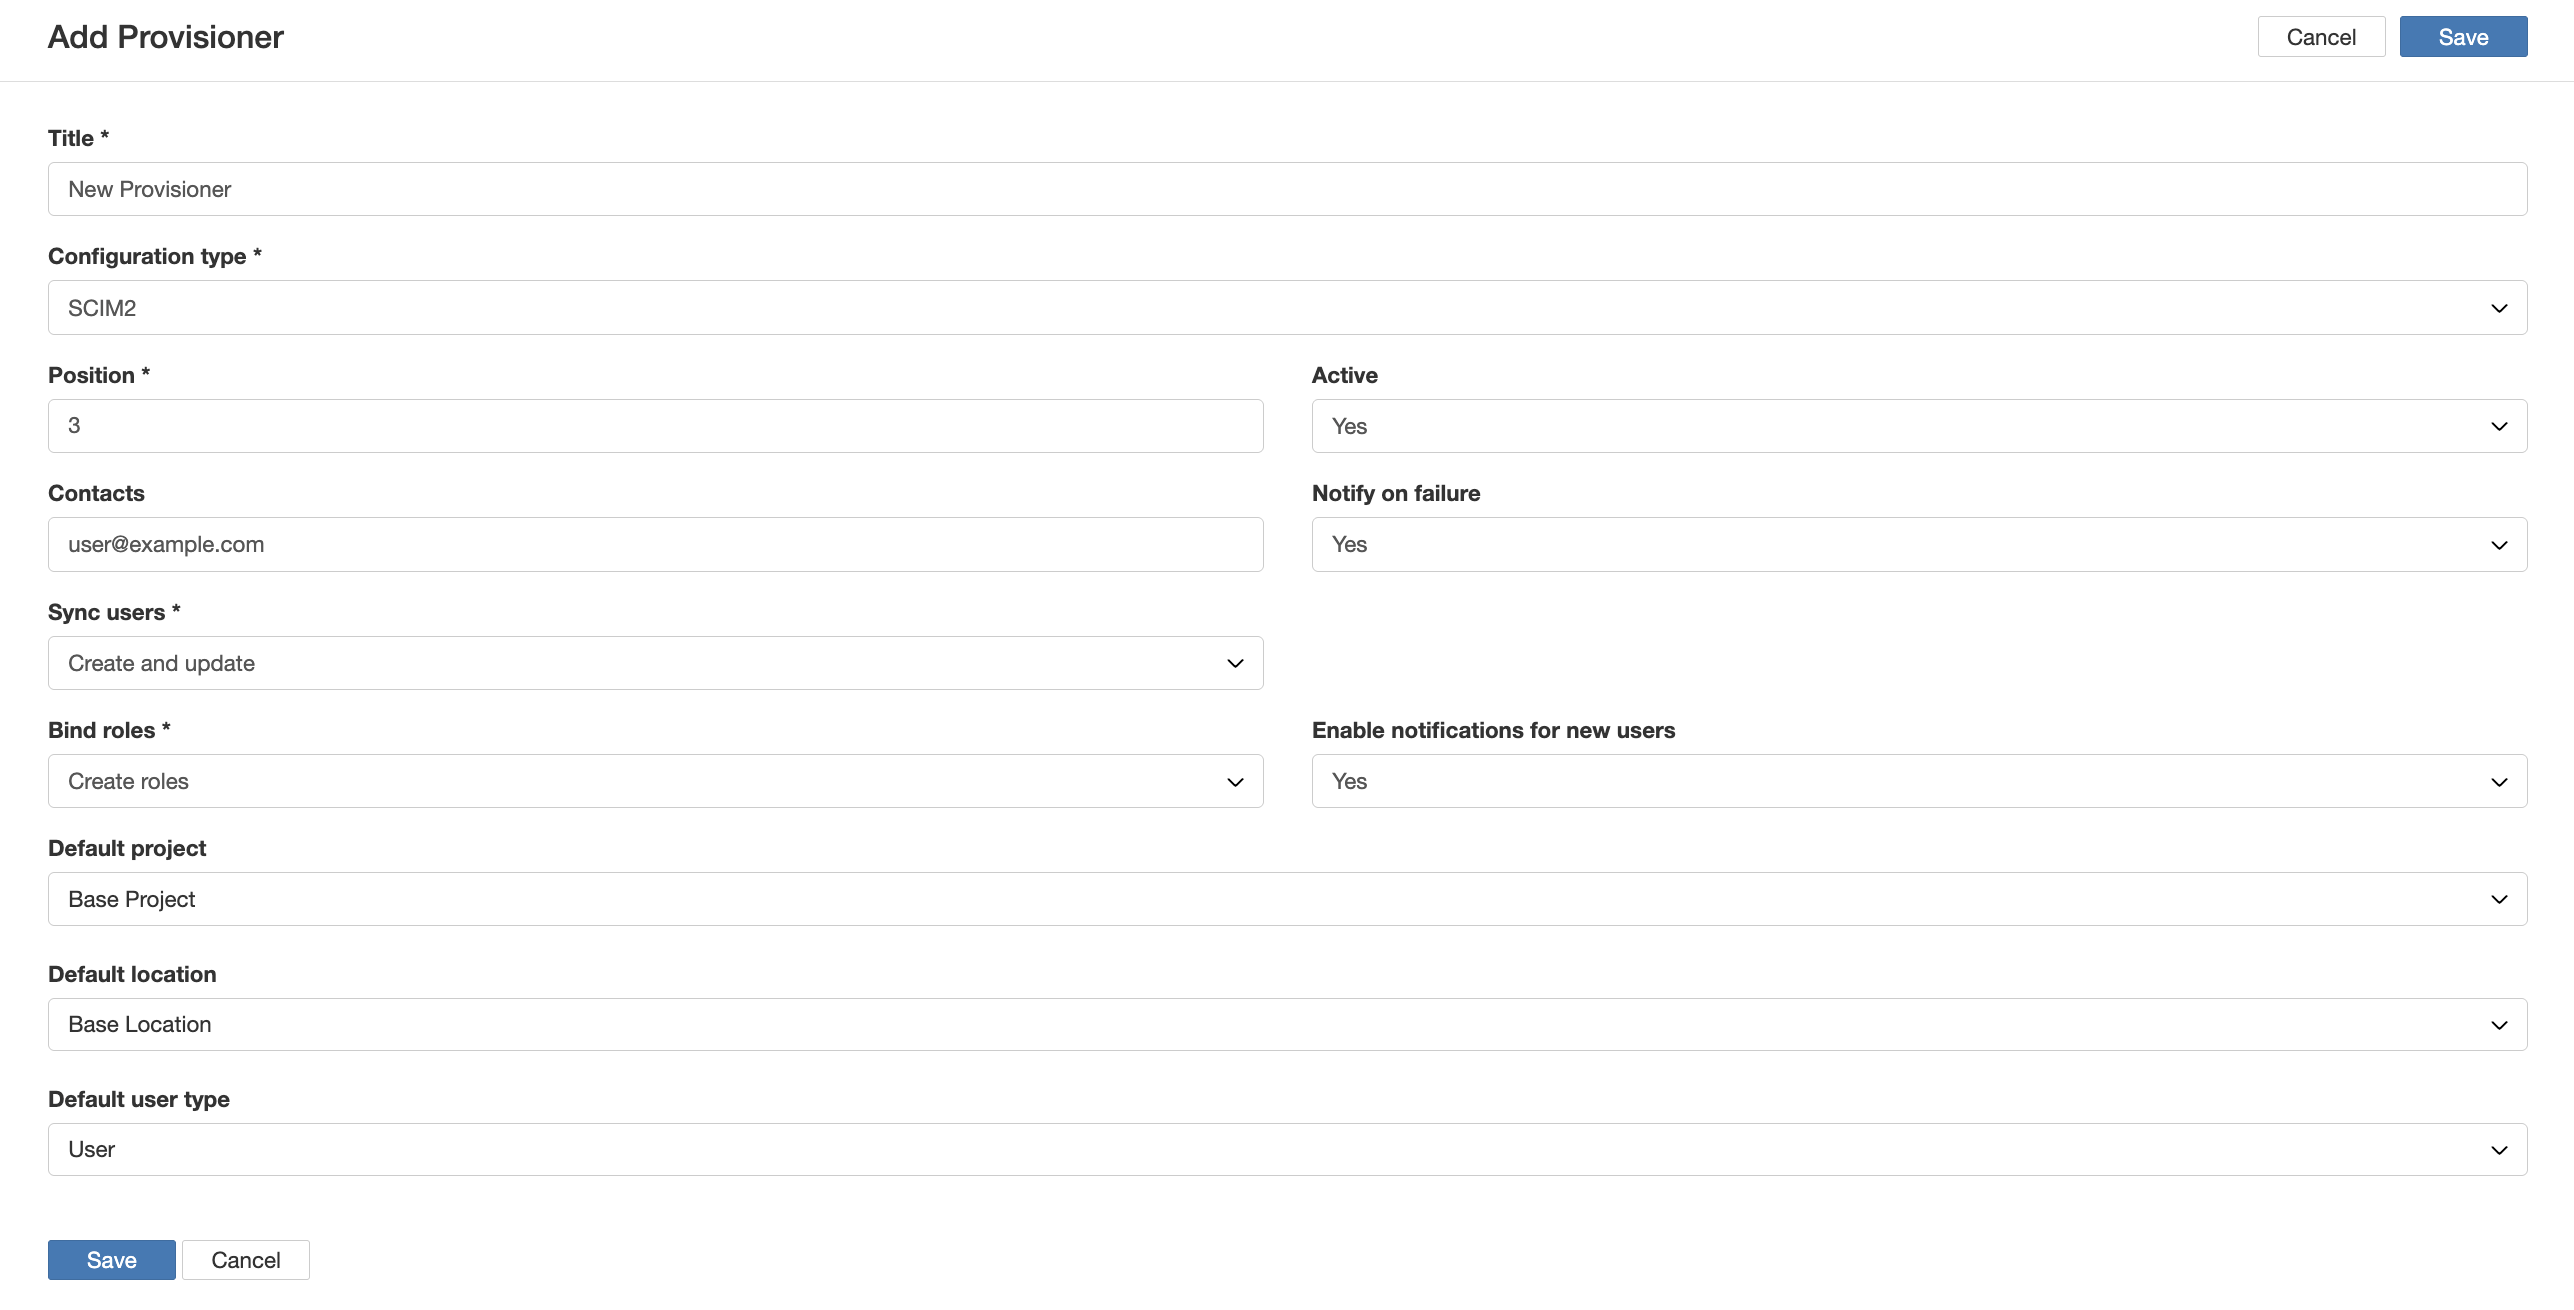
The provisioner configuration page in Clew.
The configuration fields are explained below.
- Configuration Type: set this to SCIM2.
- Position: controls only the ordering of the list on the /admin/provisioners page.
- Active: set to true to enable this provisioner.
- Contacts: a list of email addresses to be notified.
- Notify on failure: if set to Yes, a CSV of any failed users is created and sent to the list of contacts.
- Sync users:has three options.
- Do not sync: effectively turns off provisioning on the Clew side.
- Update only: only allows previously existing users to be updated through provisioning.
- Create and update: allows users to be both created and updated through provisioning.
- Bind roles:has three options.
- Do not bind roles: ignores role management completely.
- Create roles: for every new user, creates a corresponding role in Clew if no role is already bound.
- Find or create roles by position: assigns roles based on position ID, described in Mapping Roles via Position ID.
- Enable notifications on new users: set to Yes if you want provisioned users to have notifications enabled by default, or No otherwise.
- Default project / location / user type: sets the default value applied to each of these attributes on newly created users.
Configuring Attribute Mappings
Attribute mappings tell Entra ID which user attributes to send and tell Clew where to store them. The exact mappings depend on your Entra ID setup and your Clew configuration, so treat the examples below as a starting point.
In Entra ID:
- Go to Manage, then Attribute mapping, then open the Provision Microsoft Entra ID Users link.
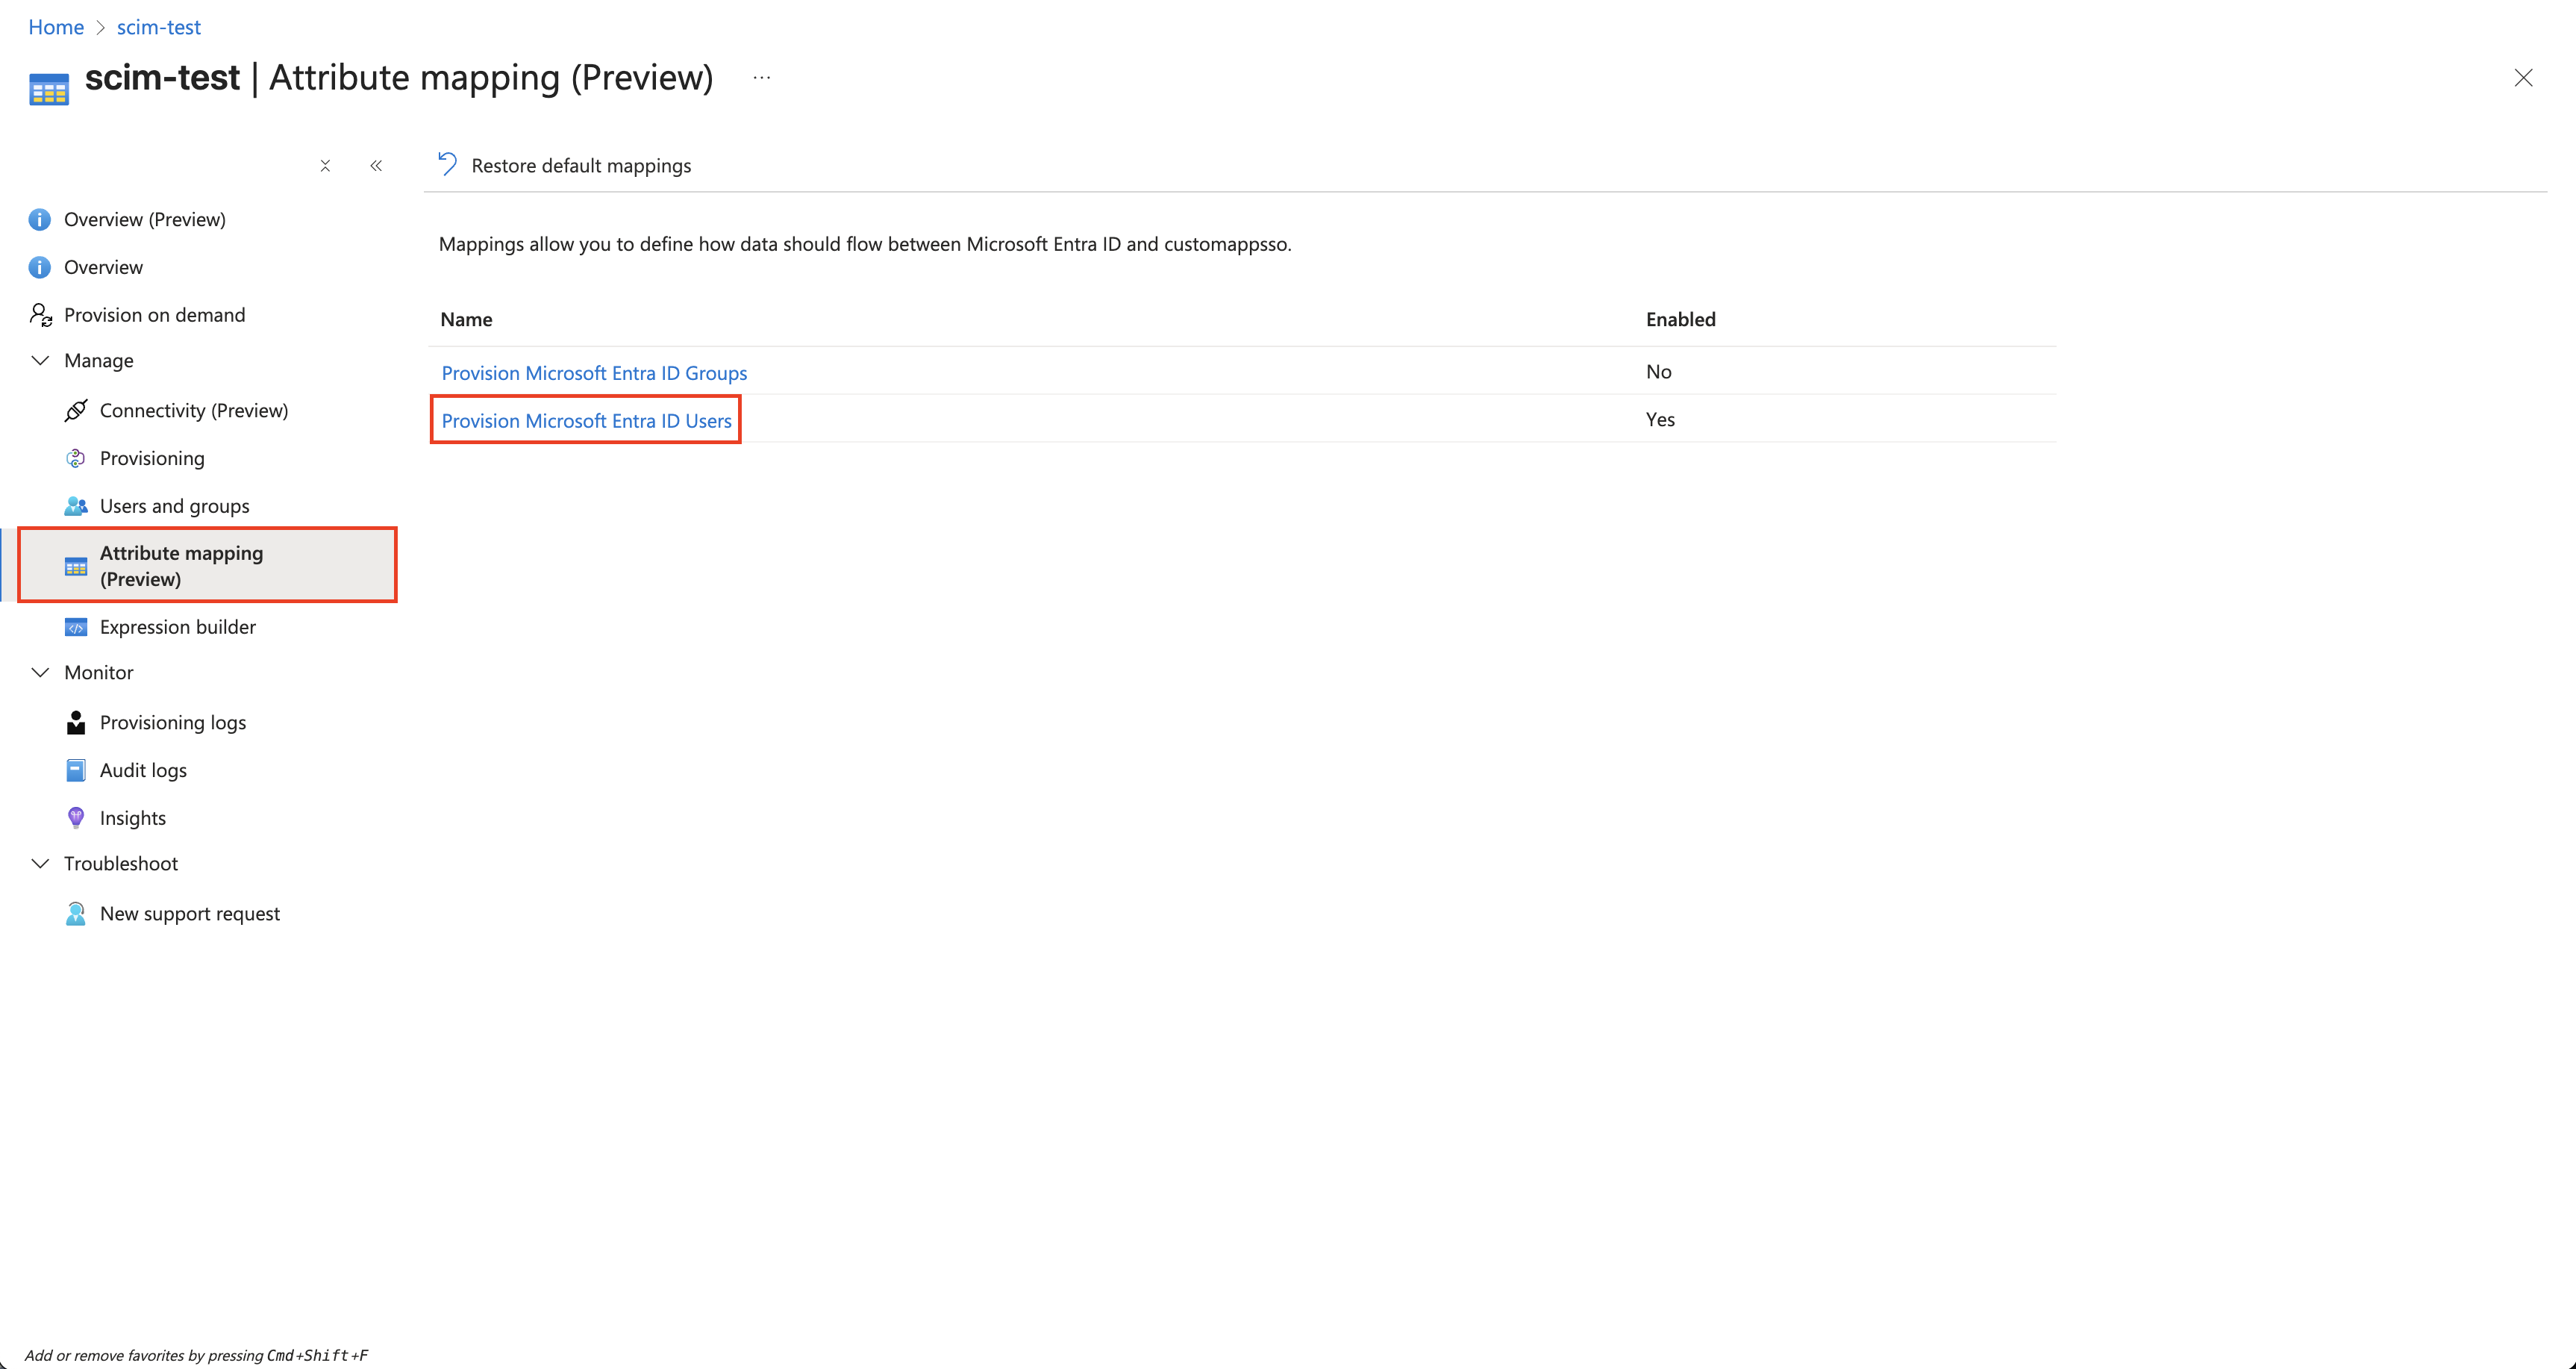
Opening the Provision Microsoft Entra ID Users mapping.
- Disable Provision Microsoft Entra ID Groups. Group provisioning is not used with Clew.
- Delete any attributes you do not need to provision, and add any that you do. Roles and positions are a special case, covered in Mapping Roles via Position ID.
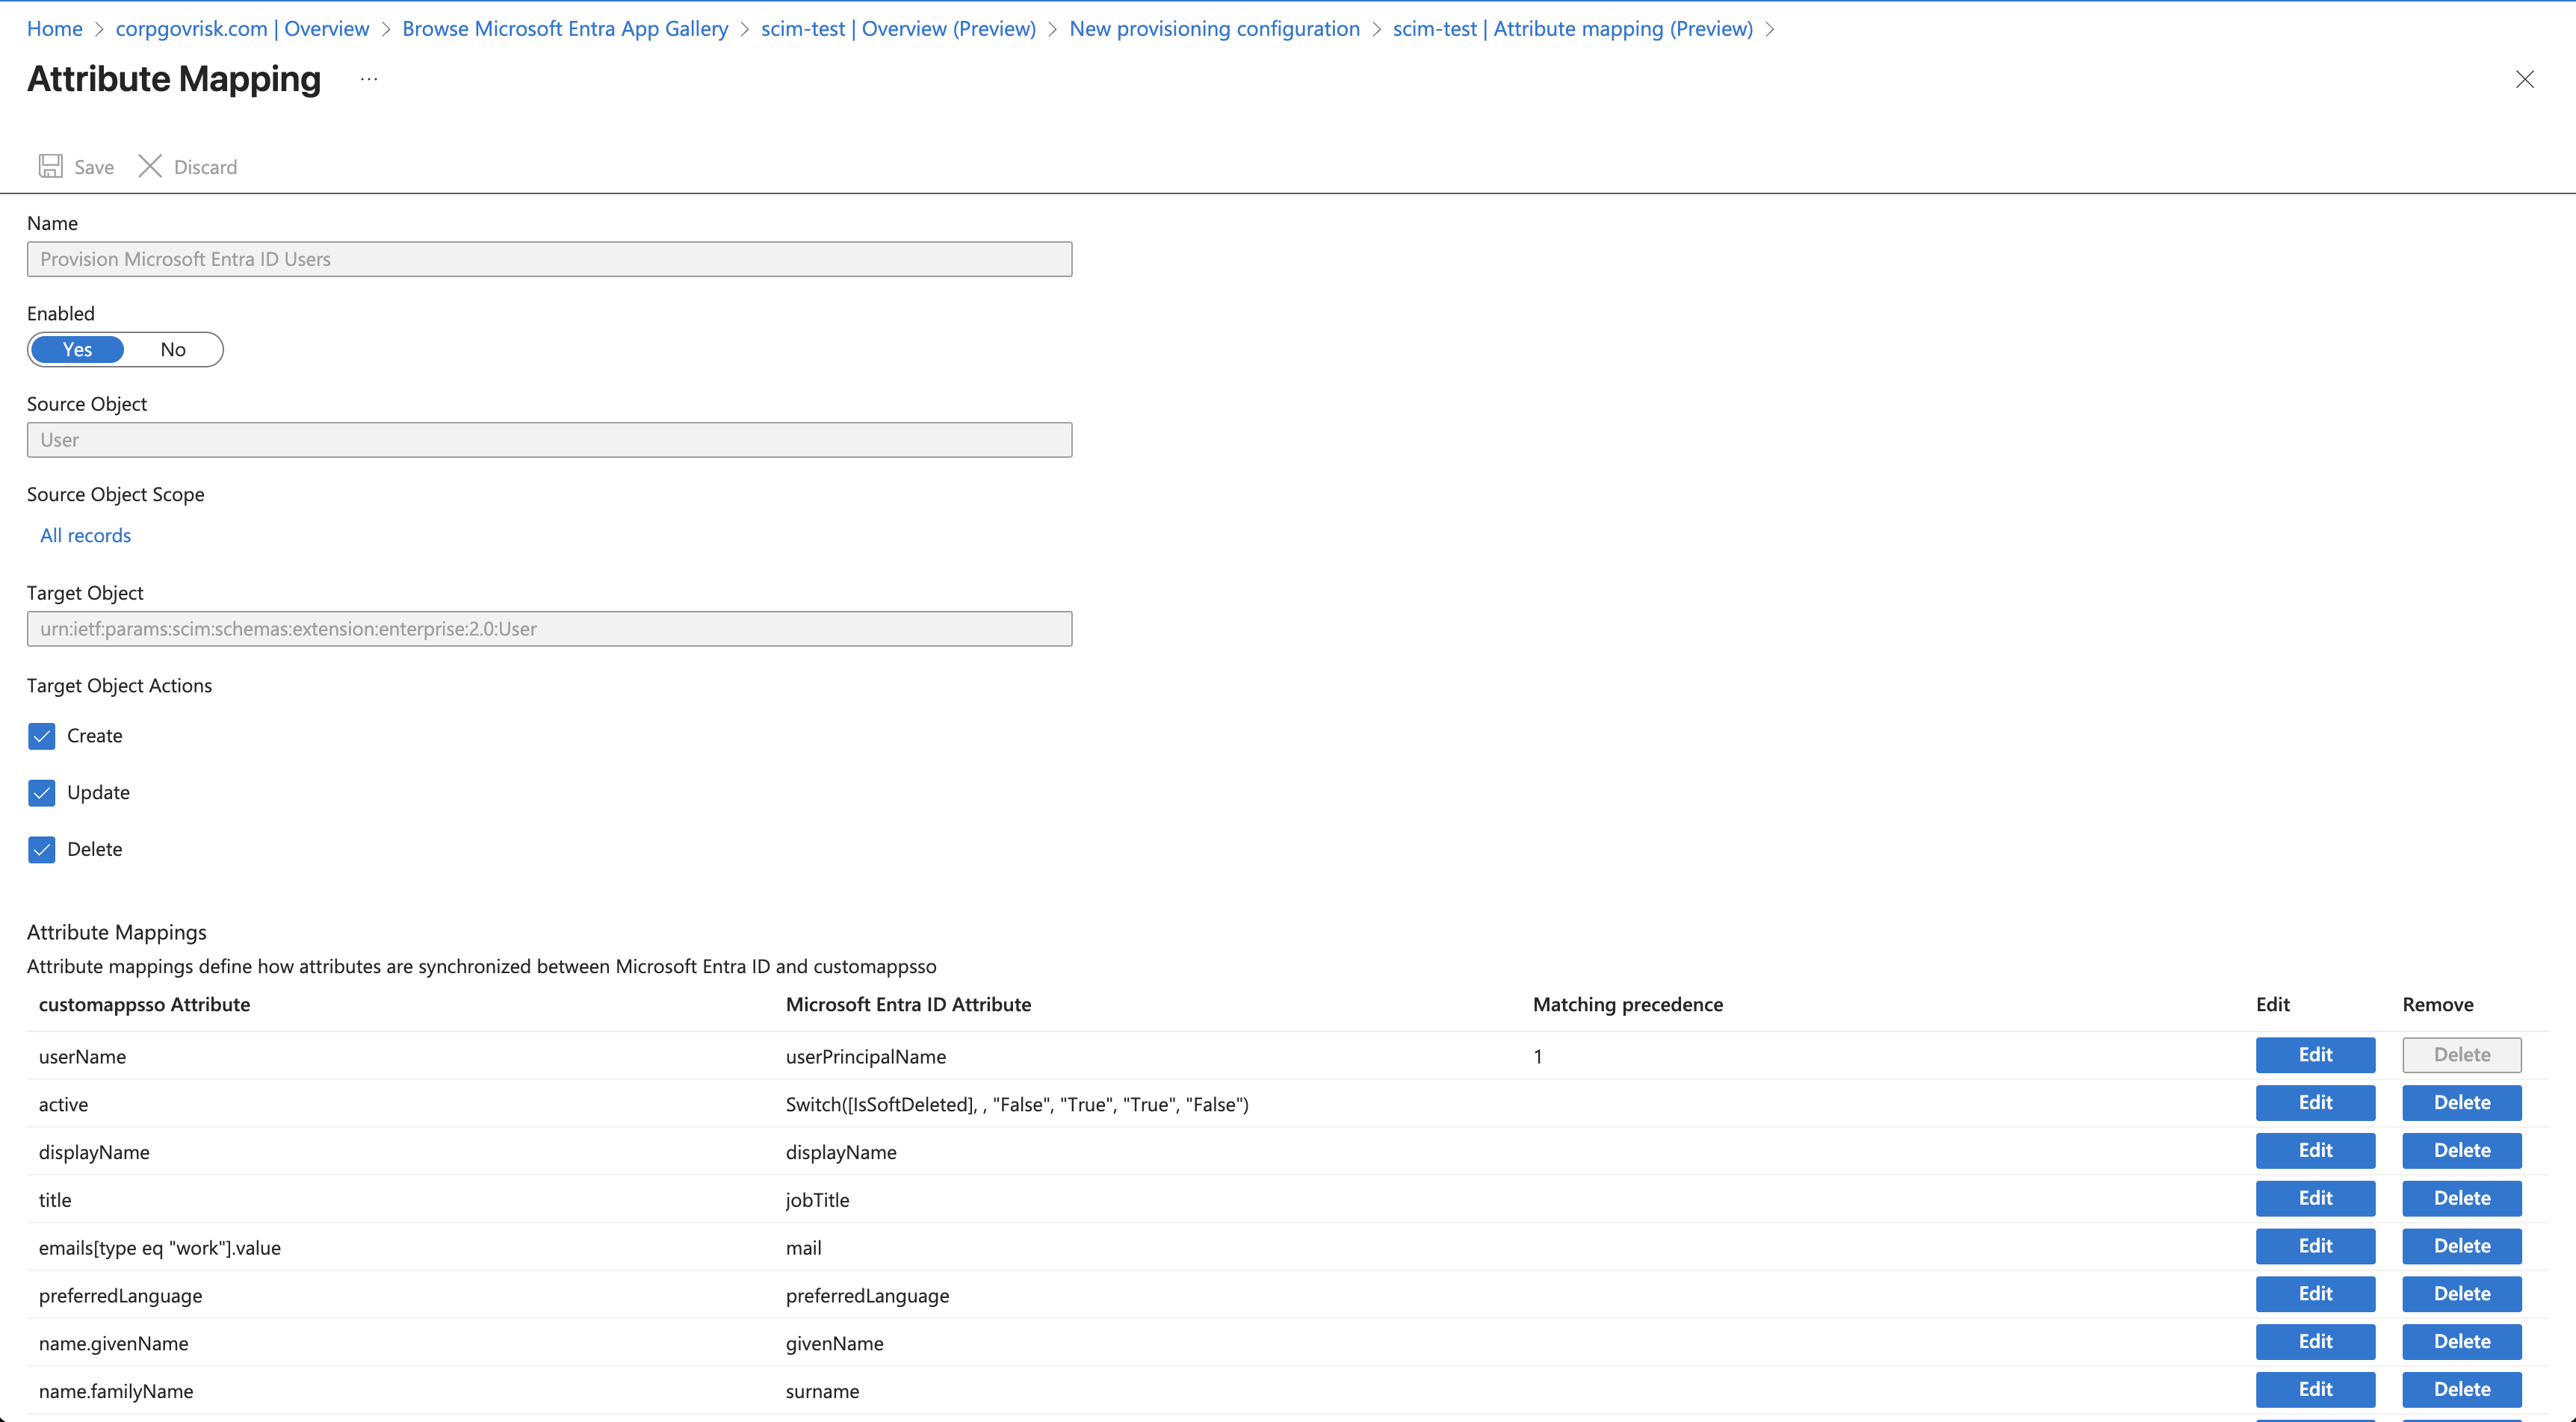
Editing the list of user attributes to provision in Entra ID.
In Clew:
Map the incoming attributes to the correct Clew fields. As above, the right mapping depends on your specific configuration. The example below shows one possible set of attribute mappings.
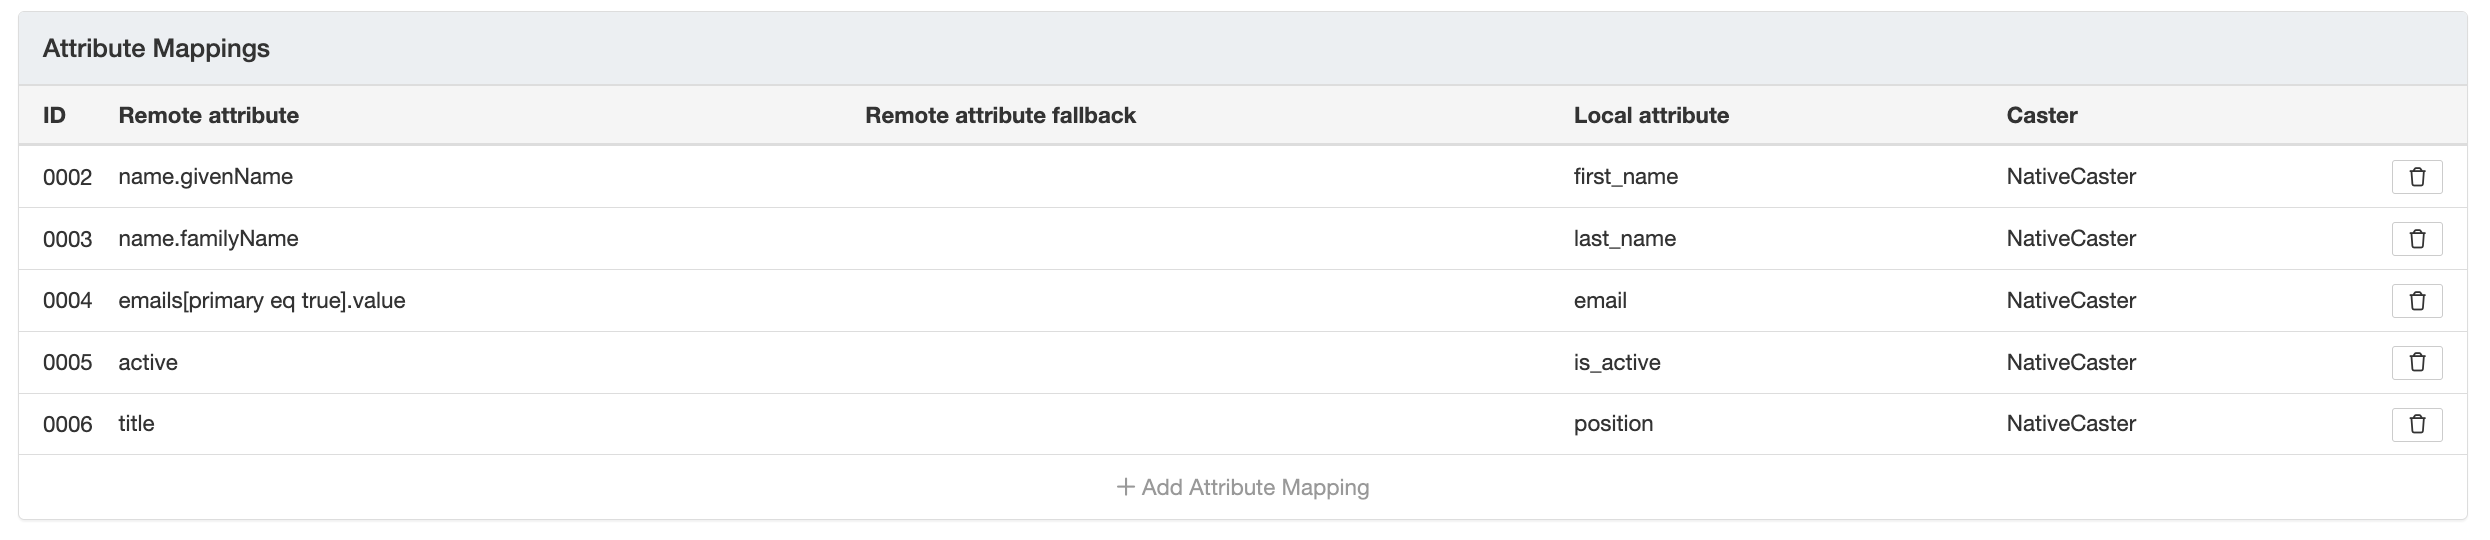
Example attribute mappings configured in Clew.
Setting Your Sync Strategy and Scoping Users
Scoping lets you control exactly which users sync to Clew, so you can start small and expand once you are confident the configuration is correct.
- Go to Manage, then Provisioning, then Settings.
- Use the Scope option to limit provisioning to selected users only.
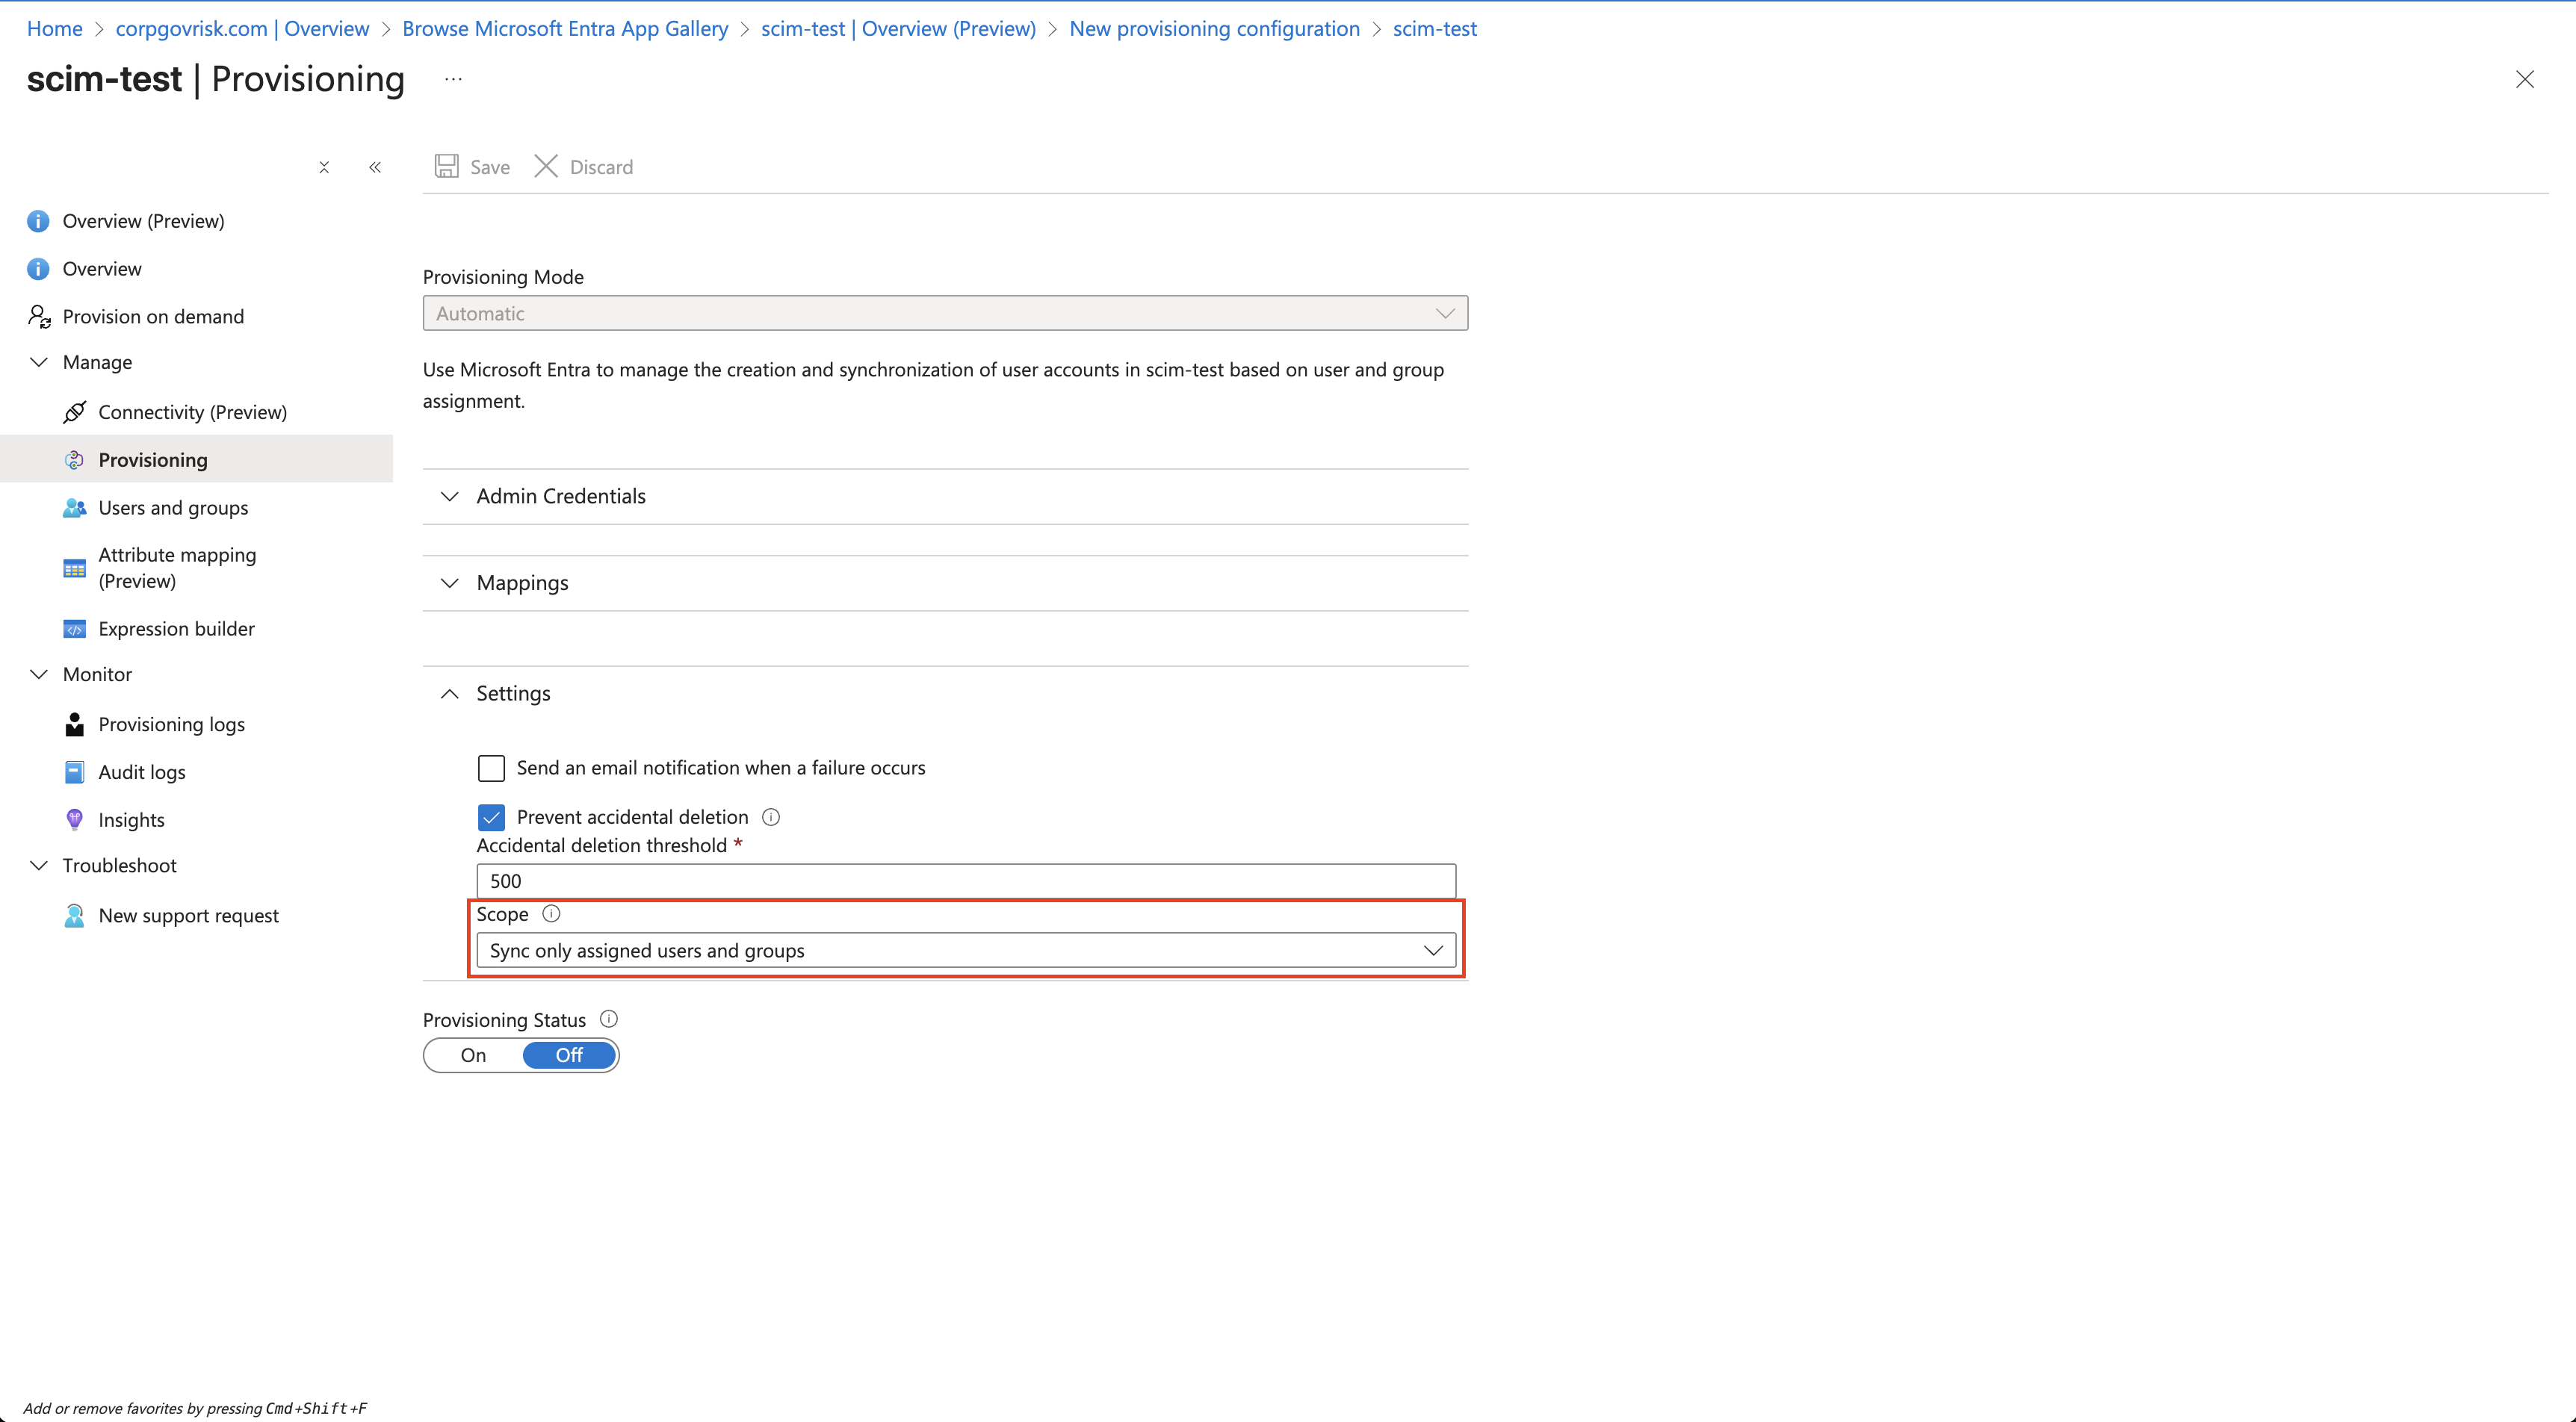
Setting the provisioning scope to selected users.
- Go to Manage, then Users and groups, and add the users you want to provision.
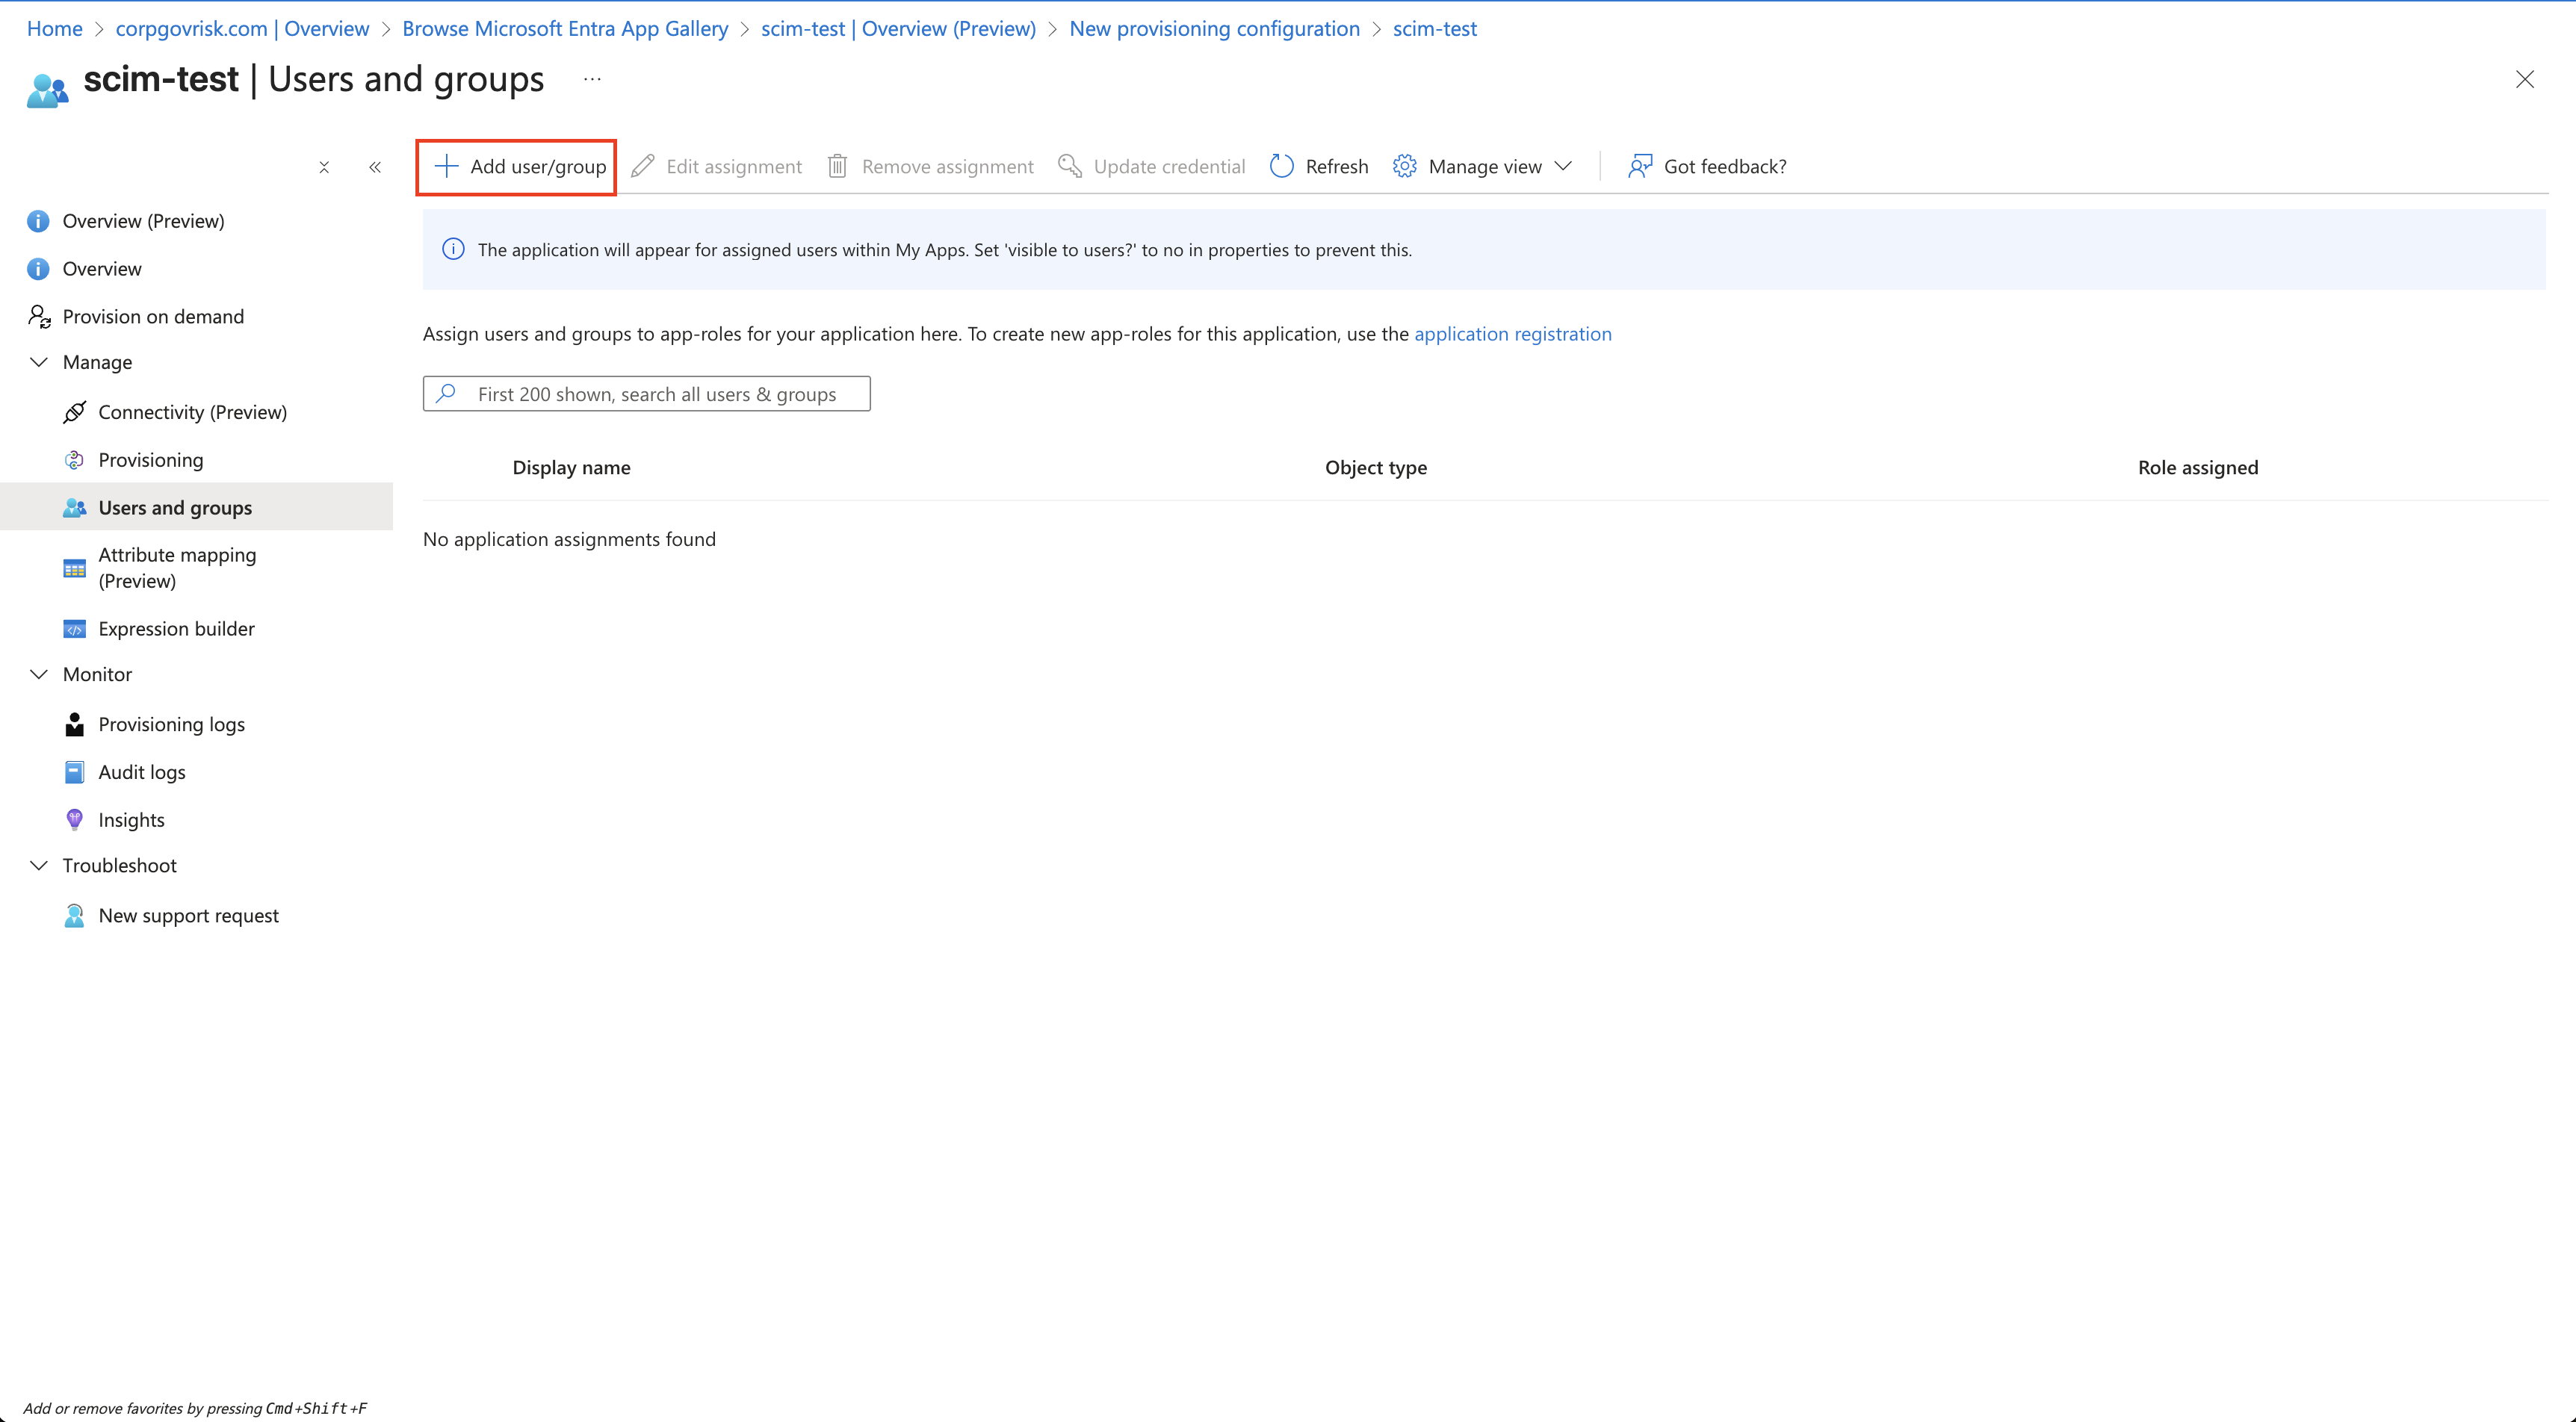
Assigning selected users to the application.
- Click the Start provisioning button at the top of the page to begin.
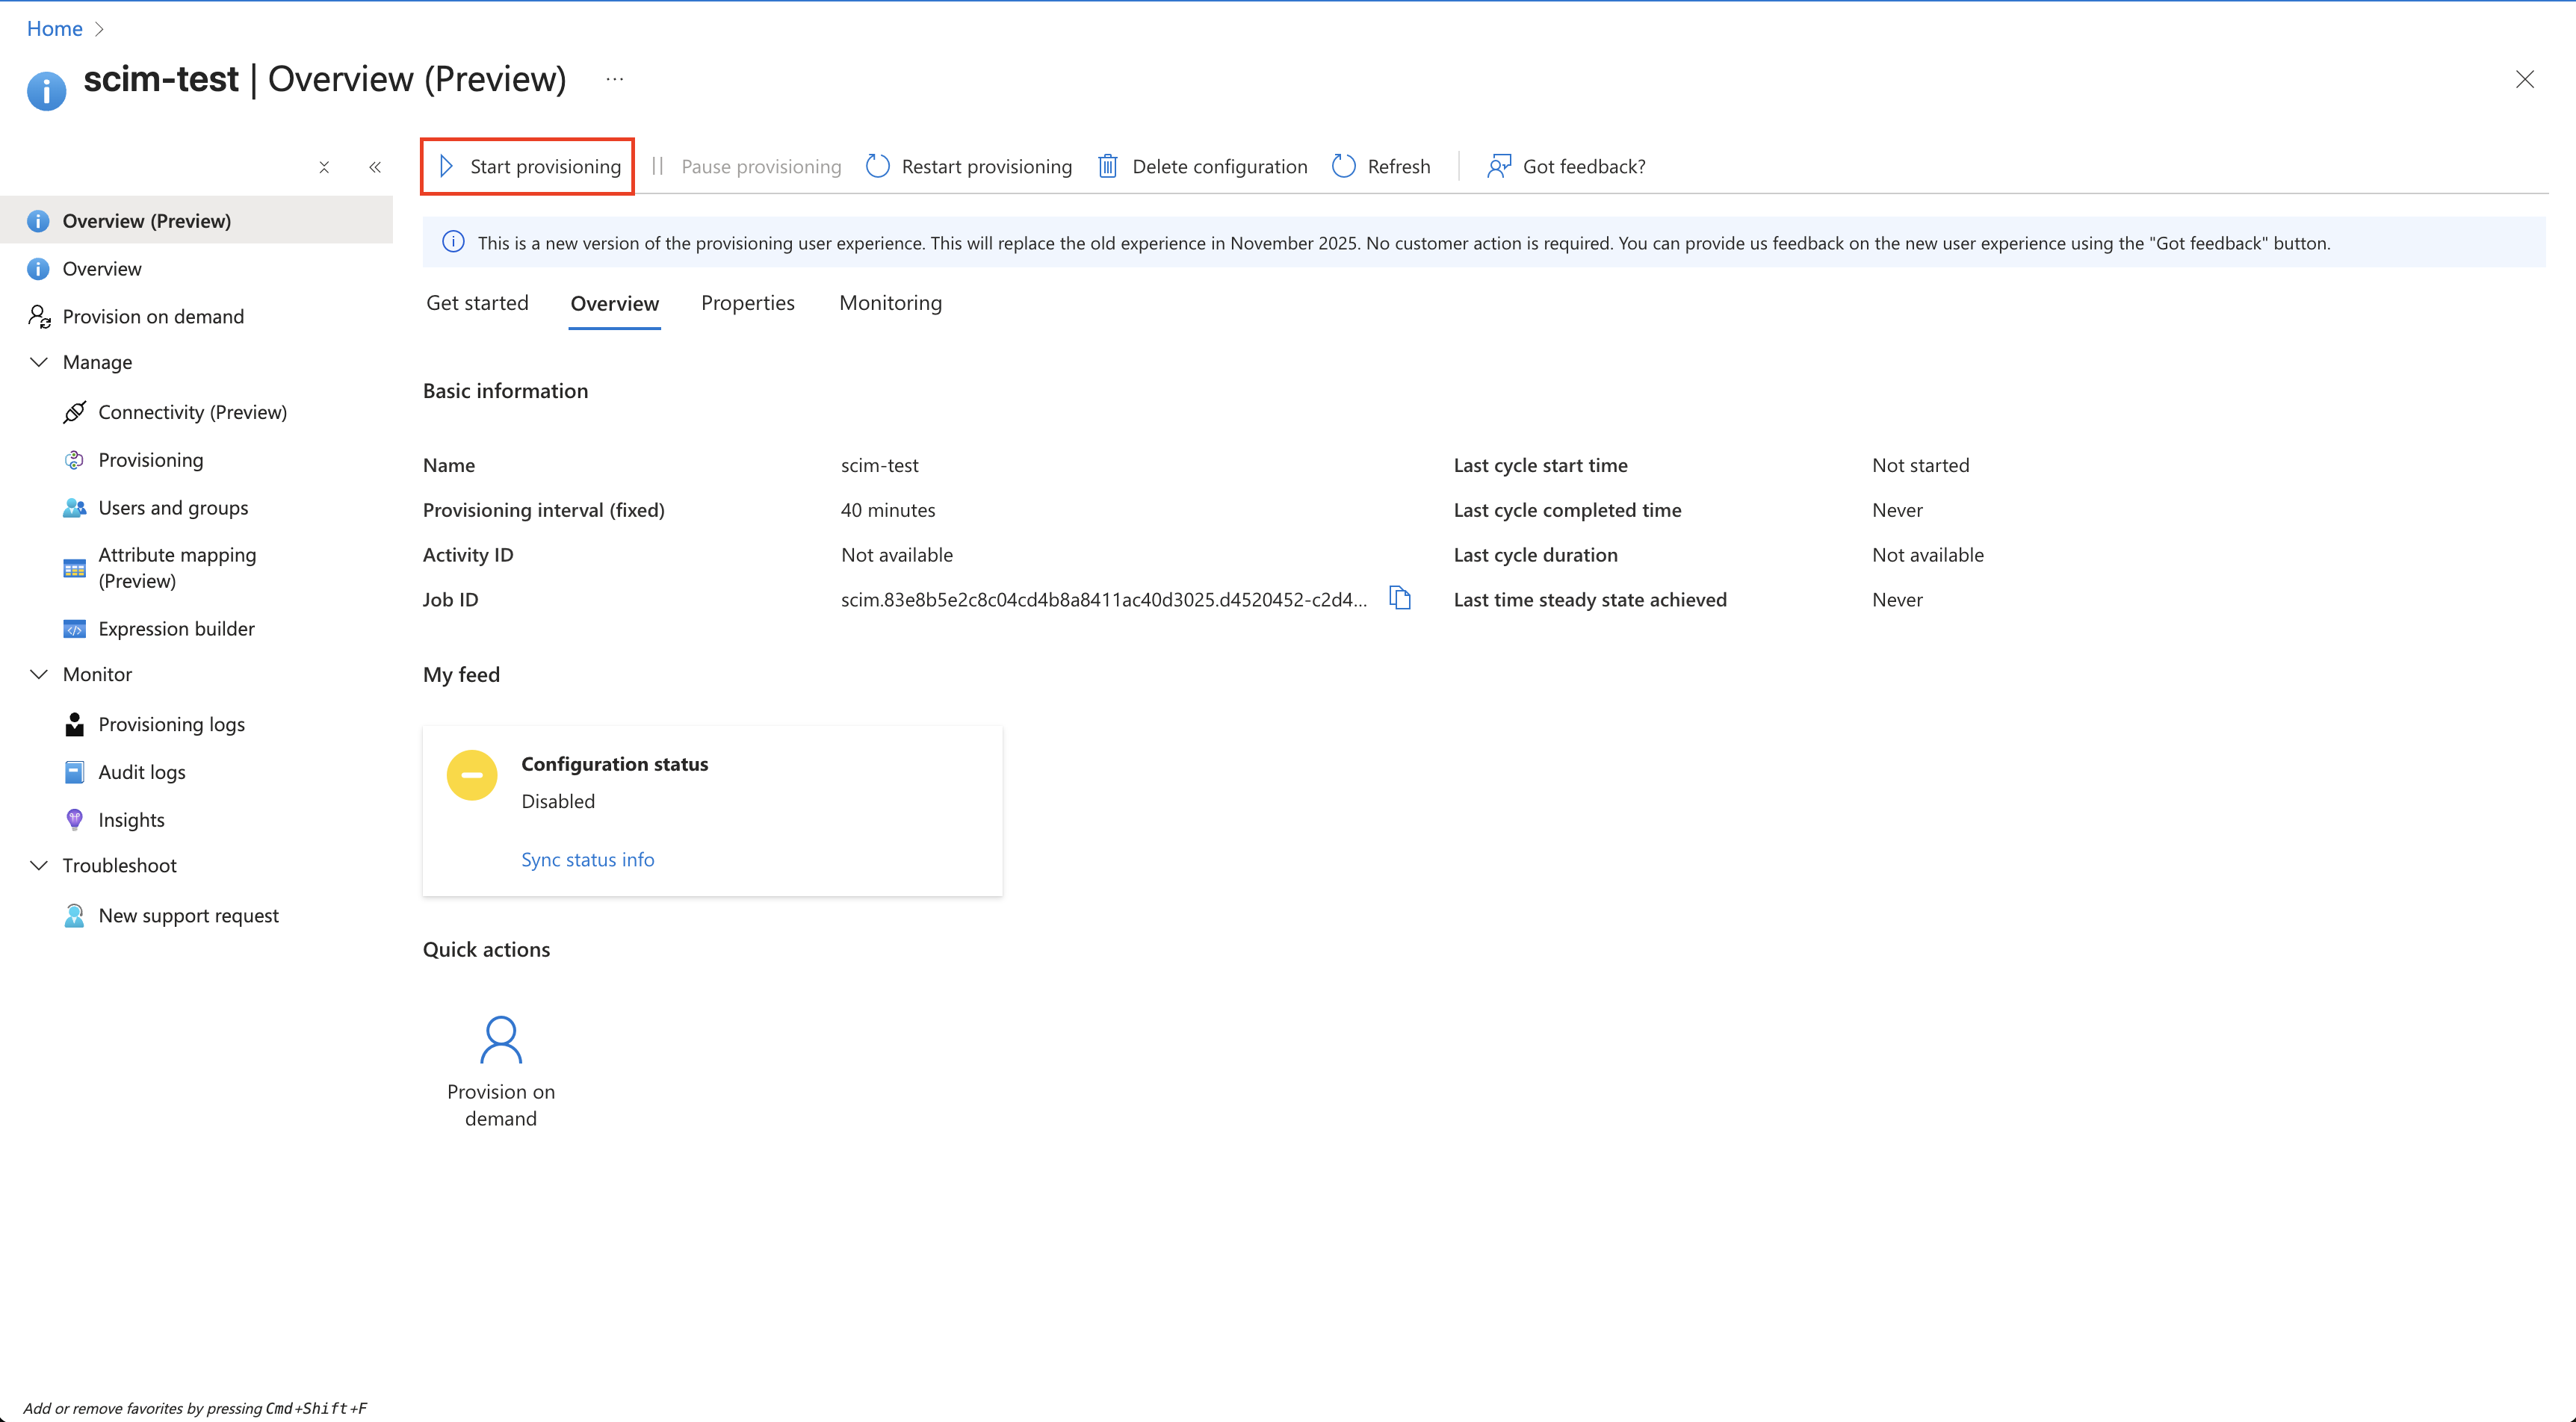
Starting provisioning once users are scoped.
Mapping Roles via Position ID
Clew can assign users to roles automatically based on a position identifier from your identity provider. This keeps role-based access control up to date without manual work, and moves users automatically when their position changes.
How it works. When a user's position ID is synchronised via SCIM:
- if a role exists with a matching external ID, the user is assigned to that role;
- if no matching role exists, a new role is automatically created;
- the role's title is set from the user's job title;
- when a user's position changes, they are automatically moved to the new role.
In Entra ID:
- Go to Attribute mapping (Preview), then Provision Microsoft Entra ID Users.
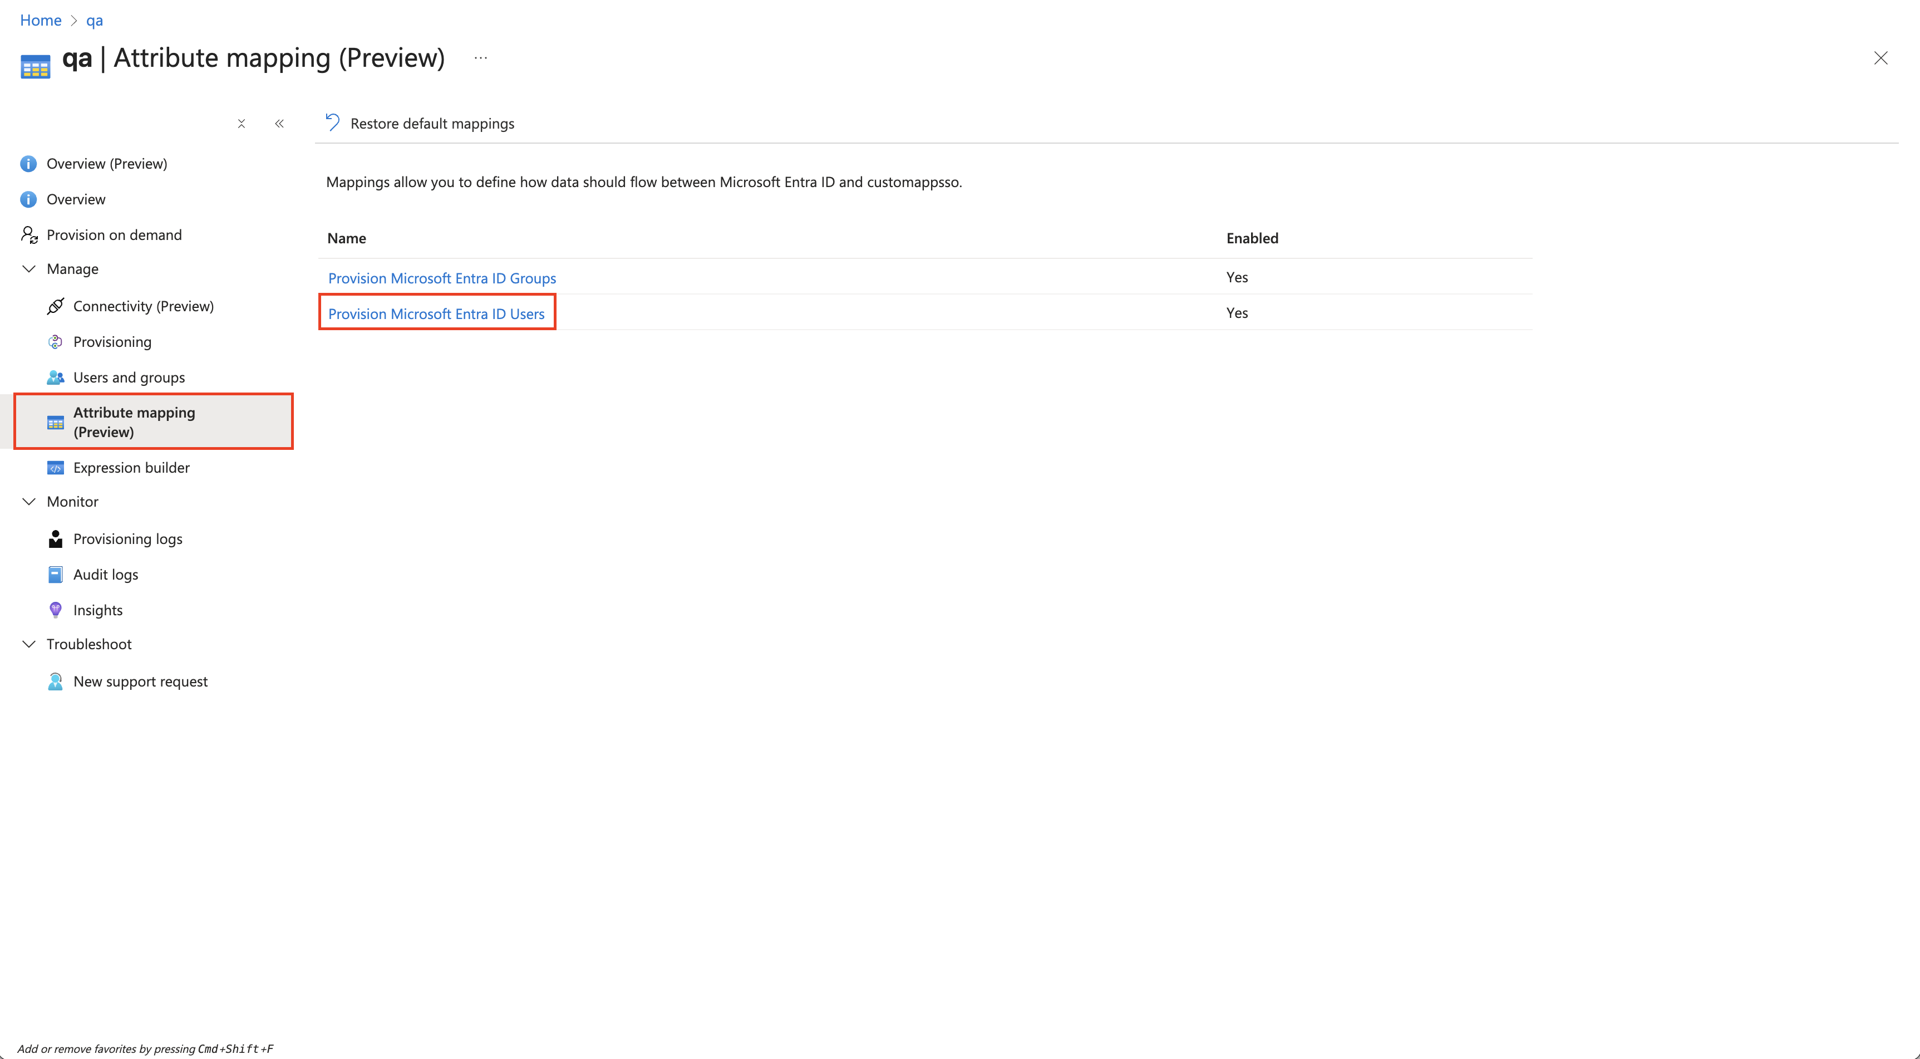
Opening the user provisioning mapping in preview mode.
- Click Show advanced options, then Edit attribute list for customappsso.
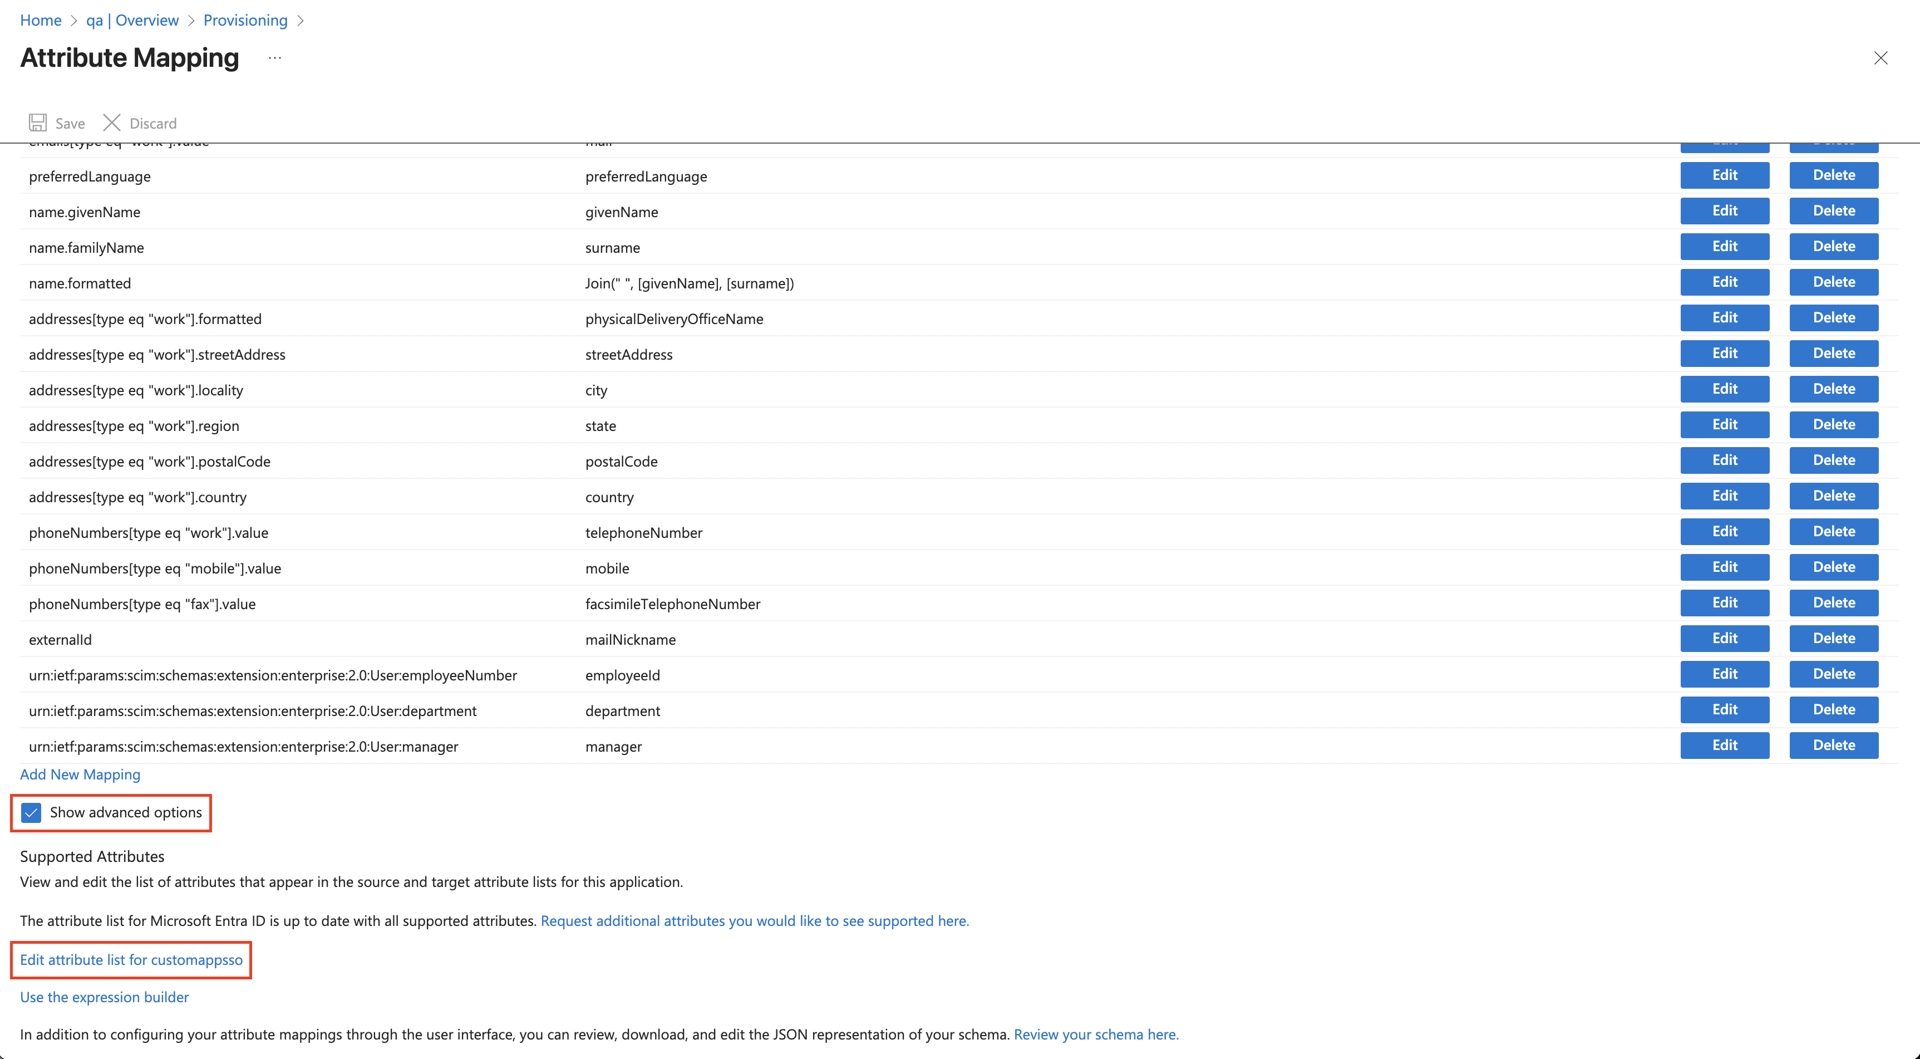
Opening the advanced attribute list editor.
- Add an attribute to the list with the name urn:cgr:params:scim:schemas:extension:custom:2.0:User:positionId and type String, then click Save.
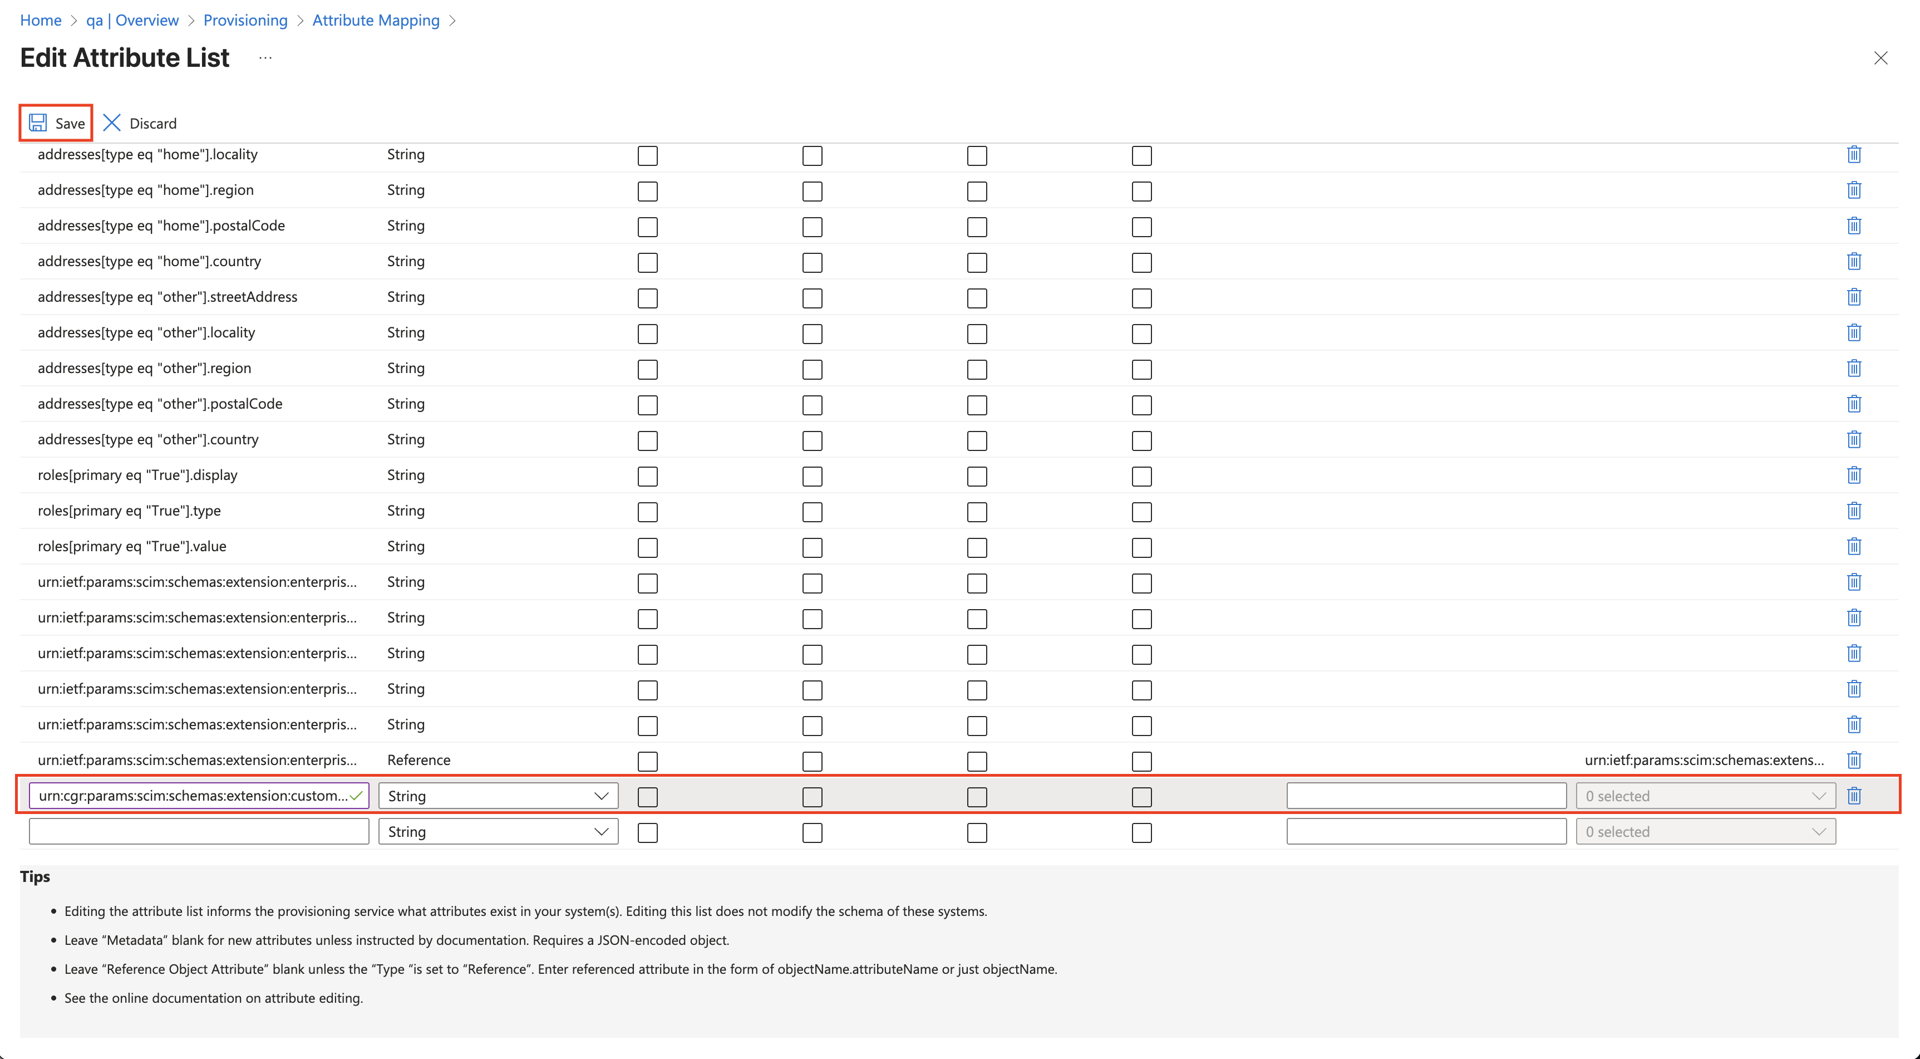
Adding the positionId attribute to the attribute list.
- On the Attribute Mapping page, click Add New Mapping.
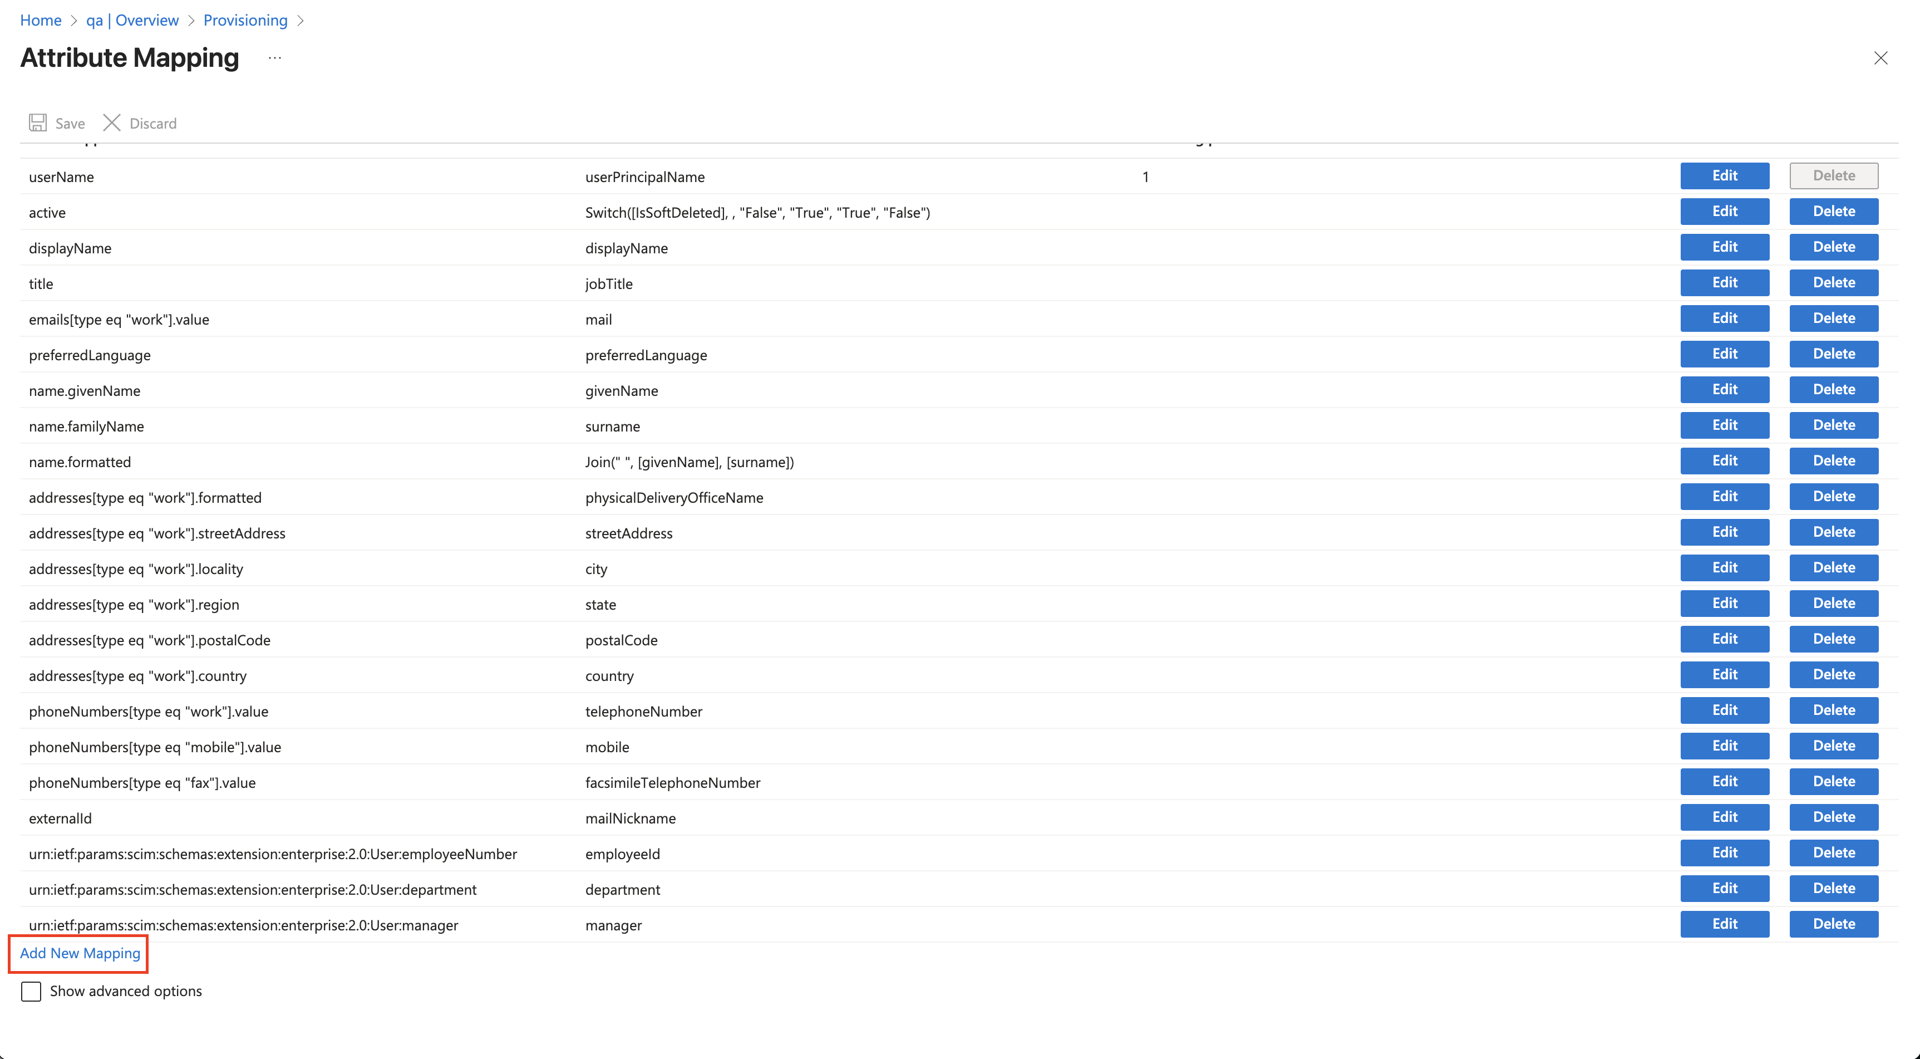
Adding a new attribute mapping.
- Choose the attribute you want to map to urn:cgr:params:scim:schemas:extension:custom:2.0:User:positionId, for example extensionAttribute5.
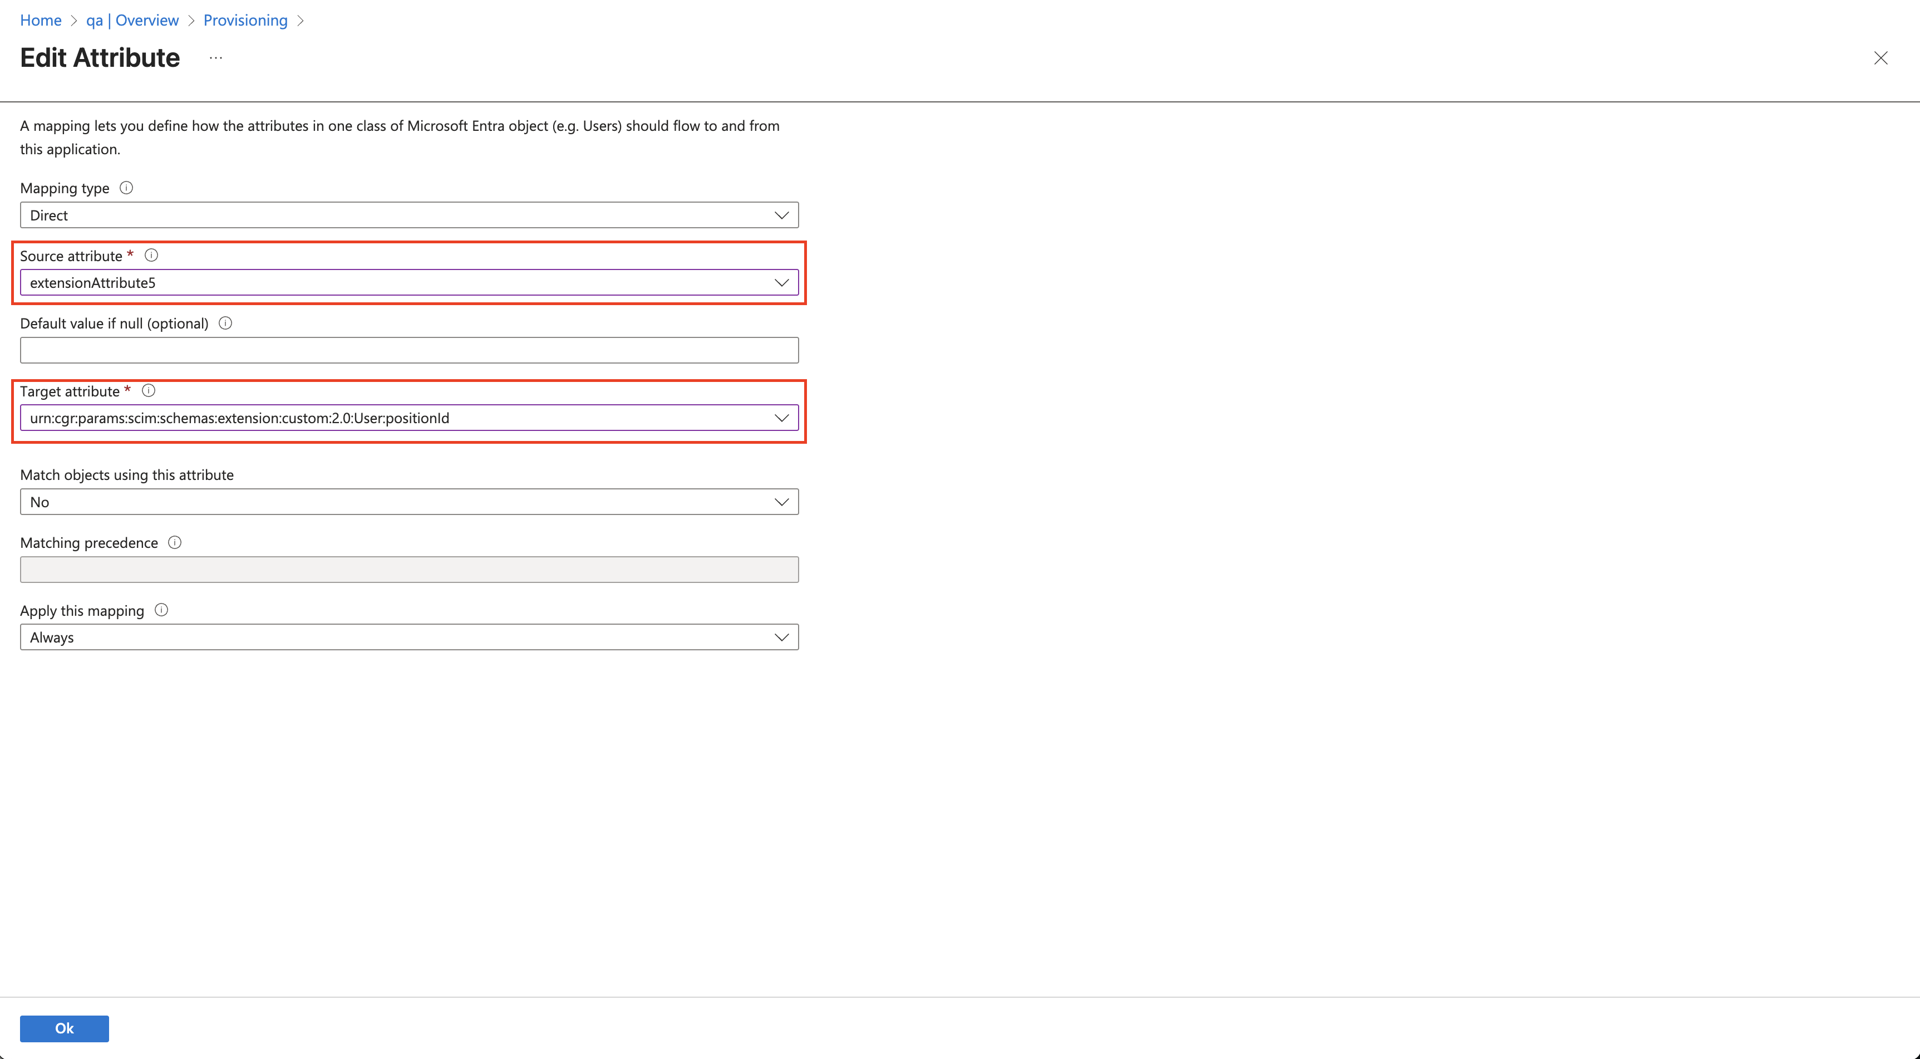
Mapping a source attribute to positionId.
- Once the attribute has been mapped, save your changes.
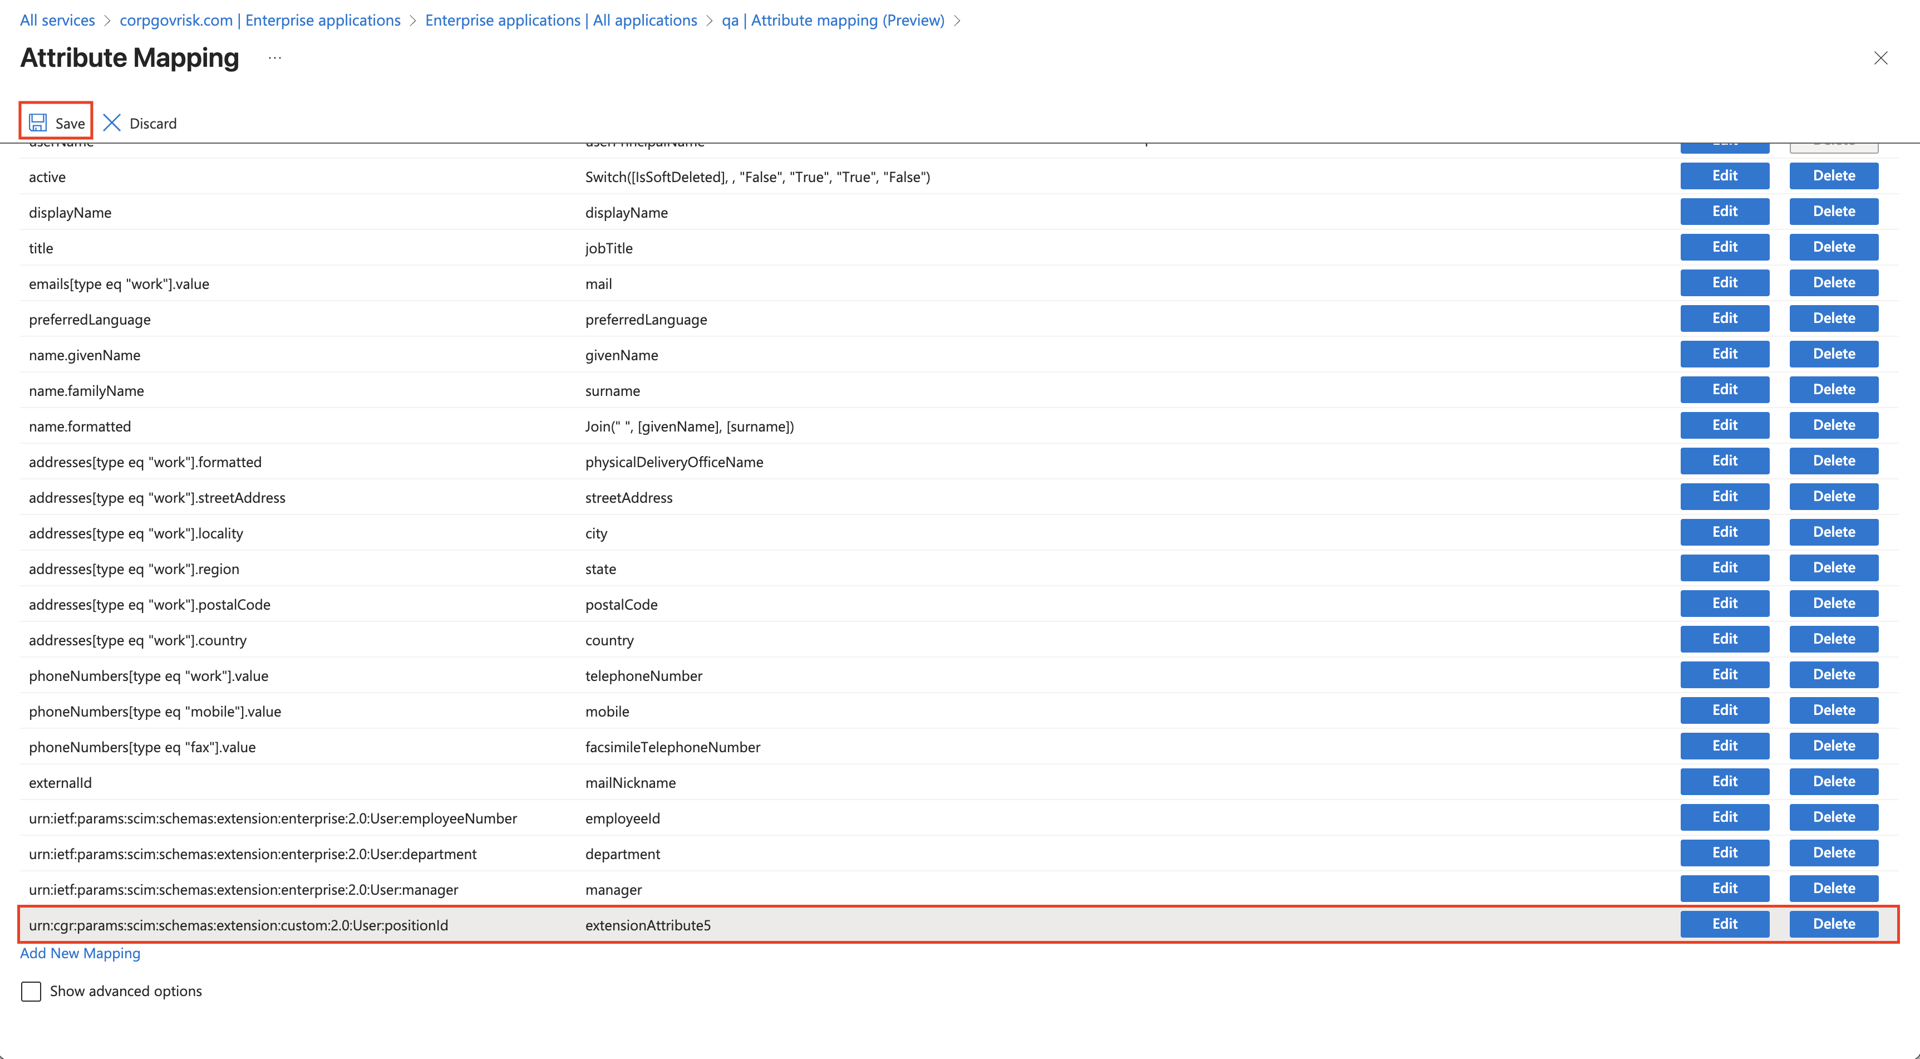
Saving the completed mapping.
- You may need to manually Restart provisioning or use Provision on demand to push the newly mapped attribute to Clew.
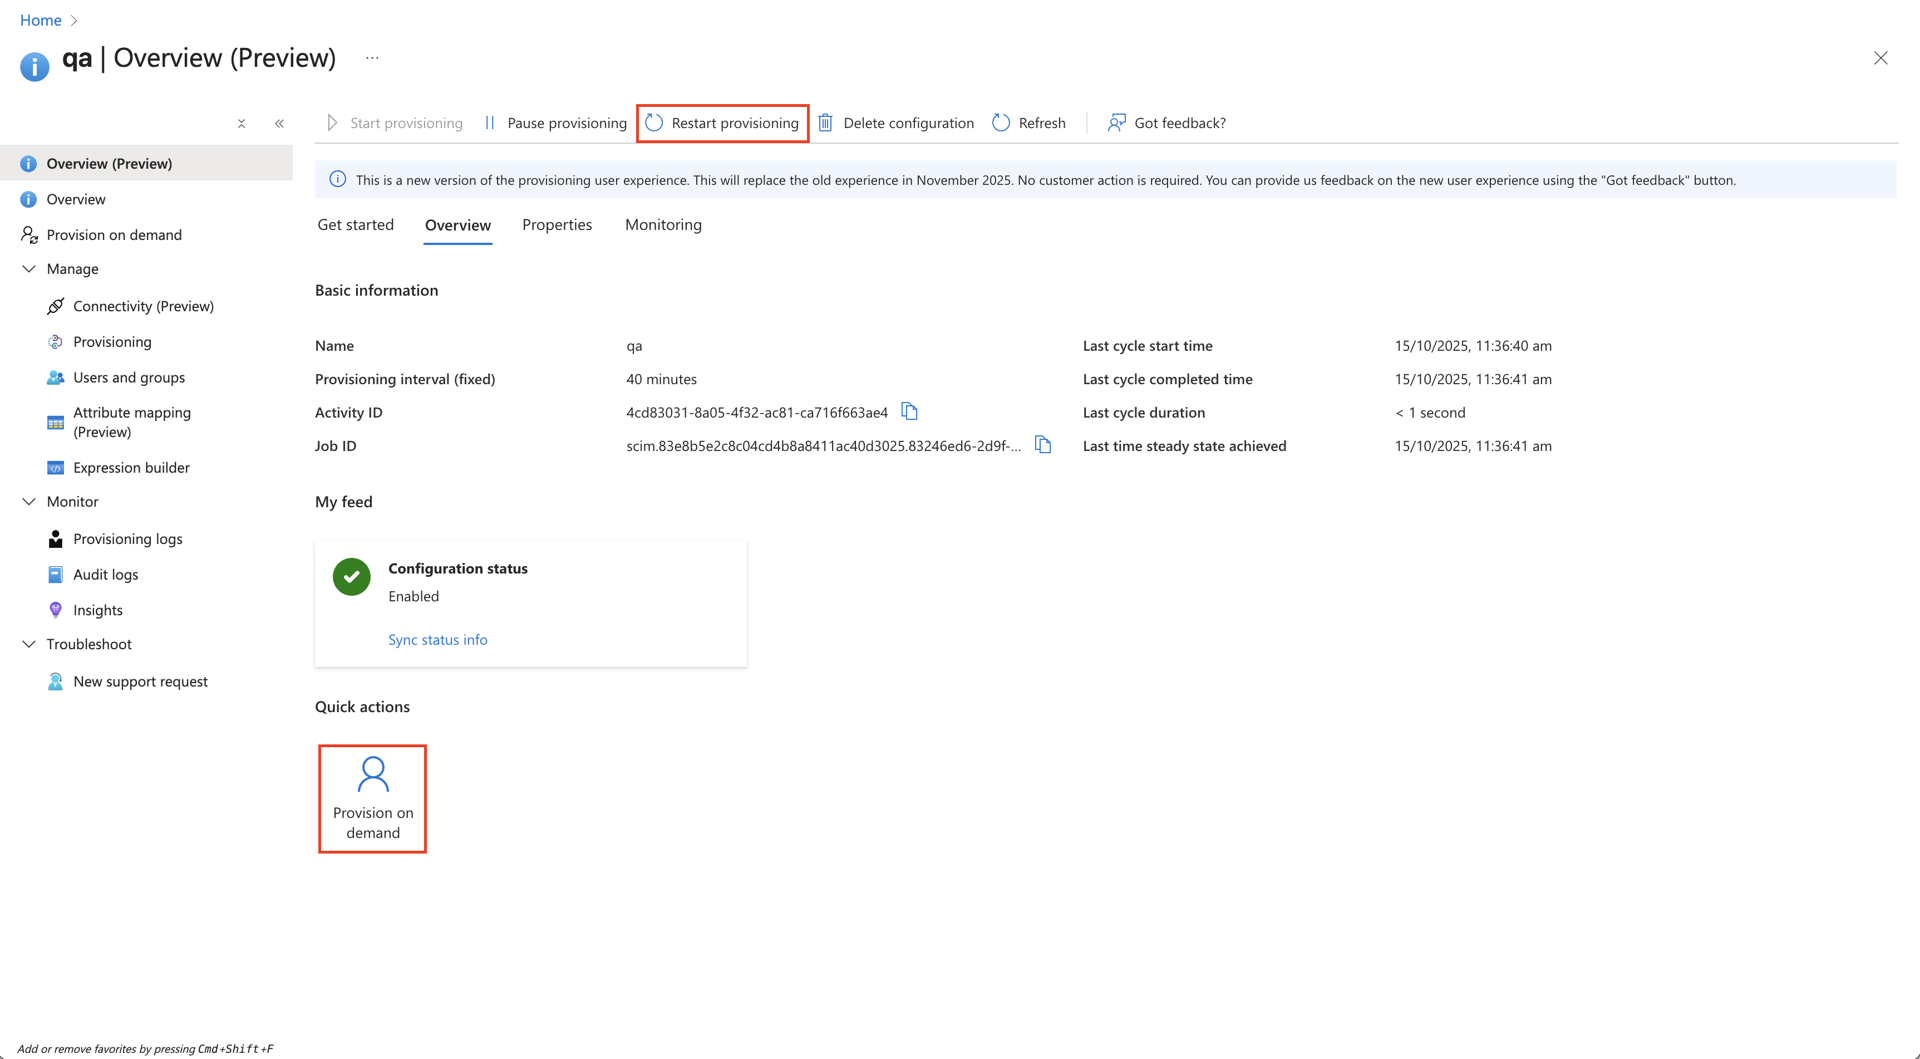
Restarting provisioning to apply the new mapping.
In Clew:
To accept roles through the position ID, set the Bind roles field on the provisioner to Find or create roles by position. No further configuration is required in Clew.
Viewing Provisioning Logs
You can review provisioning logs on both sides to help diagnose issues.
In Entra ID: go to Overview, then Monitoring, then View Provisioning Logs.
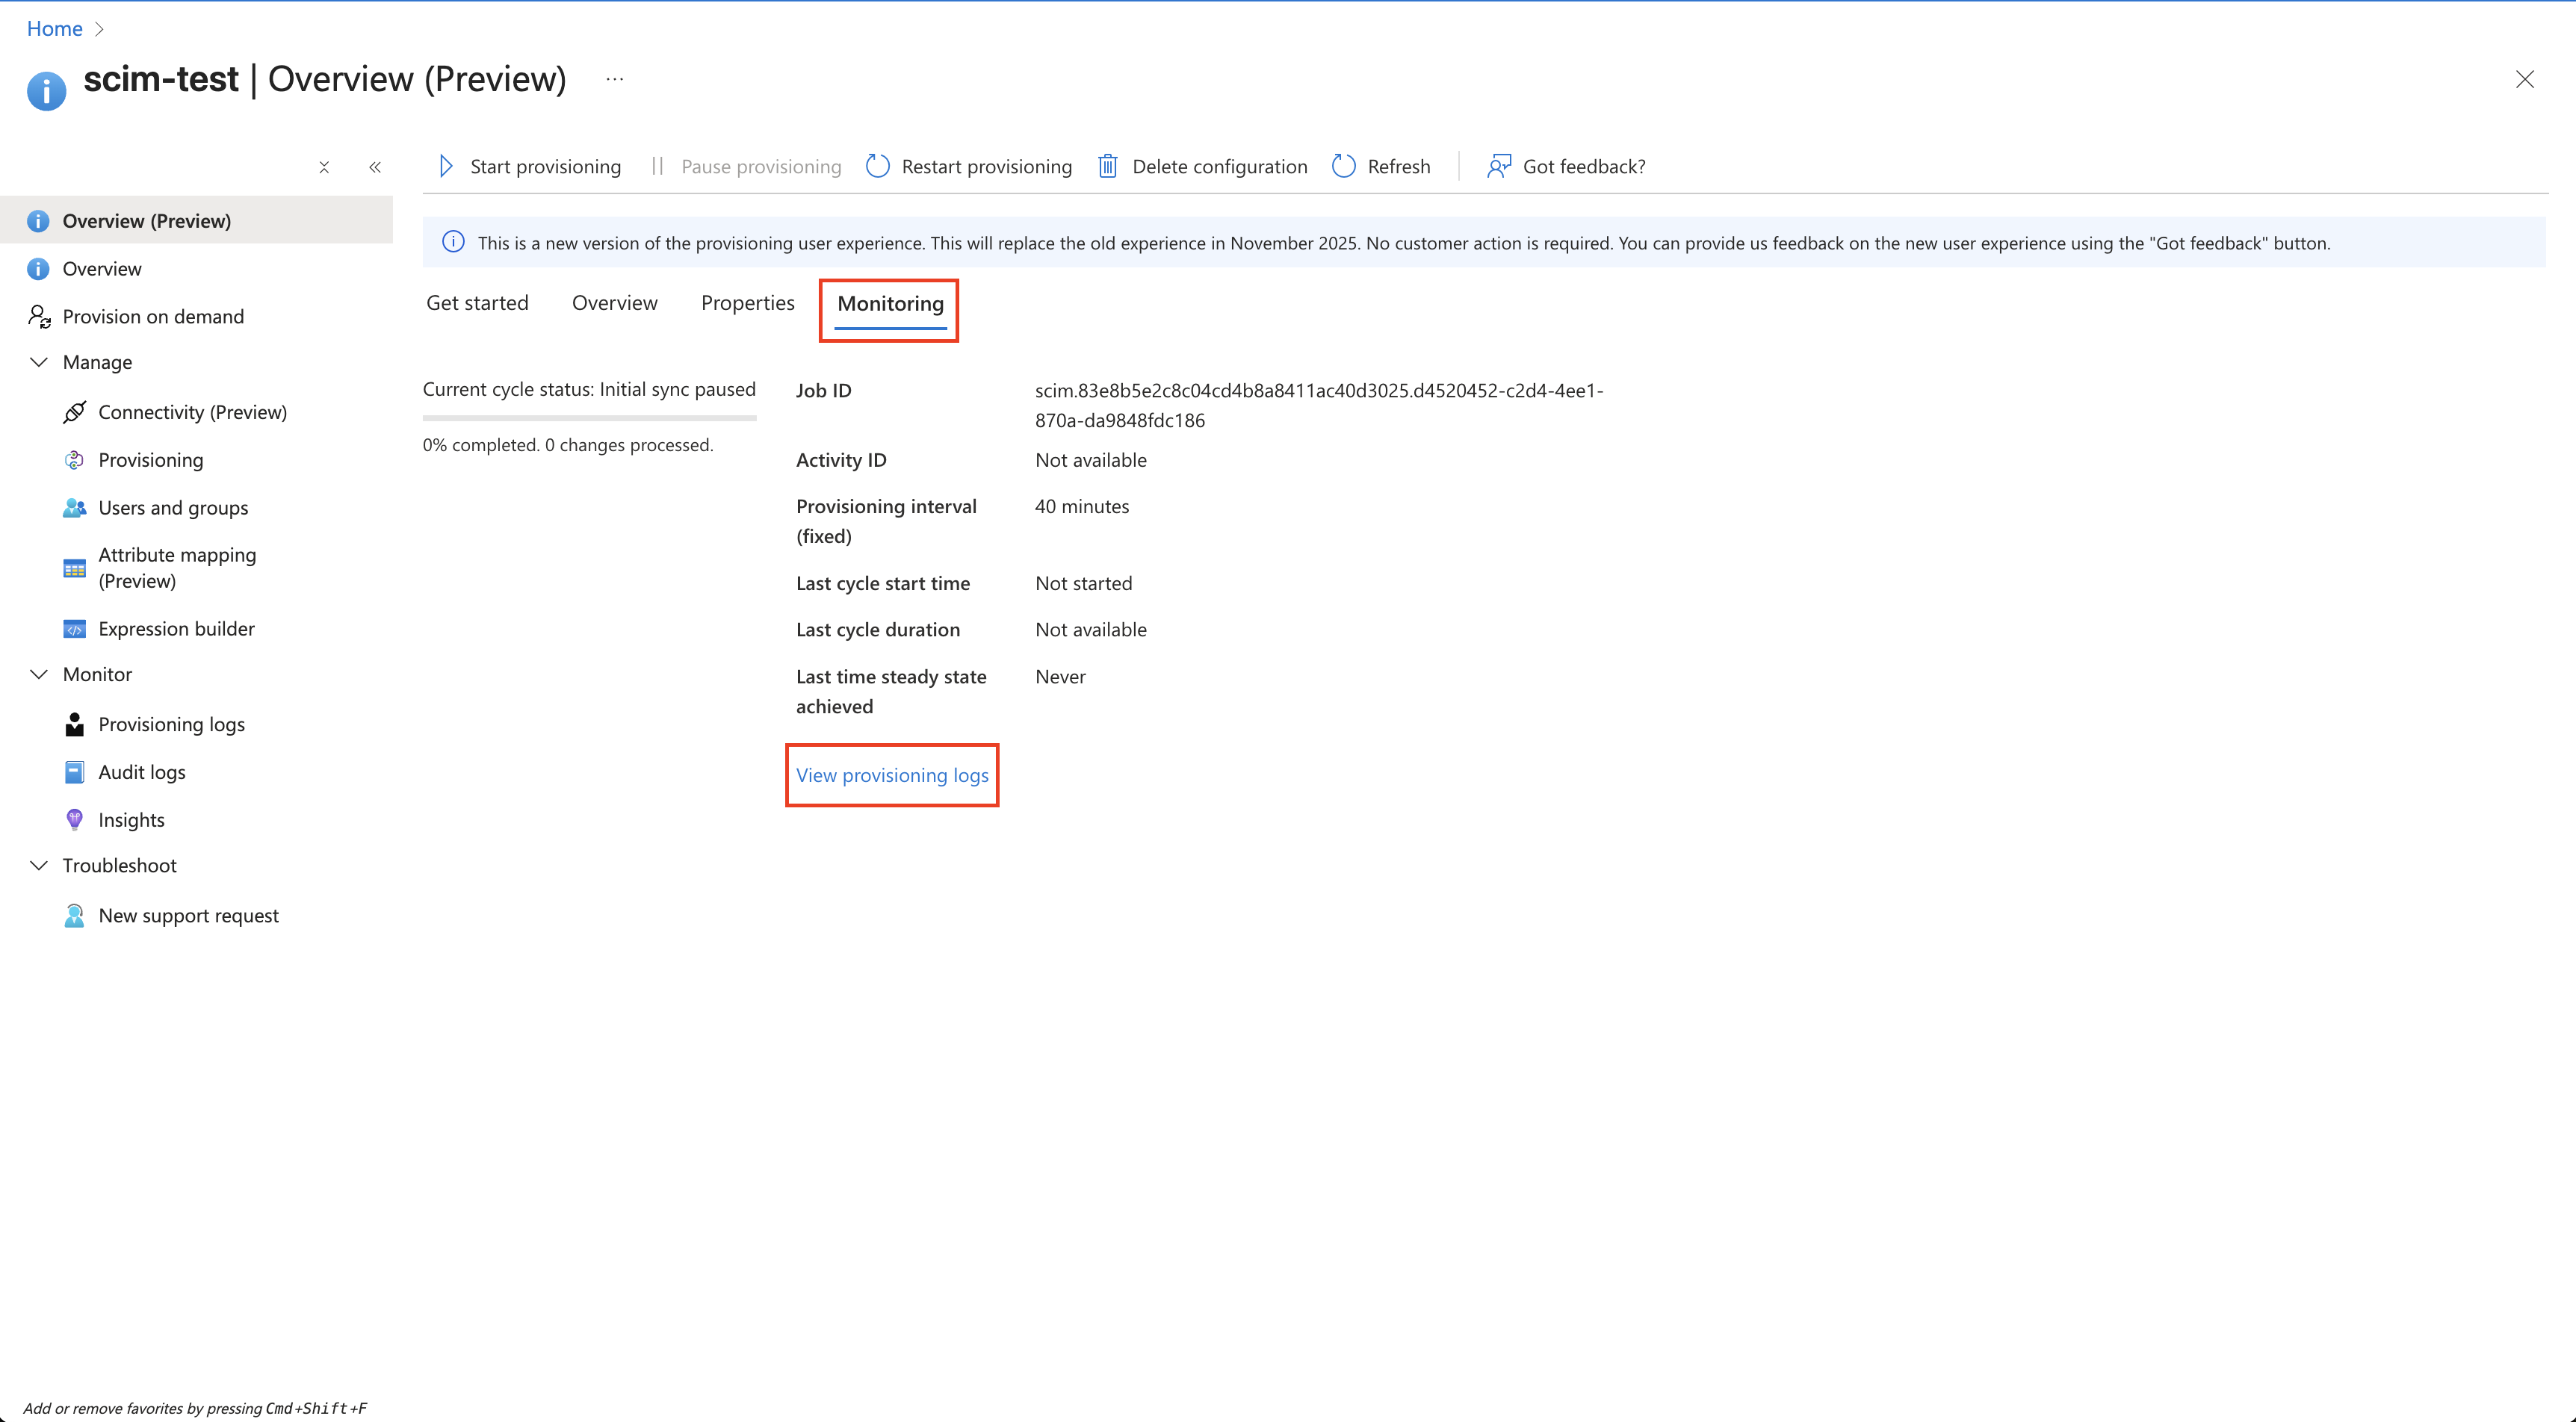
Viewing provisioning logs in Entra ID.
In Clew: on the /admin/provisioners page there is a notices panel that lists any failures, with error messages to help with debugging.
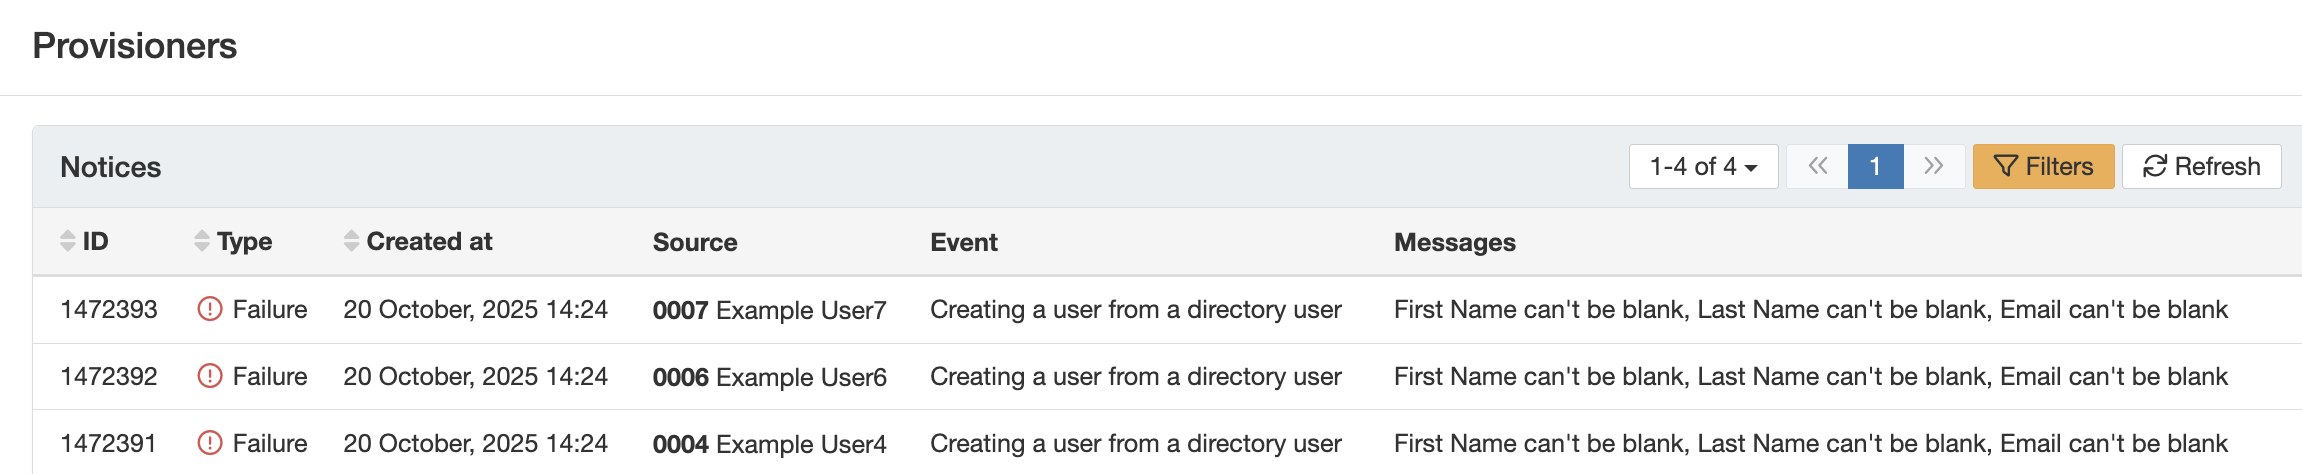
The notices panel on the Admin Provisioners page in Clew.
5. Common Issues & Troubleshooting
| Issue | Likely Cause | Solution |
| Test Connection fails in Entra ID | Incorrect Tenant URL or Secret Token, or an expired token. | Re-enter the exact Tenant URL and Secret Token supplied by Clew Support. If the connection still fails, contact Clew Support to confirm the token is still valid. |
| No users are being created in Clew | Sync users is set to Do not sync or Update only, or no users are in scope. | Set Sync users to Create and update, then assign the users under Manage then Users and groups. |
| Roles are not being assigned | The Bind roles field is not set to Find or create roles by position, or the positionId attribute is not mapped. | Set Bind roles to Find or create roles by position and confirm the positionId mapping exists in Entra ID. |
| A newly mapped attribute is not reaching Clew | Entra ID only sends changed attributes on the normal sync cycle. | Use Restart provisioning or Provision on demand in Entra ID to push the attribute immediately. |
| Users sync but SSO login fails | The identifier used for provisioning does not match the one used for SSO. | Confirm the user identifier strategy agreed with Clew Support is applied consistently across provisioning and SSO. |
| Some users fail to provision | Missing or invalid attribute values on those user records. | Check the notices panel on the /admin/provisioners page and the Entra ID provisioning logs for the specific error, then correct the source data. |
Best practices:
- Agree your user identifier strategy with Clew Support before provisioning any users, so provisioning and SSO line up from the start.
- Start with a small, scoped group of users to confirm your mappings are correct before rolling out to everyone.
- Set Notify on failure to Yes and add relevant contacts so failed users are flagged automatically.
- Keep the positionId attribute name exactly as specified, and check both sets of logs whenever something does not sync as expected.
Click a title to preview it here. Use the Open full article button to read the full version in a new tab.
▾Single Sign-On (SSO): Setup and Login Open full article »
Related article
How to set up and log in with Single Sign-On, which pairs with provisioning so the same user identifier works across both.
▾Adding New Users Open full article »
Related article
How to add users to Clew manually, useful for accounts that fall outside your provisioning scope.
▾Managing Roles and Permissions Open full article »
Related article
How roles and permissions work in Clew, which underpins the role mapping applied automatically via position ID.
Was this article helpful?
That’s Great!
Thank you for your feedback
Sorry! We couldn't be helpful
Thank you for your feedback
Feedback sent
We appreciate your effort and will try to fix the article